Mastering fife fingerings is the foundation of becoming a skilled fife player. Whether you're a beginner learning your first notes or an advanced player seeking to perfect your technique, understanding the complete range of fife fingerings will transform your playing. This comprehensive guide covers everything from basic hole combinations to advanced alternate fingerings and register techniques.
For interactive practice with detailed fingerings, use our Interactive Fife Fingering Chart alongside this guide.
Essential Foundations for Fife Playing
Master these four pillars early: embouchure formation, breath support, airtight hole coverage, and basic articulation.
1. Developing a Reliable Embouchure
Place the edge of the embouchure hole against the lower lip, aiming a narrow, centered airstream across (not into) the opening. Roll only as much as needed to stabilize tone.
Key Points:
- Lips relaxed but contained; aperture small and centered.
- Aim the air slightly downward; adjust angle to change registers.
- Start notes with a gentle tu/du; avoid explosive attacks.
Common Mistakes:
- Blowing into the hole (airy tone); instead, skim the far edge.
- Over‑rolling in; this dulls resonance and flattens pitch.
- Wide aperture; keeps tone unfocused and unstable.
2. Breath Support and Air Management
Use diaphragmatic breathing: the abdomen expands on inhalation, the ribs stay buoyant, shoulders quiet. Maintain steady air; change angle and speed, not brute force.
Breathing Drill:
- 4× cycles: inhale for 4, hold 2, exhale for 8 through a straw‑sized aperture.
- Silent siren: keep the fife off the lips and "whistle" a slow octave with the air only.
3. Hand Position and Airtight Coverage
Left hand covers holes 1–3; right hand covers 4–6. Use the pads (not tips) to seal. Keep fingers low over the holes for clean, quiet motion.
Coverage Checks:
- Hold a long D with all holes closed; slowly relax each finger to feel the leak threshold.
- Mirror practice: verify finger curvature and straight wrists.
4. Basic Articulation
- Legato: Air carries the line; tongue only to start phrases.
- Detached: Light tu with minimal tongue surface; keep tone identical to slurred notes.
- Slur–tongue patterns: Foundation for marches and quick figures.
Understanding the Fife
The fife is a compact, open‑hole woodwind known for its penetrating, brilliant tone and portability. Unlike a Boehm‑system flute, the traditional six‑hole fife relies on airtight finger coverage and precise air direction.
How Finger Holes Change Pitch
Covering more holes lengthens the acoustic tube and lowers pitch; uncovering shortens it and raises pitch. Because the system is open‑hole, even tiny leaks cause airy tone and intonation drift.
First Sounds and First Notes
- Find the core: Aim a narrow air ribbon across the edge until a centered tone appears.
- Low D setup: All holes covered; slow, supported air; roll angle minimal.
- Climb stepwise: Open holes 6→5→4 to ascend D–E–F–G–A with identical tone.
Daily Practice Routine for Beginners (25–35 minutes)
- 5 min – Long tones on D–G with a drone; stabilize aim and pitch.
- 8–10 min – Coverage drills + slow D/G major scales; fingers low and silent.
- 5 min – Register links (D4↔D5, E4↔E5); change air angle, not pressure.
- 7–10 min – Simple melodies; alternate slur and light tonguing.
Reading Music: Quick Primer
- Learn staff basics and note names within D4–A5 first.
- Count aloud; use a metronome for quarters and eighths in march time.
- Mark breath commas; avoid mid‑bar gasp breaks.
Fife Range and Registers
Most beginners start in low and middle registers, then add upper notes as embouchure focus improves.
| Register | Typical Notes | Tone Focus | Common Issues |
|---|---|---|---|
| Low | D4–C5 | Full seals, steady air | Air leaks, flat pitch |
| Middle | D5–C6 | Air‑angle control | Cracks, sharpness |
| High (later) | D6–C7 | Small aperture, focus | Stability, endurance |
Core Fingering Patterns (Beginner Table)
Use legato first, then add light tonguing. Keep fingers close to the holes.
| Pattern | Notes | Focus |
|---|---|---|
| Five‑note | D–E–F–G–A | Seals and finger height |
| Stepwise | A–G–F–E–D | Even air on descents |
| Octave link | D4 ↔ D5 (slow slurs) | Air‑angle timing |
Step‑by‑Step Learning Plan
Week 1
- Setup & tone: Posture, embouchure aim, consistent D4–G4 with a drone.
- Five‑note ladder: D–E–F–G–A legato at ♩=60; fingers low and seals airtight.
Week 2
- Articulation intro: Light tu/du at ♩=60–72; match slur and tongue tone.
- Octave control: D4↔D5, E4↔E5 using air‑angle changes; no over‑blowing.
Week 3
- Melodic shaping: Simple tunes with mp→mf contours; pitch centered on crescendi.
- Range growth: Add C5/B5 while maintaining relaxed hands and seals.
Week 4
- Alternates: Introduce tuning/response alternates in middle register when helpful.
- Performance mini: 45–60s piece combining articulation, dynamics, octave shifts.
Learning Methodology: Practice That Sticks
- Single‑focus blocks: Tone → seals → articulation → octave control; rotate every 3–5 minutes.
- Accurate then faster: Only increase tempo after two flawless reps.
- Drone + tuner: Use the drone for ear; spot‑check with tuner.
- Self‑record: 20–40s clips to diagnose air aim, finger noise, and pitch drift.
Setting Realistic Expectations
- Weeks 1–2: Stable D4–A4; clean starts; consistent five‑note ladder.
- Weeks 3–4: One‑octave D/G scales at ♩=60–72; simple melody with planned breaths.
- Weeks 5–8: Reliable octave links; tasteful dynamics without pitch wobble.
Ornamentation and Style
- Grace notes: Before the beat at soft dynamics; target note stays centered.
- Trills: 2–4 oscillations/beat; fingers close, air unchanged.
- March phrasing: Clear note fronts, tapered endings for blend.
Equipment and Care
- Choose a well‑finished fife with smooth hole rims and consistent spacing.
- After practice, swab moisture; keep the embouchure edge clean.
- Store in a protective case; avoid heat and humidity extremes.
Troubleshooting Common Beginner Problems
- Airy tone: Reduce aperture; adjust aim across the far edge; stabilize air.
- Leaky holes: Use pad surface; lower finger height; release hand tension.
- Cracked octave: Smooth air‑angle change; do not increase pressure.
- Sharp highs: Slightly lower air angle; keep support steady.
The Science Behind Fife Fingerings
Fife fingerings work on the principle of changing the instrument's effective tube length. Each hole combination opens or closes tone holes, effectively making the fife longer or shorter and changing the pitch. Understanding this fundamental concept helps you memorize fingerings more effectively.
Hole Functions Explained
- Left Hand Holes: Control upper register notes (B, A, G)
- Right Hand Holes: Control lower register notes (F, E, D)
- Thumb Hole: Controls register breaks and octave changes
- Pinky Holes: Provide additional low notes and trill options
When holes are combined, their effects work together to create the full chromatic scale. For example, covering the B hole alone produces a B note, while combining it with other holes creates different pitches.
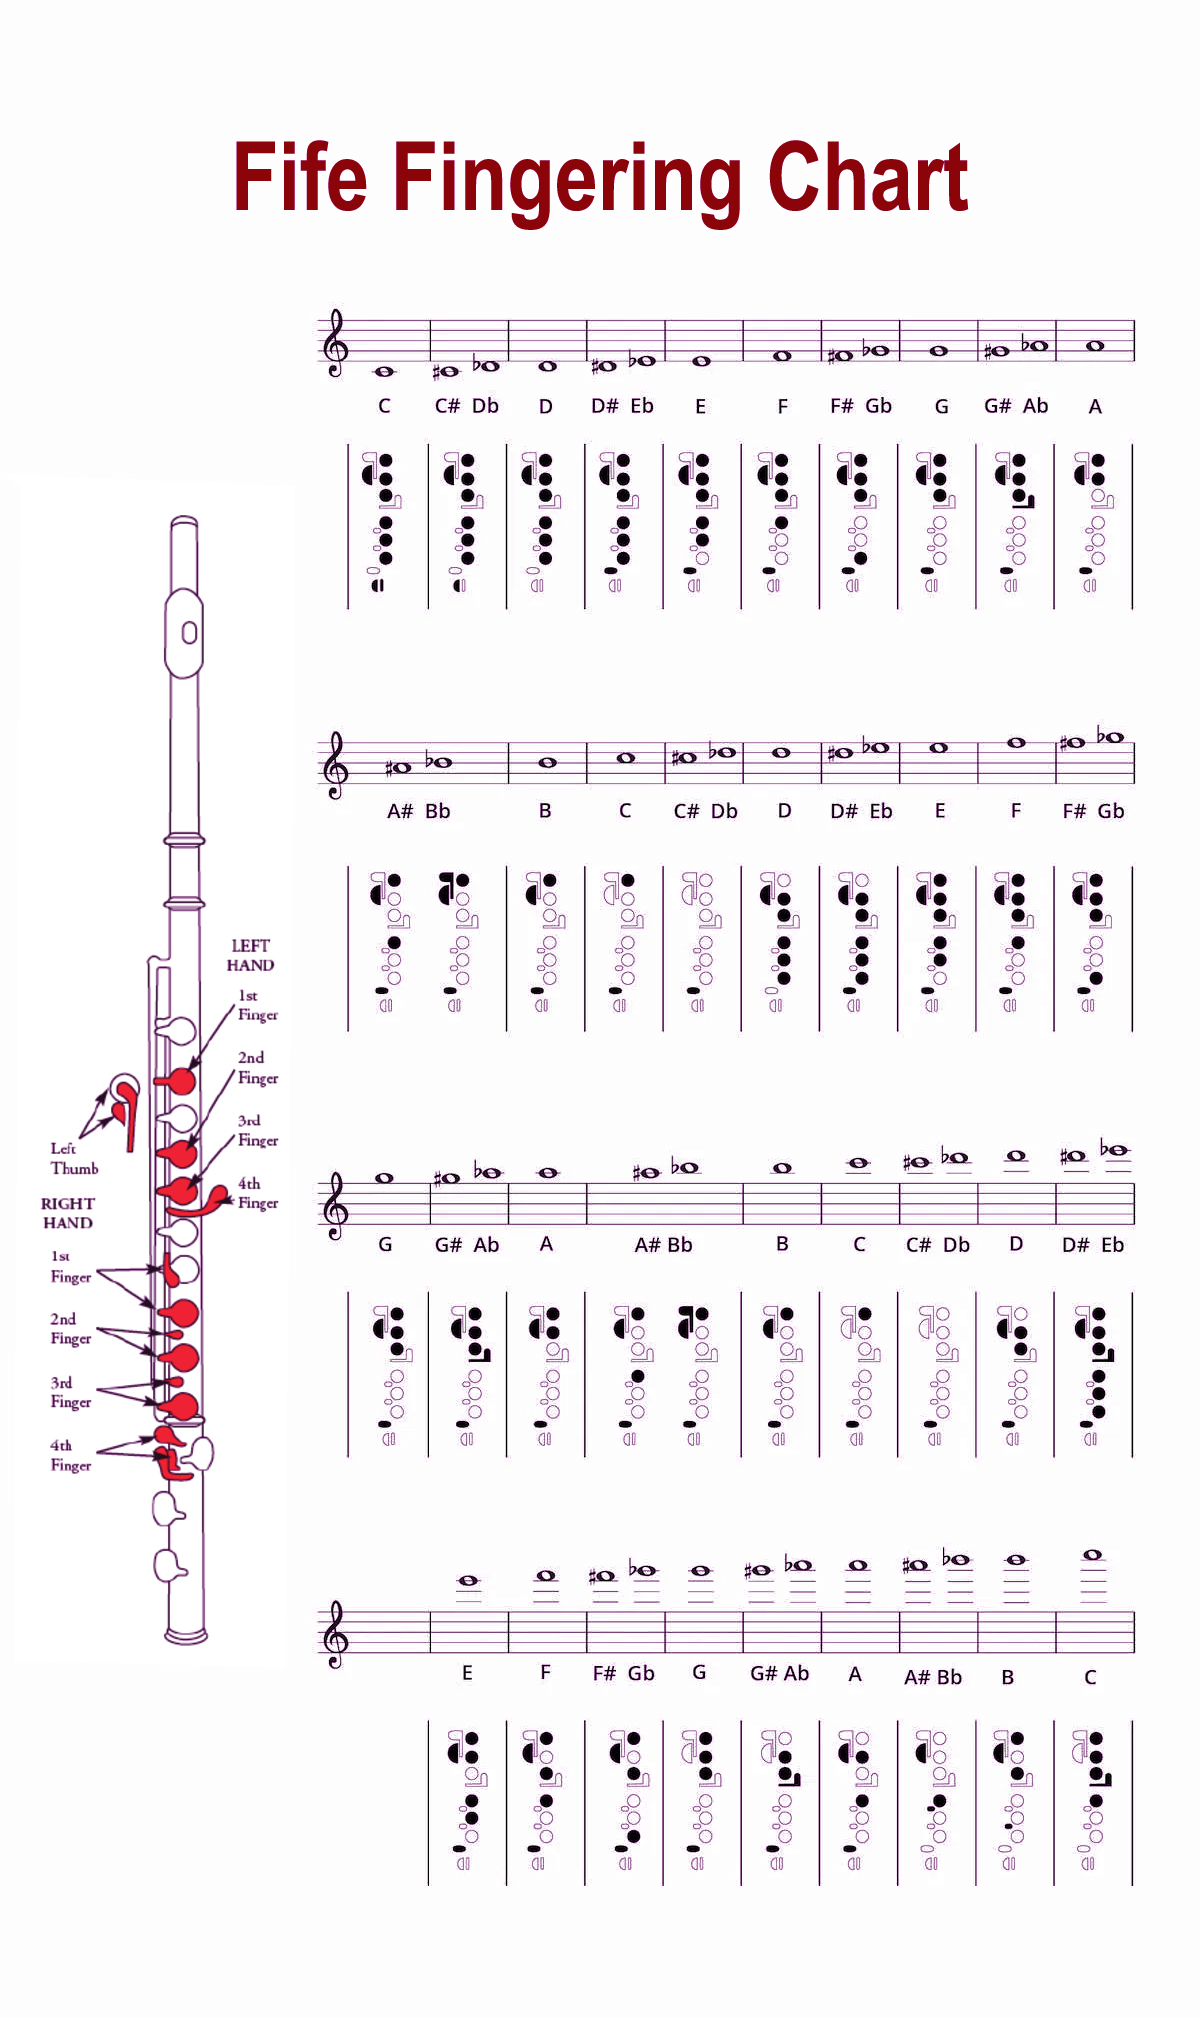
Complete Fingering Chart by Register
For an interactive experience with our detailed fingering charts, visit our Interactive Fife Fingering Chart page.
Low Register (D4 to C5)
The low register requires covering most holes and using the thumb hole for register control. These notes form the foundation of fife playing.
| Note | Fingering | Hole Combination | Description |
|---|---|---|---|
| D (D4) | All holes covered | All holes closed | Lowest note on fife |
| E (E4) | Bottom hole open | Right hand pinky hole | One whole step up from D |
| F (F4) | Bottom two holes open | Right hand pinky and ring finger | Major second from E |
| G (G4) | Bottom three holes open | Right hand bottom three | Perfect fourth from D |
| A (A4) | Bottom four holes open | Right hand all holes | Perfect fifth from D |
| B (B4) | Bottom five holes open | Right hand + left pinky | Major sixth from D |
| C (C5) | Bottom six holes open | Right hand + left pinky and ring | Major seventh from D |
Middle Register (D5 to C6)
The middle register uses the thumb hole to create the octave jump. This register is the most comfortable for beginners and forms the core of most fife music.
| Note | Fingering | Thumb Hole | Description |
|---|---|---|---|
| D (D5) | All holes covered | Half open | One octave above low D |
| E (E5) | Bottom hole open | Half open | One whole step up from D5 |
| F (F5) | Bottom two holes open | Half open | Major second from E5 |
| G (G5) | Bottom three holes open | Half open | Perfect fourth from D5 |
| A (A5) | Bottom four holes open | Half open | Perfect fifth from D5 |
| B (B5) | Bottom five holes open | Half open | Major sixth from D5 |
| C (C6) | Bottom six holes open | Half open | Major seventh from D5 |
High Register (D6 to C7)
The high register requires precise thumb hole control and often uses alternate fingerings for better intonation and response.
| Note | Primary Fingering | Thumb Hole | Description |
|---|---|---|---|
| D (D6) | All holes covered | Fully open | Two octaves above low D |
| E (E6) | Bottom hole open | Fully open | One whole step up from D6 |
| F (F6) | Bottom two holes open | Fully open | Major second from E6 |
| G (G6) | Bottom three holes open | Fully open | Perfect fourth from D6 |
| A (A6) | Bottom four holes open | Fully open | Perfect fifth from D6 |
| B (B6) | Bottom five holes open | Fully open | Major sixth from D6 |
| C (C7) | Bottom six holes open | Fully open | Three octaves above low D |
Advanced Fingering Techniques
Once you've mastered basic fingerings, these advanced techniques will enhance your playing:
Alternate Fingerings
Alternate fingerings can improve intonation, facilitate difficult passages, or create different tone colors:
- F# (F#5): Use left hand ring finger + right hand pinky for better intonation
- G# (G#5): Half-hole the G hole for smoother transitions
- High D (D6): Use thumb hole + left hand index finger for stability
- High E (E6): Alternate with thumb hole + right hand pinky for trills
Trill Fingerings
Special fingerings designed for smooth, fast trills between adjacent notes:
- D-E Trill: Use thumb hole + left hand index finger
- E-F Trill: Alternate between right hand pinky and ring finger
- F-G Trill: Use half-hole technique on the F hole
- G-A Trill: Alternate between right hand index and left hand pinky
Register Breaks
Understanding register breaks helps you navigate octave changes smoothly:
- Low to Middle: Open thumb hole halfway for clean octave jumps
- Middle to High: Open thumb hole fully and adjust air speed
- Breath Support: Increase air speed for higher registers
- Embouchure: Slightly tighten lips for high notes
Common Fingering Mistakes and Solutions
Even experienced players can develop bad habits. Here's how to identify and fix common issues:
Mistake: Incomplete Hole Coverage
Problem: Not fully covering holes, resulting in airy or out-of-tune notes
Solution: Practice covering holes completely with the pads of your fingers, not the tips
Mistake: Incorrect Thumb Hole Usage
Problem: Using thumb hole inconsistently or incorrectly for register changes
Solution: Practice thumb hole exercises and understand its role in register control
Mistake: Poor Finger Coordination
Problem: Fingers moving at different speeds or not coordinating properly
Solution: Practice slow, deliberate finger movements and gradually increase speed
Mistake: Neglecting Alternate Fingerings
Problem: Always using the same fingering, even when alternatives would be better
Solution: Learn and practice alternate fingerings for common notes and passages
Practice Strategies for Mastery
Effective practice is key to mastering fife fingerings. Here are proven strategies:
Daily Fingering Practice
- Scale Practice: Play major and minor scales in all keys
- Arpeggio Studies: Practice chord arpeggios for finger independence
- Interval Training: Practice large leaps and interval jumps
- Trill Exercises: Work on trills between all adjacent notes
Technical Exercises
- Hole Coverage Drills: Practice covering and uncovering holes slowly
- Register Break Practice: Work on smooth octave transitions
- Alternate Fingering Studies: Learn multiple fingerings for each note
- Speed Building: Gradually increase tempo while maintaining accuracy
Fife-Specific Considerations
The fife has unique characteristics that affect fingering technique:
Breath Control
Unlike other woodwinds, the fife requires precise breath control for intonation and tone quality. Practice breathing exercises and learn to control air speed for different registers.
Thumb Hole Technique
The thumb hole is crucial for register control. Practice opening it halfway for middle register and fully for high register notes.
Hole Size and Coverage
Fife holes vary in size, requiring different finger techniques. Larger holes need more finger coverage, while smaller holes require precise placement.
Equipment and Maintenance
Proper equipment and maintenance are essential for good fingering technique:
Fife Selection
- Quality Instruments: Invest in a good-quality fife for consistent response
- Proper Size: Choose the right size for your hand span and playing level
- Hole Alignment: Ensure holes are properly aligned and sized
- Thumb Hole Position: Check that the thumb hole is positioned correctly
Maintenance Tips
- Regular Cleaning: Clean your fife after each use
- Proper Storage: Store in a case to protect from damage
- Hole Care: Keep holes clean and free from debris
- Professional Service: Have your fife serviced regularly
Intonation Tendencies on the Fife
Because the fife is an open-hole transverse flute with a simple acoustical design, certain notes naturally sit sharp or flat depending on air speed, angle, and hole coverage. Training your ear and adjusting your technique will stabilize pitch across registers.
- Low Register: D4–F4 can run flat if the air stream is too relaxed. Use a slightly faster airstream and ensure complete hole coverage.
- Middle Register: A5–B5 often runs sharp with aggressive air. Reduce air angle slightly and relax embouchure corners.
- High Register: C6–C7 tends to rise with overblown air. Narrow the aperture, keep support steady, and avoid lifting fingers too high.
- Thumb Hole: Inconsistent half-holing causes unstable octaves. Practice slow octave slurs focusing on identical embouchure while the thumb does the work.
Articulation and Tone Production
Clear articulation on the fife relies on a focused airstream and light tongue contact. Avoid heavy tonguing that disturbs pitch or causes airy attacks.
Core Concepts
- Attack: Use a gentle tu/du syllable for most passages; ta for fanfares; ru for legato.
- Air Angle: Aim slightly downward over the embouchure hole; adjust angle rather than force to change registers.
- Dynamics: Crescendos come from increased support, not jaw pressure. Keep fingers relaxed to prevent squeezing tone sharp.
- Finger Height: Keep fingers close to the holes to reduce noise and improve clarity during fast passages.
Daily Tone Builder (5 minutes)
- Long tones from D4 upward (8–10 seconds each) with tuner and drone.
- Octave slurs using thumb half-hole from D4↔D5, E4↔E5, F4↔F5.
- Articulation ladder: 4 notes slurred, then tongued (tu/du) at pp–ff.
Progressive Practice Plan
Structure your practice to balance tone, finger facility, and musical application. Adjust timings to your level.
Suggested 30–45 minute routine
- 5 min – Long tones with drone (intonation and resonance)
- 5–10 min – Finger drills: scales, thirds, and chromatic links
- 5 min – Register transitions with thumb half-hole
- 5–10 min – Articulation patterns (single, double, slur–tongue)
- 10–15 min – Repertoire or etudes applying current focus
Troubleshooting and Quick Fixes
- Airy Sound: Embouchure hole too open or low air speed. Narrow the aperture and increase support.
- Notes Crack Between Octaves: Thumb motion too abrupt. Practice slow octave slurs; keep embouchure constant.
- Inconsistent High Notes: Fingers lifting too high. Keep finger height minimal and maintain steady air angle.
- Flat Low Notes: Seal holes fully; rotate fingers so pads (not tips) cover holes.
- Noisy Fingering: Practice silent finger drops close to the holes; reduce tension in the hand.
Repertoire and Learning Path
Beginner
- Five-note patterns in D major and G major (quarter notes at ♩=72)
- Simple marches with stepwise motion focusing on steady tone
Intermediate
- Major/minor scales to two octaves with thumb half-hole control
- Etudes emphasizing articulation variety and register changes
Advanced
- Fast ornamental figures (grace notes, turns) at moderated dynamics
- Transcriptions requiring rapid alternations and alternate fingerings
Performance Tips and Ensemble Playing
- Balance: The fife cuts through; shape phrases to avoid overpowering ensemble.
- Tuning: Tune to a reference drone; recheck after dynamic changes.
- Blend: Match articulation lengths and note starts with fellow players.
- Stamina: Schedule breaths musically; avoid force in the upper register.
Conclusion
Mastering fife fingerings is a journey that requires patience, consistent practice, and a systematic approach. Whether you're a complete beginner learning your first notes or an advanced player seeking to perfect your technique, this comprehensive guide provides everything you need to develop the finger dexterity and muscle memory needed for fife playing.
By understanding the science behind fingerings, practicing systematically, and avoiding common mistakes, you'll develop the skills needed for expressive, musical playing. Remember that good fingering technique is not just about covering holes correctly—it's about understanding how fingerings work together to create music. Combine your fingering practice with work on embouchure, breath control, articulation, and musical expression to become a well-rounded fife player.
Start with the fundamentals, build your skills progressively, and celebrate small victories along the way. With dedication and the right approach, you'll be playing beautiful music on the fife in no time. The fife's brilliant, penetrating sound and portable nature make it a perfect instrument for musicians of all levels, and your dedication to learning will be rewarded with years of musical enjoyment.