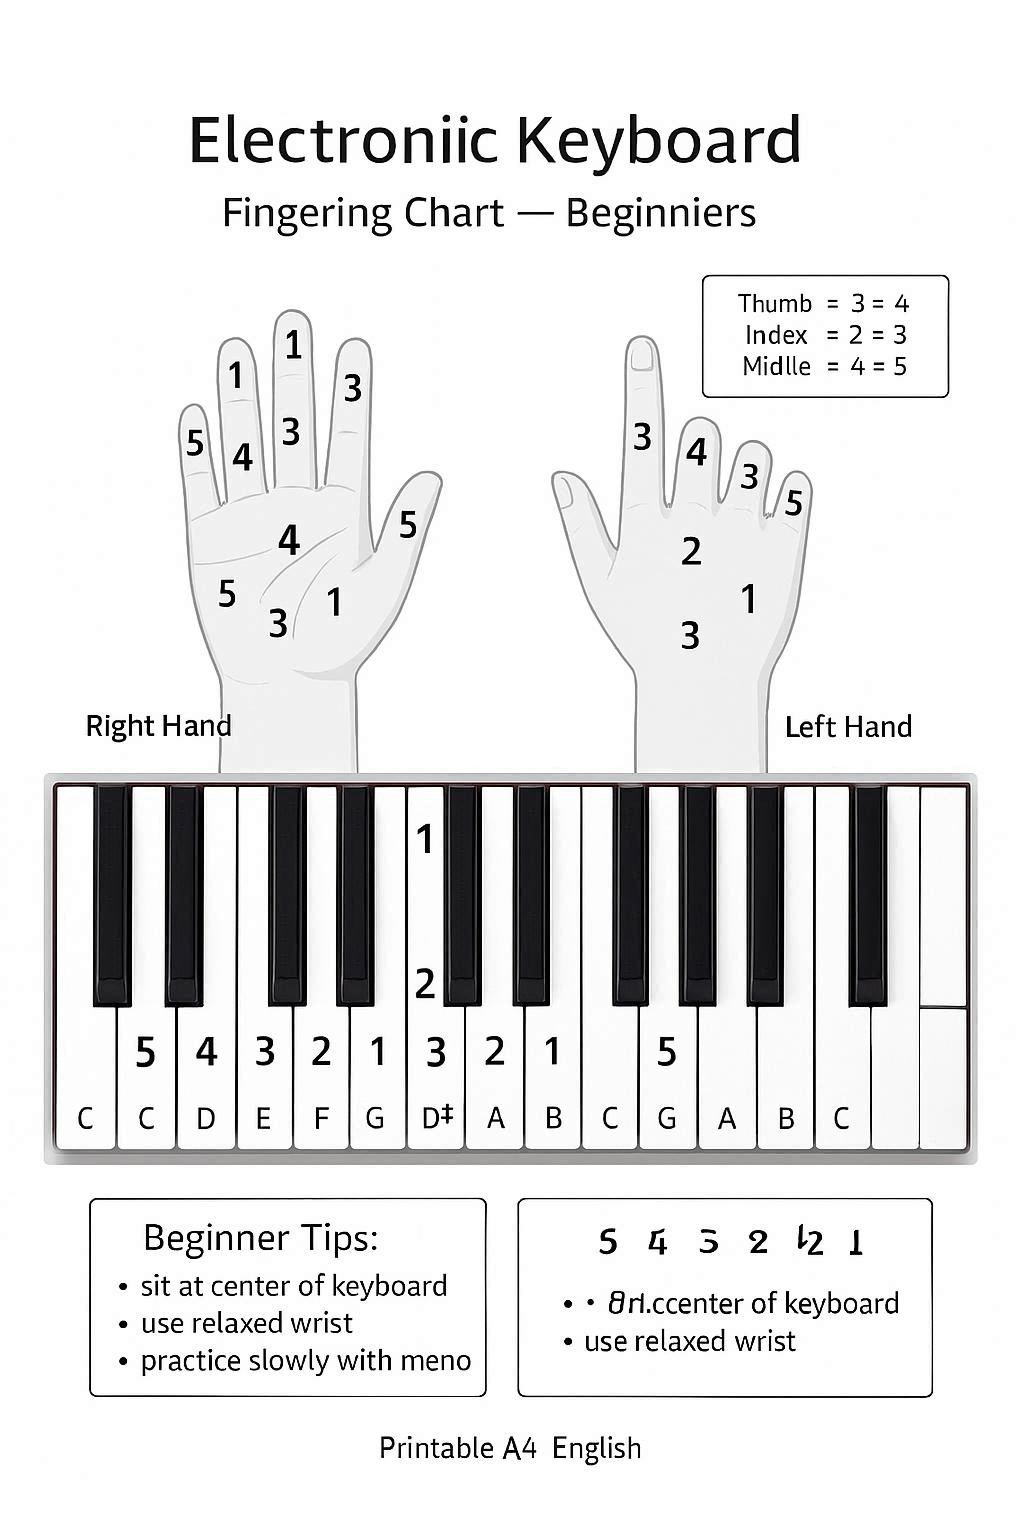
Keyboarding Fingering Chart
Interactive keyboard guide • hand position • finger numbering • electronic features • PDF download
Interactive Electronic Keyboarding Fingering Chart
⌨️ How to Use This Interactive Keyboard
Step 1: Select a Note
Click any note button to see its position on the keyboard and recommended fingering (1-5, thumb=1).
Step 2: View Keyboard
The keyboard diagram highlights the selected key. White and black keys are clearly labeled.
Step 3: Learn Fingering
See recommended finger numbers (1=thumb, 2=index, 3=middle, 4=ring, 5=pinky) for both hands.
Select a Note (C4-C6, Two Octaves)
Note: Electronic keyboards typically have 61 keys (5 octaves), 76 keys (6.5 octaves), or 88 keys (full piano range). This interactive display shows 2 octaves (14 white keys + 10 black keys).
Keyboarding Fingering Chart Image (PRINTABLE)
High-quality color PDF perfect for printing and carrying with you. Go to Download Page or open PDF directly: Open PDF
Understanding Electronic Keyboard Fingerings
Electronic Keyboard Anatomy and Parts
Before learning fingerings, familiarize yourself with the electronic keyboard's components and how they work together to produce sound.
Key Components:
- Keyboard: 61, 76, or 88 keys arranged in white and black (typically 61 keys for beginners, 88 for advanced)
- Display Screen: Shows settings, sounds, rhythms, and song information
- Control Panel: Buttons and sliders for selecting sounds, rhythms, and features
- Speakers: Built-in amplification for practice and performance
- USB/Audio Output: Connection for recording, headphones, or external amplification
- Pedal Jack: Optional sustain pedal connection for expression
- Auto-Accompaniment: Built-in rhythm patterns and chord accompaniments (on many models)
Key Types:
- Non-Weighted Keys: Light touch, common on beginner keyboards (61-76 keys)
- Semi-Weighted Keys: Moderate resistance, found on intermediate models
- Weighted Keys: Piano-like feel, available on advanced electronic keyboards (typically 88 keys)
- Touch-Sensitive Keys: Respond to playing velocity (harder = louder)
How Electronic Keyboards Work
Electronic keyboards generate sound through digital synthesis or sampled recordings. When you press a key, sensors detect the velocity and trigger the selected sound (piano, organ, strings, etc.). The keyboard can layer multiple sounds, add effects, and provide rhythm accompaniments. Unlike acoustic pianos, electronic keyboards require power (batteries or AC adapter) and can be easily transported.
Understanding Musical Notes
Musical notes are organized in a specific pattern. Understanding this pattern is crucial for reading music and learning fingerings.
Want a deeper primer? Read our Music Notes Guide for beginners.
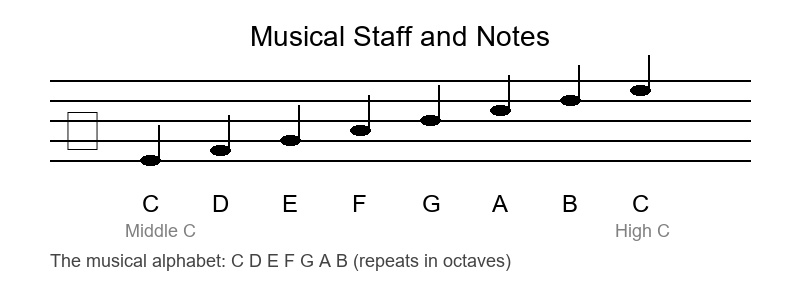
The Musical Alphabet:
Musical notes use the letters A, B, C, D, E, F, G, then repeat. In keyboard music, middle C is written as C4.
- Natural Notes: C, D, E, F, G, A, B
- Sharp (♯): Raises a note by one half step (e.g., C♯ is the black key above C)
- Flat (♭): Lowers a note by one half step (e.g., B♭ is the black key below B)
Note: The keyboard layout repeats the same pattern of 7 white keys and 5 black keys in each octave. Electronic keyboards typically start at C2 or C3 and extend to C6 or C7 depending on the number of keys.
Half Steps and Whole Steps
Understanding the distance between notes is essential for learning scales and fingering patterns.
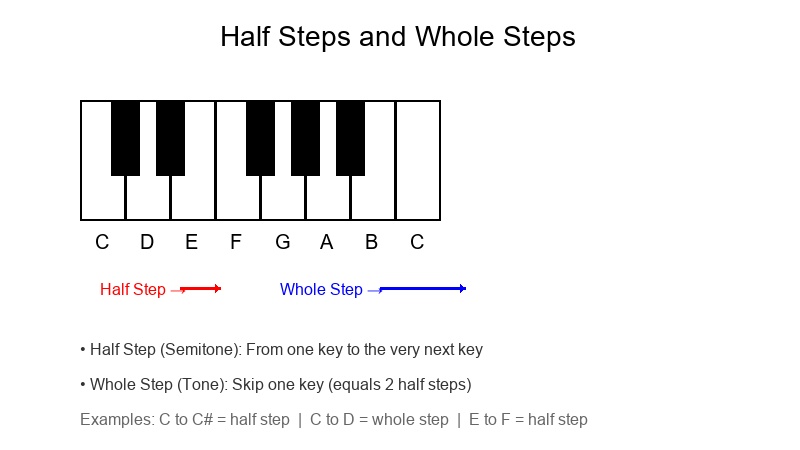
Half Step (Semitone):
The smallest distance between two notes. On a keyboard, it's from one key to the very next key (including black keys).
Examples:
- C to C♯ (or D♭) - adjacent keys
- E to F - natural half step (no black key between)
- B to C - natural half step (no black key between)
- F♯ to G - from black key to white key
Whole Step (Tone):
Equal to two half steps. Skip one key on the keyboard.
Examples:
- C to D (2 half steps, white to white)
- F to G (2 half steps, white to white)
- A to B (2 half steps, white to white)
- C♯ to D♯ (2 half steps, black to black)
Electronic Keyboard Octaves and Pitch Ranges
An octave is the interval between one note and another with the same letter name but different pitch. Electronic keyboards vary in range based on the number of keys.

Keyboard Range by Number of Keys:
- 61 Keys (5 octaves): C2 to C7 - Common beginner keyboards, portable and affordable
- 76 Keys (6.5 octaves): E1 to G7 - Extended range for intermediate players
- 88 Keys (7.25 octaves): A0 to C8 - Full piano range, professional models
Registers:
- Low Register: Bass notes, left hand territory for chords and bass lines
- Middle Register: C3 to C5 (middle C area), most comfortable for beginners
- High Register: C5 and above, treble notes, right hand territory, bright and brilliant
Octave Example: C4 (middle C) to C5 is one octave. Same note name, different pitch level. The pattern of white and black keys repeats every octave.
Common Electronic Keyboard Fingering Patterns Chart
Here are the most frequently used keyboard fingering patterns. Mastering these will build a solid foundation for scales, chords, and pieces.
| Pattern | Fingering | Hand Position | Description |
|---|---|---|---|
| C Major Scale RH | 1-2-3-1-2-3-4-5 | C-D-E-F-G-A-B-C | Thumb crosses under at F |
| C Major Scale LH | 5-4-3-2-1-3-2-1 | C-D-E-F-G-A-B-C | Finger crosses over thumb at G |
| Thumb Under Technique | 1 crosses under | Scales ascending | Smooth scale playing, used in RH |
| Finger Over Technique | 3/4 crosses over | Scales ascending | Smooth scale playing, used in LH |
| C Major Chord RH | 1-3-5 | C-E-G | Basic triad fingering |
| C Major Chord LH | 5-3-1 | C-E-G | Mirror of RH pattern |
| G Major Scale RH | 1-2-3-1-2-3-4-5 | G-A-B-C-D-E-F♯-G | Thumb crosses under at C |
| F Major Scale RH | 1-2-3-4-1-2-3-4 | F-G-A-B♭-C-D-E-F | Thumb crosses under at B♭ |
Tip: The thumb-under (RH) and finger-over (LH) techniques are essential for smooth scale playing. Practice these transitions slowly at first, then gradually increase speed.
Electronic Keyboard Features and Functions
Modern electronic keyboards offer a wide range of features that enhance learning and performance:
Sound Features:
- Multiple Voices: Piano, organ, strings, brass, synthesizer, and more
- Layering: Combine two sounds simultaneously (e.g., piano + strings)
- Splitting: Different sounds for left and right hands
- Effects: Reverb, chorus, delay, and other sound modifications
Rhythm and Accompaniment:
- Auto-Accompaniment: Built-in rhythm patterns (pop, rock, jazz, waltz, etc.)
- Chord Recognition: Automatic chord accompaniment based on left-hand chords
- Style Variation: Different variations of the same rhythm
- Tempo Control: Adjust speed of rhythm patterns
Learning Features:
- Built-in Songs: Demo songs and practice pieces
- Lessons: Step-by-step tutorials and exercises
- Recording: Record and playback your performance
- Metronome: Built-in timing tool for practice
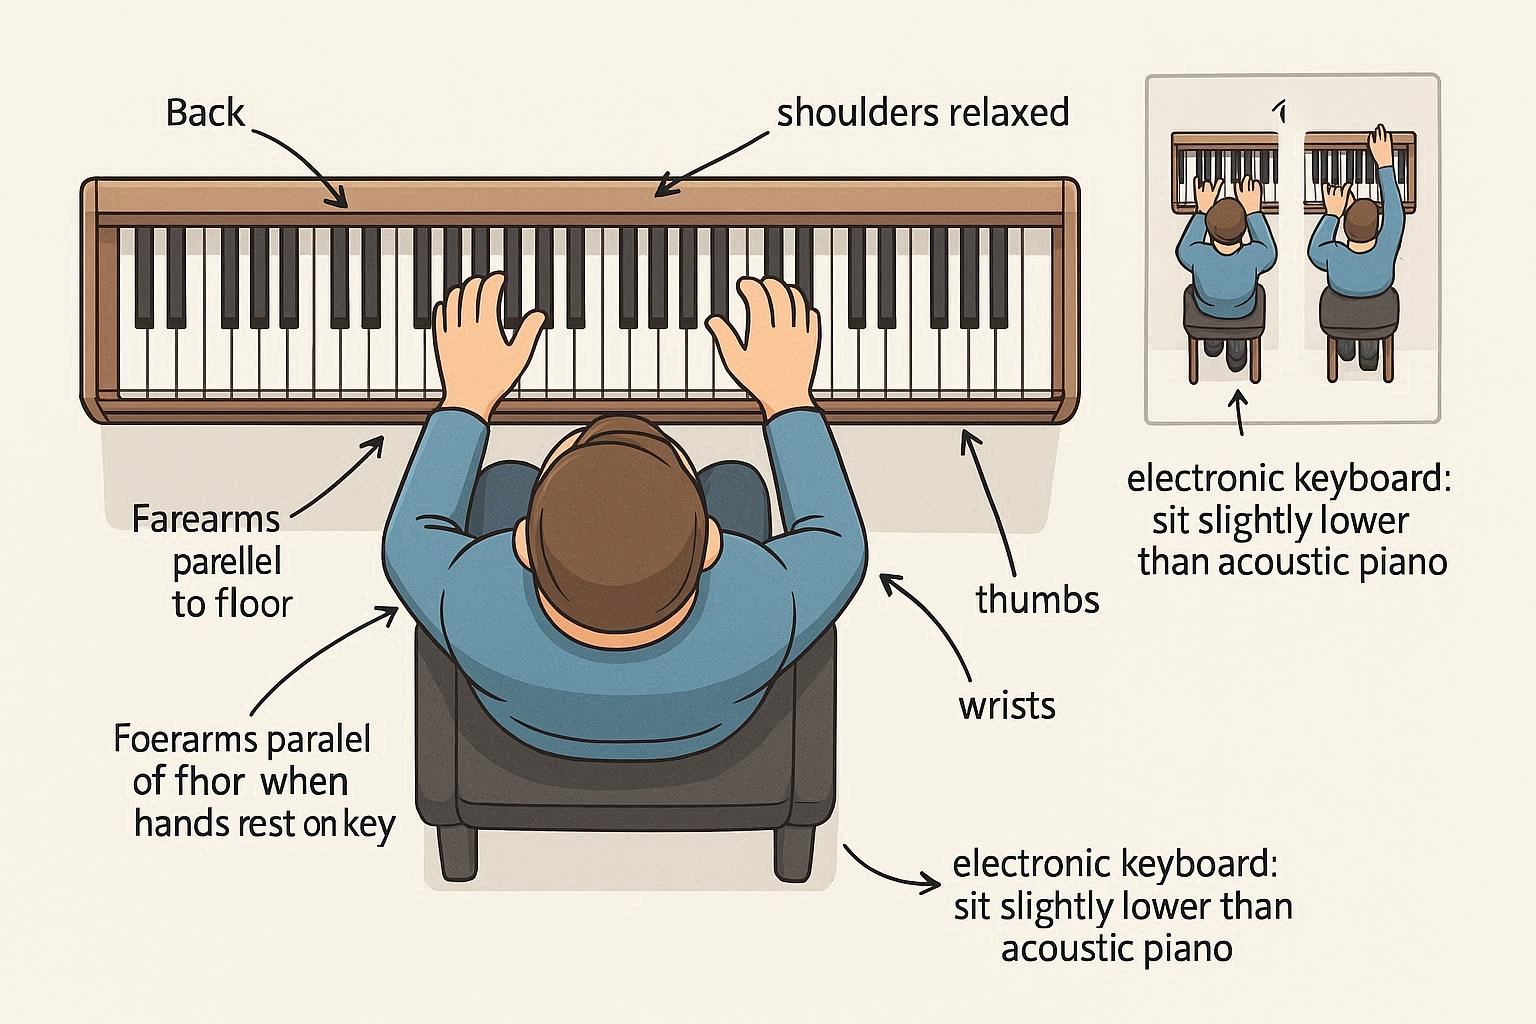
How to Position Your Hands Correctly
Sit at the correct height: forearms parallel to the floor when hands are on keys. Keep back straight, shoulders relaxed. Curve fingers naturally as if holding a ball. Thumb (finger 1) should be curved, not flat. Keep wrists level or slightly above keyboard. For electronic keyboards, you may sit slightly lower than for acoustic pianos.
How to Learn to Play the Electronic Keyboard
- Start with basics: Learn proper posture, hand position, and sound production
- Explore the keyboard: Familiarize yourself with different sounds, rhythms, and features
- Practice scales: Build finger dexterity and note recognition
- Use this chart: Reference fingerings until they become automatic
- Play simple melodies: Apply fingerings in musical context
- Try auto-accompaniment: Use rhythm patterns to enhance your playing
- Experiment with sounds: Explore different voices and layering options
- Listen actively: Study professional recordings and keyboard performances
- Be patient: Consistent daily practice yields best results
- Find a teacher: Professional guidance accelerates progress
Best Beginner Electronic Keyboard Brands and Models
High-value beginner options: Yamaha PSR-E373 (61 keys), Casio CT-X700 (61 keys), Korg EK-50 (61 keys), Roland GO:KEYS (61 keys), Yamaha PSR-EW310 (76 keys). Before purchasing, check build quality, key action (weighted vs. non-weighted), touch sensitivity, number of voices and rhythms, connectivity options (USB, headphones), and warranty. We recommend trying instruments in person with guidance from a teacher or professional.
Practice Tips and Common Mistakes
- Incorrect hand position: Sit at correct height (forearms parallel to floor), curve fingers naturally, keep wrists level. Avoid flat fingers or collapsing knuckles.
- Ignoring electronic features: Explore different sounds and rhythms to keep practice engaging and musical.
- Rushing through exercises: Practice slowly with accuracy before increasing speed. Use the built-in metronome.
- Not using both hands: Practice left-hand chords and right-hand melodies together from the beginning.
- Lack of practice structure: Set weekly goals (scales, pieces, exercises), practice hands separately before combining, use metronome for steady rhythm.
- Overlooking reading music: Learn to read notation while learning fingerings for long-term success.