Saxophone Fingering Chart
Comprehensive fingering guide + technique tips + beginner learning resources + free PDF download
Interactive Saxophone Fingering Chart
🎵 How to Use This Interactive Chart
Step 1: Choose Key Signature
Select your desired key signature from the dropdown menu. This will show you which notes are sharp or flat in that key.
Step 2: Click on a Note
Click any note button below to see the correct fingering. The saxophone diagram will highlight the keys you need to press.
Step 3: Learn the Fingering
Study the highlighted keys on the saxophone and read the fingering description. Practice until it becomes automatic!
Select a Note
Saxophone Fingering Chart Image (PRINTABLE)
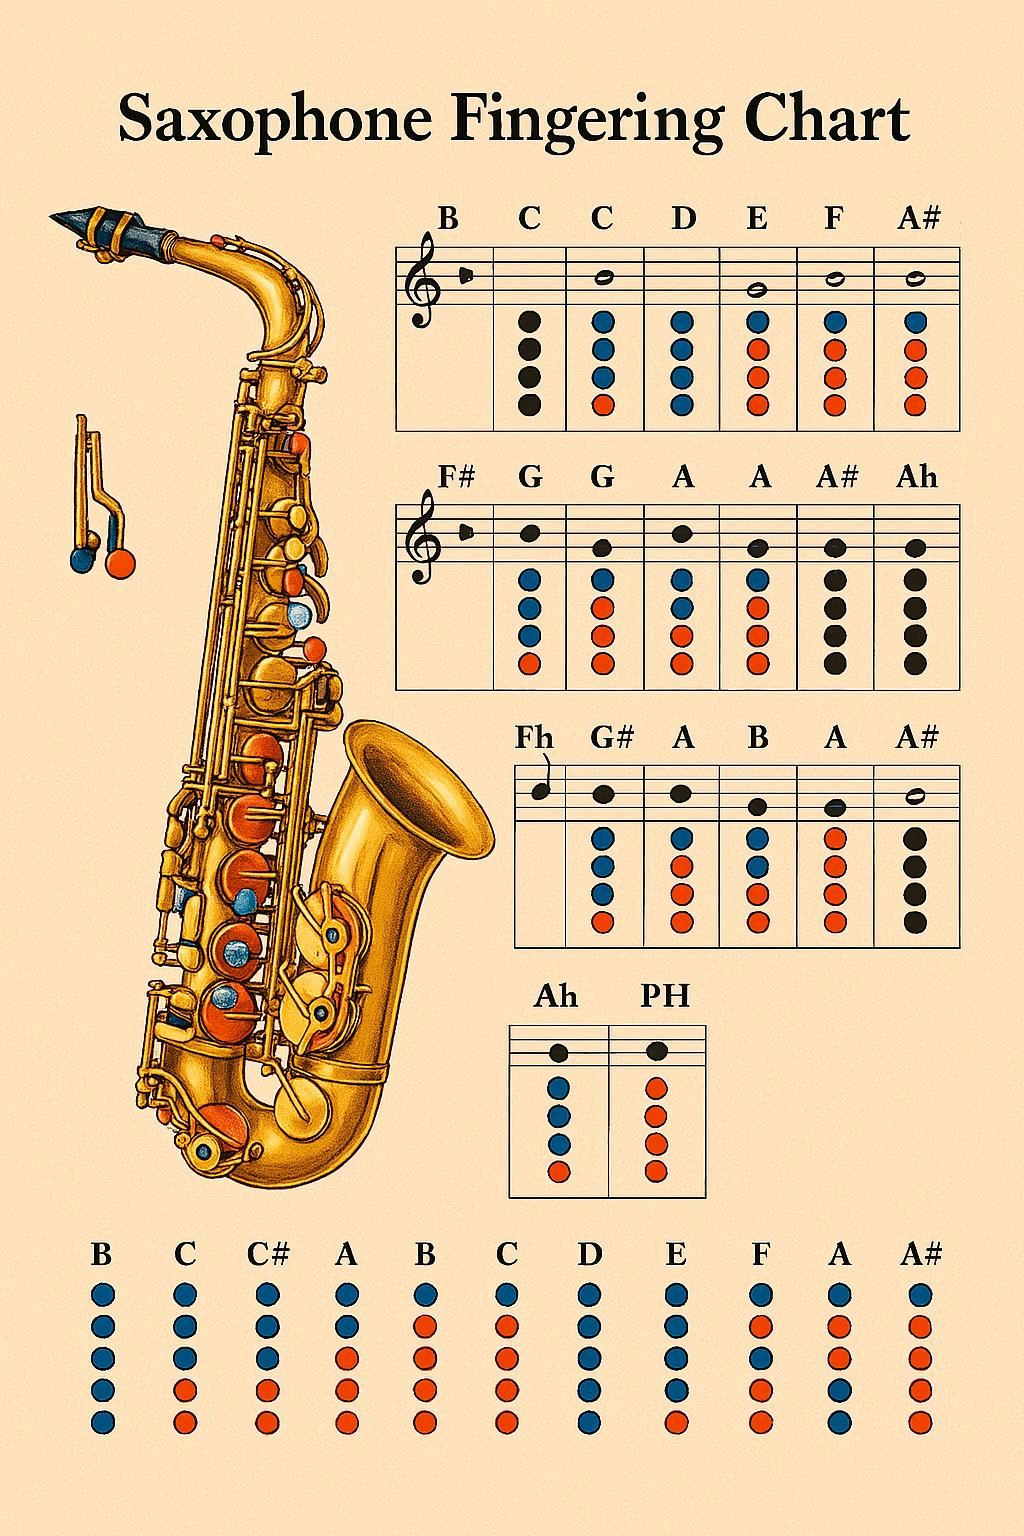
High-quality fingering chart perfect for practice and reference. Download PDF
📚 Complete Saxophone Fingering Guide
For a comprehensive deep-dive into saxophone fingerings, register breaks, palm/side keys, and advanced alternates, check out our detailed guide:
BEGINNER SAXOPHONE FINGERING CHART
(Alto/Tenor Saxophone | Standard System)
1. Basic Fingering Combinations
| Note | Left Hand | Right Hand | Description |
|---|---|---|---|
| Bb3 | TH, L1, L2, L3, L4 | R1, R2, R3, R4 | All fingers down including both pinkies |
| B3 | TH, L1, L2, L3, L4 | R1, R2, R3 | All left, first 3 right |
| C4 | TH, L1, L2, L3 | R1, R2, R3 | Left thumb + first 3 fingers, right first 3 |
| D4 | TH, L1, L2, L3 | R1, R2 | Left thumb + first 3 fingers, right first 2 |
| E4 | TH, L1, L2, L3 | R1 | Left thumb + first 3 fingers, right first |
| F4 | TH, L1, L2, L3 | - | Left thumb + first 3 fingers |
| G4 | TH, L1, L2 | - | Left thumb + first 2 fingers |
| A4 | TH, L1 | - | Left thumb + first finger |
| B4 | TH | - | Left thumb only |
| C5 | TH | P1 | Left thumb + palm key 1 |
Tip: Use palm keys (P1, P2, P3) for notes above B4. The octave key is used automatically for higher notes.
2. Essential Beginner Scales
Practice these scales to develop finger dexterity and smooth transitions.
C Major Scale
C4 (TH, L1, L2, L3, R1, R2, R3) - D4 (TH, L1, L2, L3, R1, R2) - E4 (TH, L1, L2, L3, R1) - F4 (TH, L1, L2, L3) - G4 (TH, L1, L2) - A4 (TH, L1) - B4 (TH) - C5 (TH, P1)
G Major Scale
G4 (TH, L1, L2) - A4 (TH, L1) - B4 (TH) - C5 (TH, P1) - D5 (TH, P2) - E5 (TH, P3) - F#5 (TH, P1, P2, P3) - G5 (TH, P1, P2, P3)
F Major Scale
F4 (TH, L1, L2, L3) - G4 (TH, L1, L2) - A4 (TH, L1) - Bb4 (TH, L1, L2, L3, R1, R2, R3) - C5 (TH, P1) - D5 (TH, P2) - E5 (TH, P3) - F5 (TH, P1, P3)
3. Simple Practice Melodies
(Great for applying new fingerings!)
"Hot Cross Buns":
B4 (TH) - A4 (TH, L1) - G4 (TH, L1, L2)
B4 (TH) - A4 (TH, L1) - G4 (TH, L1, L2)
G4 (TH, L1, L2) - G4 (TH, L1, L2) - G4 (TH, L1, L2) - G4 (TH, L1, L2)
A4 (TH, L1) - A4 (TH, L1) - A4 (TH, L1) - A4 (TH, L1)
B4 (TH) - A4 (TH, L1) - G4 (TH, L1, L2)
"Mary Had a Little Lamb":
E4 (TH, L1, L2, L3, R1) - D4 (TH, L1, L2, L3, R1, R2) - C4 (TH, L1, L2, L3, R1, R2, R3) - D4 (TH, L1, L2, L3, R1, R2) - E4 (TH, L1, L2, L3, R1) - E4 (TH, L1, L2, L3, R1) - E4 (TH, L1, L2, L3, R1)
D4 (TH, L1, L2, L3, R1, R2) - D4 (TH, L1, L2, L3, R1, R2) - D4 (TH, L1, L2, L3, R1, R2)
E4 (TH, L1, L2, L3, R1) - G4 (TH, L1, L2) - G4 (TH, L1, L2)
4. Saxophone Fingering Tips for Beginners
- Use a neck strap to support the saxophone's weight - adjust it so the mouthpiece comes naturally to your lips.
- Form a proper embouchure: place the reed on your lower lip, top teeth on the mouthpiece, and create a seal with your lips.
- Keep fingers curved and close to the keys for quick, efficient movement.
- Ensure all tone holes are completely covered to avoid airy or squeaky sounds.
- Use the octave key (thumb key) for notes above B4 - it's essential for proper pitch.
- Practice long tones to develop a consistent, clear sound and breath control.
- Breathe deeply from your diaphragm for good breath support - saxophone requires substantial air.
- Start slowly with a metronome and gradually increase tempo.
- Listen carefully to your tone and intonation - use a tuner regularly.
- Keep reeds properly moistened and maintained for best sound quality.
- Clean your saxophone regularly, especially after each practice session - swab out moisture.
- Master the transition between registers - the break between notes can be challenging.
- Use palm keys (P1, P2, P3) for high notes - practice them separately to build confidence.
- Maintain proper posture - sit or stand up straight with the saxophone at a comfortable angle.
- Don't take in too much mouthpiece - only about half should be in your mouth.
- Practice overtones to improve tone quality and control.
Common Saxophone Fingering Patterns
Here are fundamental fingering patterns to get you started. Mastering these will build a solid foundation.
| Note/Pattern | Fingering/Position |
|---|---|
| Low Bb | All fingers down including both pinkies |
| B | All fingers except right pinky |
| C | Left hand: thumb, first 3 fingers; Right hand: first 3 fingers |
| D | Left hand: thumb, first 3 fingers; Right hand: first 2 fingers |
| E | Left hand: thumb, first 3 fingers; Right hand: first finger |
| F | Left hand: thumb, first 3 fingers |
| G | Left hand: thumb, first 2 fingers |
| A | Left hand: thumb, first finger |