Use this guide alongside our Interactive Saxophone Fingering Chart for hands-on practice.
Essential Foundations for Saxophone Playing
Before you can play beautiful melodies, you need to master the fundamental aspects of saxophone playing: proper embouchure, breath control, fingering techniques, and basic articulation.
1. Developing the Correct Embouchure
The embouchure is how you position your lips around the mouthpiece and reed. Think of it as forming a cushion around the reed - your lips should create a firm but flexible seal that allows the reed to vibrate freely while maintaining control over the sound.
Key Points:
- Roll your lower lip slightly over your bottom teeth
- Place your top teeth gently on the mouthpiece
- Create a seal that allows reed vibration without air leaks
- Practice in front of a mirror for 5 minutes daily
- The goal is to create a controlled, resonant sound
Common Mistakes to Avoid:
- Don't bite down on the mouthpiece too hard
- Avoid letting your lips become too loose
- Don't let air escape around the mouthpiece
- Avoid taking in too much mouthpiece
2. Mastering Breath Control
Proper breathing is crucial for saxophone playing. You need to use diaphragmatic breathing (belly breathing) rather than shallow chest breathing, as the saxophone requires significant air support for good tone production.
Breathing Technique:
- Inhale deeply, allowing your abdomen to expand
- Keep your shoulders relaxed and still
- Practice lying down with your hand on your stomach to feel the correct movement
- Exhale with steady, controlled air flow
Practice Exercise:
Try blowing air through the mouthpiece without making a sound first. Aim for a steady, consistent air stream that demonstrates good breath support.
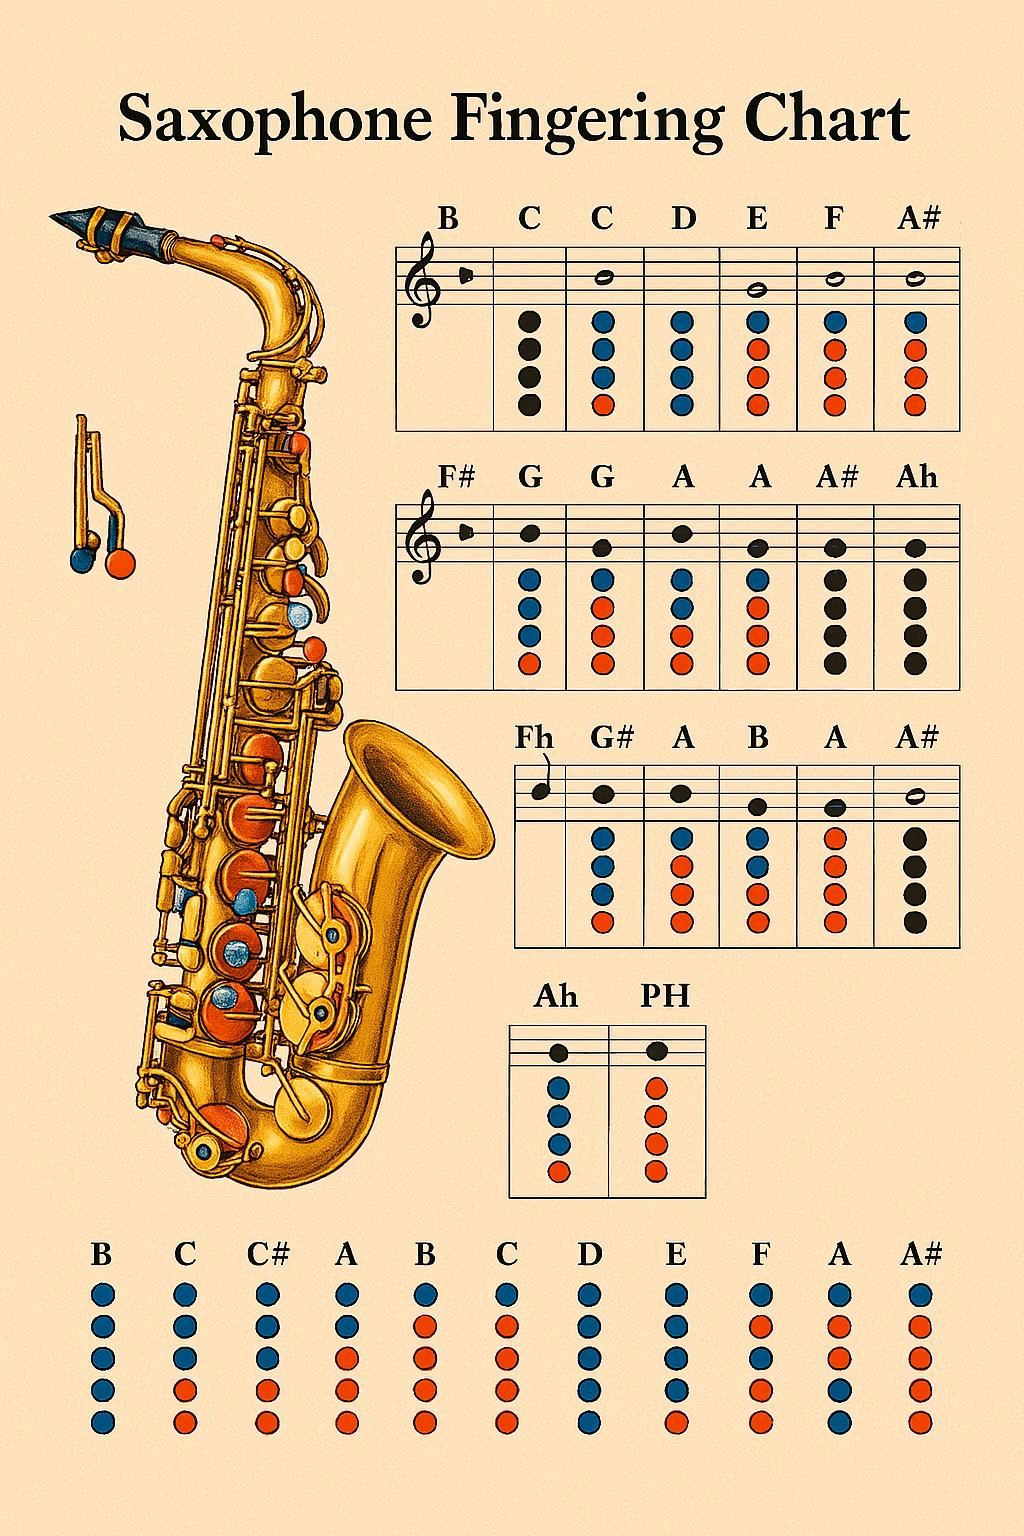
3. Understanding Basic Saxophone Fingering
The saxophone has a complex key system that allows you to play the full chromatic scale. For a comprehensive guide to all finger positions, check out our Saxophone Fingering Chart. Here's the basic fingering pattern:
Basic Fingering:
- All keys closed: Low B♭ and B
- Left hand keys: Control upper register notes (B, A, G)
- Right hand keys: Control lower register notes (F, E, D)
- Octave key: Opens a vent hole for higher notes
Recommended Starting Notes:
Begin with low B♭ (all fingers down) and work your way up to G. Practice each note for 4 beats, focusing on steady tone and proper embouchure.
4. Basic Articulation Techniques
Learn these fundamental articulation methods:
- Long tones: Sustained notes for breath control
- Legato: Smooth, connected notes
- Staccato: Short, detached notes
- Tonguing: Using the tongue to articulate notes (say "tu" while playing)
Understanding the Saxophone
The saxophone is a single-reed woodwind instrument with a conical metal body that produces a powerful, expressive tone. Its unique design combines elements of both woodwind and brass instruments, making it versatile across many musical genres.
Saxophone Anatomy
- Mouthpiece: Where the reed attaches and you blow
- Reed: Single piece of cane that vibrates to produce sound
- Ligature: Metal band that secures the reed to the mouthpiece
- Neck: Curved tube connecting mouthpiece to body
- Body: Main section with most keys and tone holes
- Bell: Flared opening that projects sound
- Keys: Metal covers that open and close tone holes
- Neck Strap: Supports the instrument's weight
- Tone holes: Openings in the saxophone body
How Keys Change Saxophone Pitch
The saxophone has a complex key system that changes the tube length to alter pitch. When you press a key, it closes a tone hole, making the instrument effectively longer and lowering the pitch.
Key Functions:
- Left hand keys: Control upper register notes (B, A, G)
- Right hand keys: Control lower register notes (F, E, D)
- Octave key: Opens a vent hole for higher notes
- Palm keys: Provide access to high register notes
- Side keys: Offer alternate fingerings for agility
- Pinky keys: Control low notes and trills
Daily Practice Routine for Beginners
Structure your practice sessions for maximum effectiveness:
5-Minute Warm-up
- Breathing exercises: 2 minutes
- Embouchure practice: 3 minutes
10-Minute Technique Practice
- Long tones: Practice sustained notes from low B♭ to G
- Simple scales: Try B♭-C-D-E♭-F-G-F-E♭-D-C-B♭ pattern
- Breathing exercises: Focus on steady air flow
10-Minute Song Practice
- Start with simple melodies
- Focus on correct fingering and steady tone
- Don't worry about speed - accuracy comes first
Important: Practice no more than 40 minutes daily to avoid fatigue.
Troubleshooting Common Beginner Problems
Problem: Weak or Airy Sound
Solution: Check that your embouchure is firm around the mouthpiece and your air stream is steady and controlled.
Problem: Can't Reach High Notes
Solution: Focus your embouchure more and increase abdominal support. Use the octave key properly.
Problem: Inconsistent Tone
Solution: Focus on steady breath support and consistent embouchure formation.
Essential Equipment for Beginners
- Saxophone: Rent or purchase a student model saxophone
- Reeds: Start with strength 2.5-3 reeds
- Cleaning supplies: Cleaning swab and polishing cloth
- Metronome: For timing practice
- Music stand: For proper posture while reading music
- Method book: Choose a beginner saxophone method book
Setting Realistic Expectations
- Week 1-2: Focus on producing a clear, steady tone on a few notes
- Week 3-4: Begin playing simple scales and short melodies
- Month 2-3: Start working on more complex pieces and faster passages
Remember, progress varies for each individual. Consistent daily practice is more important than the amount of time spent in each session.
Quick Improvement Tips
1. Embouchure Flexibility Exercises
Practice forming your embouchure around the mouthpiece without playing daily. This builds the muscle control needed for saxophone playing.
2. Long Tone Training
Spend 10 minutes daily on sustained notes from low to high register. This improves breath control and intonation.
3. Tonguing Practice
Use the "tu" syllable to practice clean articulation. This makes your notes crisp and clear.
4. High Note Technique
For higher notes, focus your embouchure more while increasing abdominal support. Use the octave key properly.
How to Hold a Saxophone Correctly
Proper saxophone holding technique is fundamental to developing good tone, technique, and preventing fatigue. The saxophone's weight and unique design require specific posture and hand positioning that differs significantly from other woodwind instruments. Correct saxophone posture affects every aspect of your playing.
Why Proper Saxophone Holding Matters
Correct saxophone holding technique provides numerous benefits that directly impact your playing ability:
- Tone Quality: Proper positioning allows for optimal air flow and embouchure formation
- Technique Development: Correct hand placement enables smooth finger movement and key access
- Endurance: Proper weight distribution prevents neck and shoulder strain
- Intonation: Stable holding position supports consistent embouchure and air support
- Musical Expression: Comfortable posture allows for relaxed, expressive playing
Basic Saxophone Holding Position
The saxophone should be held at a comfortable angle that allows natural hand positioning and easy access to all keys. The instrument's weight should be supported primarily by the neck strap, not by your hands.
Step-by-Step Setup:
- Neck Strap Adjustment: Adjust the strap so the mouthpiece comes naturally to your mouth without tilting your head
- Instrument Angle: Hold the saxophone slightly forward, not pulled back toward your body
- Body Position: Sit or stand with your back straight and shoulders relaxed
- Head Position: Keep your head level and look straight ahead, not down at the instrument
Left Hand Position
The left hand controls the upper register keys and octave mechanism. Proper positioning is crucial for smooth technique and easy key access.
Left Hand Setup:
- Thumb Position: Place your left thumb on the thumb rest, positioned for easy octave key access
- Finger Curvature: Keep fingers naturally curved and close to the pearl keys
- Key Contact: Use the pads of your fingers, not the tips, for better control
- Palm Keys: Position your hand to easily reach the palm keys for high notes
- Relaxation: Keep your hand relaxed and avoid tension in the wrist
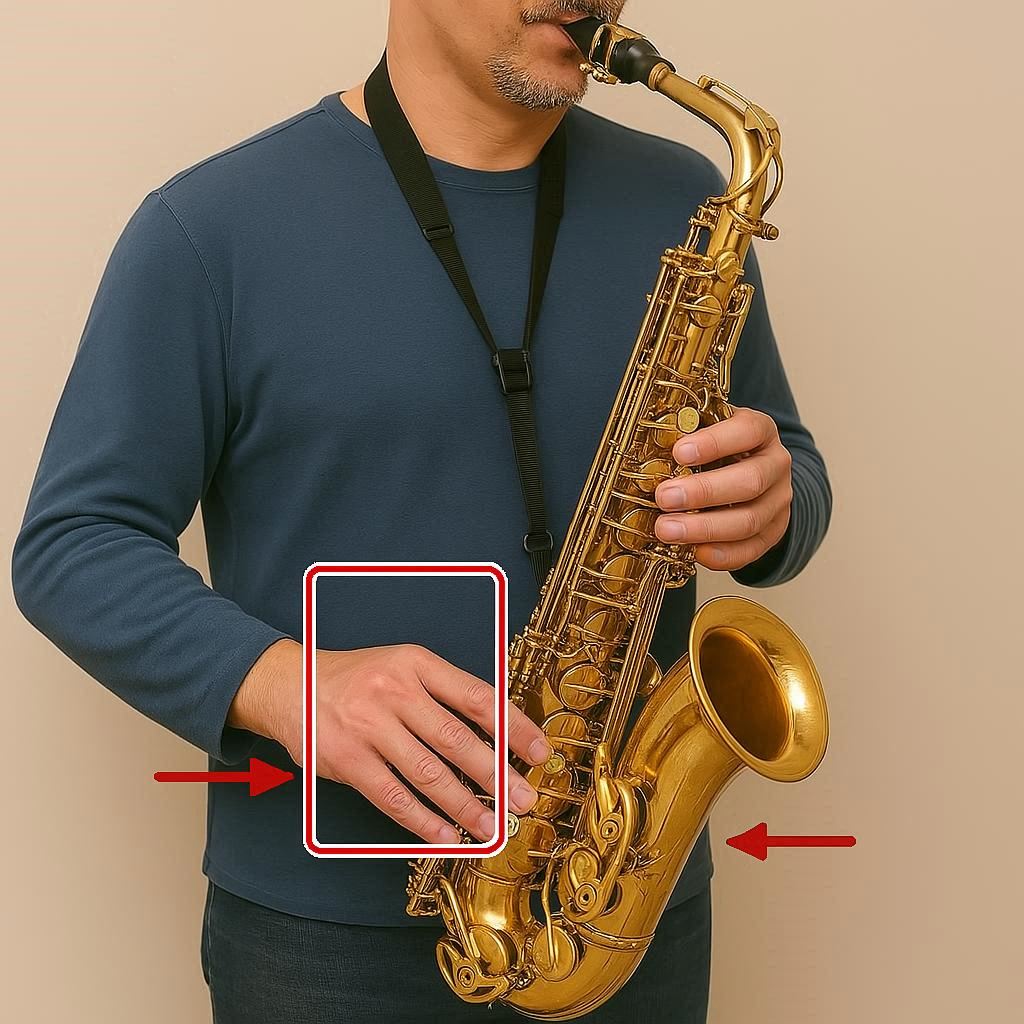
Right Hand Position
The right hand controls the lower register keys and provides additional support for the instrument. Proper positioning ensures smooth finger movement and stability.
Right Hand Setup:
- Thumb Hook: Place your right thumb under the thumb hook for support
- Finger Placement: Position fingers over the pearl keys with natural curvature
- Pinky Keys: Keep your pinky ready for the low note keys and trill keys
- Side Keys: Position your hand to easily access side keys for alternate fingerings
- Wrist Alignment: Keep your wrist straight and avoid bending it excessively
Neck Strap and Weight Distribution
The neck strap is essential for proper saxophone support. It should carry most of the instrument's weight, allowing your hands to focus on playing rather than supporting.
Neck Strap Setup:
- Length Adjustment: Adjust so the mouthpiece meets your mouth without strain
- Weight Distribution: The strap should support 80% of the instrument's weight
- Comfort: Use a padded strap to prevent neck strain during long practice sessions
- Stability: Ensure the strap is secure and won't slip during playing
Common Holding Mistakes and Solutions
Many beginners develop poor holding habits that can limit their progress. Here are the most common issues and how to fix them:
Mistake: Supporting with Hands Instead of Strap
Problem: Using your hands to support the instrument's weight
Solution: Adjust the neck strap so it carries the weight, allowing your hands to move freely
Mistake: Incorrect Hand Angles
Problem: Bending wrists too much or holding hands at awkward angles
Solution: Keep wrists relatively straight and hands in natural playing position
Mistake: Poor Finger Positioning
Problem: Using fingertips instead of finger pads or keeping fingers too far from keys
Solution: Use the pads of your fingers and keep them close to the keys for quick access
Mistake: Tension in Shoulders and Neck
Problem: Raising shoulders or tilting head to reach the mouthpiece
Solution: Adjust the neck strap length and maintain relaxed, natural posture
Advanced Holding Techniques
Once you've mastered basic holding technique, these advanced concepts will improve your playing:
Dynamic Hand Movement
Learn to move your hands smoothly between different key combinations without losing stability or changing your basic holding position.
Palm Key Access
Develop the ability to reach palm keys for high notes while maintaining proper left hand position and instrument stability.
Side Key Technique
Practice accessing side keys for alternate fingerings without disrupting your basic hand position or instrument balance.
Equipment Considerations
The right equipment can significantly improve your holding comfort and technique:
Essential Equipment:
- Quality Neck Strap: Padded, adjustable strap for comfort and proper weight distribution
- Proper Mouthpiece: Correctly sized mouthpiece for your embouchure and playing level
- Good Reeds: Consistent reeds that respond well to your embouchure
- Ligature: Properly fitted ligature for secure reed placement
Practice Exercises for Proper Holding
These exercises will help you develop and maintain proper holding technique:
Basic Position Practice:
- Hold the saxophone in playing position without playing for 5 minutes
- Practice moving your fingers over the keys without pressing them
- Work on smooth transitions between different hand positions
- Practice holding while standing and sitting to develop versatility
Endurance Building:
- Gradually increase practice time while maintaining proper posture
- Take breaks every 20-30 minutes to prevent fatigue
- Focus on relaxation and efficient movement
- Monitor for tension and adjust your position as needed
Troubleshooting Common Holding Issues
If you're experiencing discomfort or technique problems, these solutions can help:
Neck and Shoulder Pain:
Adjust your neck strap length and ensure you're not supporting the instrument with your hands. Consider a different strap style or padding.
Finger Fatigue:
Check your finger positioning and ensure you're using the pads of your fingers, not the tips. Avoid excessive tension in your hands.
Difficulty Reaching Keys:
Adjust your hand position and ensure your wrists are straight. Consider the size of your saxophone and whether it's appropriate for your hand size.
How Saxophone Fingerings Work
The saxophone uses a single-reed mouthpiece with a conical bore. Keys and pads cover tone holes to lengthen/shorten the air column, changing pitch. The octave mechanism vents specific tone holes to stabilize higher partials without dramatically increasing embouchure pressure.
Registers and Breaks
- Low register: B♭3 to C4 (alto) — maintain relaxed air with secure seal
- Middle register: D4 to B♭5 — primary range for beginners
- High register: C6 and above — requires octave key coordination and focused air
Core Fingering Map (Alto/Tenor Concepts)
| Pitch Area | Primary Fingering Concept | Mechanism Notes | Stability Tips |
|---|---|---|---|
| Low B♭–C | Right-hand pinky keys with full LH core | Pinky rollers; ensure pad seal | Warm air, relaxed jaw |
| D–F# (no octave) | LH core + RH support | Avoid collapsing fingers | Even finger motion before tonguing |
| G–C (octave) | Engage octave key; maintain LH core | Check octave vent timing | Faster air, not tighter jaw |
| Palm tones (D–F) | Left-hand palm keys with supporting fingers | Micro hand angle adjustments | Aim air toward top of mouthpiece |
| Side keys (B♭/C/E) | Use side keys as alternates for agility | Minimize hand displacement | Choose by musical context |
Alternate Fingerings and When to Use Them
- B♭ options: Bis B♭, side B♭, or A+RH B♭—select for line smoothness
- Trill choices: Use side keys or palm alternates to avoid awkward motion
- Intonation fixes: Venting or subtle finger lifts for sharp/flat tendencies
Practice Strategies
- Long tones through registers: Link breath, embouchure, octave key timing
- Slow scales with alternates: Integrate side/palm keys deliberately
- Overtone studies: Strengthen voicing for palm and altissimo control
Intonation Tendencies (Alto/Tenor)
Each saxophone has characteristic pitch tendencies. Train your ear and adjust with voicing and finger choices rather than biting.
- Low B♭/B: Often flat if air is too warm/slow — add core support
- Middle D/E♭: Can run sharp — stabilize with relaxed jaw and centered air
- Palm D–F: Tends sharp — lower voicing (think “oh”), add resonance
- Side B♭: Context-dependent — choose bis/side by tuning and fingering smoothness
Palm and Side Key Technique
Efficient palm/side key use enables clean high-note transitions and agile passages.
- Palm D–F: Rotate hand slightly to reach keys without collapsing LH core
- Side B♭: Prefer bis B♭ for scalar lines; use side B♭ for certain trills/leaps
- Side C/E: Helpful as alternates to reduce motion in fast passages
- Octave timing: Synchronize with finger motion; avoid late/early octave vents
Altissimo Strategy (Overview)
Altissimo depends on overtone control and precise voicing—not squeezing.
- Establish overtone series on low notes (e.g., low B♭ overtones)
- Match mouthpiece pitch (concert A for alto; G for tenor) for stable voicing
- Transition from overtones to practical altissimo fingerings gradually
- Use a tuner and drone for center; prioritize tone over range at first
Articulation and Dynamic Control
- Light “tah/da” articulation: Tip of tongue to reed; avoid heavy attacks
- Legato connections: Keep air continuous—fingers move before tongue
- pp to ff control: Support with air speed; embouchure remains cushioned
- Accent clarity: Air spike + minimal tongue for clean fronts
Equipment That Influences Fingerings
- Reeds: Consistent strength (e.g., 2.5–3 for many beginners) improves response
- Mouthpiece facing: Medium facings balance ease and tone core
- Ligature: Even pressure aids reed vibration and articulation clarity
- Pads and regulation: Properly sealing pads are essential for reliable fingerings
Progressive Practice Plan
- Week 1–2: Long tones across low–middle register; slow C–G scales
- Week 3–4: Add octave scales; introduce bis B♭ vs. side B♭ choices
- Week 5–6: Palm D–F exercises; overtone beginnings; alternate trill fingerings
- Week 7–8: Etudes with deliberate alternates; dynamics pp–ff; light staccato
Troubleshooting
- Notes not speaking: Check leaks, relax jaw, increase focused air
- Register crack at break: Coordinate octave key; move fingers first, then tongue
- Sharp palm tones: Lower voicing, add resonance, experiment with alternates
- Sloppy fast lines: Choose alternates that reduce motion; practice rhythms slowly
Fingering Guidance by Register
| Register | Primary Fingering Focus | Technique Notes | Tone & Intonation |
|---|---|---|---|
| Low B♭3–C4 (Alto) B♭2–C3 (Tenor) |
Full LH core with RH support; RH pinky rollers (B♭/B/C) | Practice smooth lateral pinky motion; avoid collapsing fingers | Warm, steady air; tune with voicing (don’t bite to correct pitch) |
| Middle D4–B♭5 |
Octave key integration from G↑; bis B♭ for scales, side B♭ for select trills/leaps | Fingers move before tongue; keep palm keys off and hands relaxed | Centered air stream; consistent embouchure cushion for stable pitch |
| High & Palm C6+ / Palm D–F |
Small LH rotation to reach palm keys without collapsing core | Increase air speed; synchronize octave vent timing; overtone linking | Lower voicing (think “oh”) to tame sharpness; match mouthpiece pitch daily |
Use the table as a quick reference, then apply the concepts in slow scales and overtone studies. Prioritize smooth finger motion before articulation, maintain a cushioned embouchure, and adjust voicing—not jaw pressure—for intonation.
Quick Trills and Alternates (Context-First)
| Interval | Suggested Approach | Notes |
|---|---|---|
| A–B♭ (concert G–A♭) | Bis B♭ or side B♭ | Choose for line smoothness and tuning |
| E–F | LH alternate F when available | Reduces RH motion in runs |
| D–E♭ (palm) | Palm alternates + voicing control | Watch sharpness—lower voicing |
Warm-up Routines (10–15 minutes)
- Long tones: pp→mf cresc/dim on low–middle–high notes (drone)
- Slow scales: Two octaves where possible; include bis/side B♭ paths
- Overtones: Low B♭ overtone ladder; match tone and pitch center
- Articulation: Legato→light staccato with even finger motion
Repertoire-Oriented Practice
- Pattern cells: Practice 3–5 note cells using chosen alternates
- Register bridges: Compose mini-exercises crossing the octave break
- Dynamics: Shape phrases pp–ff without changing pitch center
- Recording: Evaluate attack clarity, line smoothness, and intonation
Conclusion
Mastering saxophone fingerings is a journey that requires patience, consistent practice, and a systematic approach. Whether you're a complete beginner learning your first notes or an advanced player seeking to perfect your technique, this comprehensive guide provides everything you need to develop the finger dexterity and muscle memory needed for saxophone playing.
By understanding the relationship between fingerings and reed characteristics, practicing with proper technique, and using modern learning tools, you can develop the skills needed for advanced saxophone playing. Remember that fingerings are just one aspect of saxophone playing. Combine your fingering practice with work on embouchure, breath control, reed care, and musical expression to become a well-rounded saxophonist.
Start with the fundamentals, build your skills progressively, and celebrate small victories along the way. With dedication and the right approach, you'll be playing beautiful music on the saxophone in no time. The saxophone's rich, expressive sound and unique character make it a valuable addition to any musical ensemble, and your dedication to learning will be rewarded with years of musical enjoyment.