Piccolo Fingering Chart
Interactive fingering demonstration + beginner learning guide + free PDF download
Interactive Piccolo Fingering Chart
🎵 How to Use This Interactive Chart
Step 1: Choose Key Signature
Select your desired key signature from the dropdown menu. This will show you which notes are sharp or flat in that key.
Step 2: Click on a Note
Click any note button below to see the correct key fingering. The piccolo diagram will highlight the keys you need to press.
Step 3: Learn the Fingering
Study the highlighted keys on the piccolo and read the fingering description. Practice until it becomes automatic!
Select a Note
Piccolo Fingering Chart Image (PRINTABLE)

High-quality piccolo fingering chart perfect for practice and reference. For a comprehensive guide covering every note from low D to high C with detailed explanations, visit our Complete Piccolo Fingering Guide. Download PDF
BEGINNER PICCOLO FINGERING CHART
(Standard Piccolo | D5-C7 Range | Sounds One Octave Higher Than Written)
1. Basic Fingerings & Note Chart
| Note | Left Hand | Right Hand | Fingering Description | Octave |
|---|---|---|---|---|
| D | Thumb + 1, 2, 3 | 1, 2, 3 | Left 3 fingers, right 3 fingers | D5, D6, D7 |
| E | Thumb + 1, 2, 3 | 1, 2 | Left 3 fingers, right 2 fingers | E5, E6 |
| F | Thumb + 1, 2, 3 | 1 | Left 3 fingers, right 1 finger | F5, F6 |
| G | Thumb + 1, 2, 3 | — | Left 3 fingers only | G5, G6 |
| A | Thumb + 1, 2 | — | Left 2 fingers only | A5, A6 |
| B | Thumb + 1 | — | Left thumb + index finger | B5, B6 |
| C | Thumb + 2 | — | Left thumb + middle finger | C6, C7 |
| C♯/D♭ | Thumb + 1, 2, 3 | 1, 2, 3 | Left 3 fingers, right 3 fingers | C♯5, C♯6 |
| E♭ | Thumb + 1, 2, 3 | 1, 2, 3 | Left 3 fingers, right 3 fingers | E♭5, E♭6 |
| F♯/G♭ | Thumb + 1, 2 | 1 | Left 2 fingers, right 1 finger | F♯5, F♯6 |
Tip: Left hand fingers: 1=index, 2=middle, 3=ring, 4=pinky. Right hand fingers: 1=index, 2=middle, 3=ring. Thumb = left thumb key. Piccolo sounds one octave higher than written—when you play written D5, it sounds as D6. Cover tone holes completely for clear sound. Use less air than flute but with more focused stream.
2. Essential Beginner Scales
(Practice these scales daily to build finger dexterity and muscle memory. Start slowly and focus on intonation.)
D Major Scale
D (Thumb+1,2,3, R1,2,3) → E (Thumb+1,2,3, R1,2) → F♯ (Thumb+1,2, R1) → G (Thumb+1,2,3) → A (Thumb+1,2) → B (Thumb+1) → C♯ (Thumb+1,2,3, R1,2,3) → D (Thumb+1,2,3, R1,2,3)
(Two sharps: F♯, C♯ - Start with D5)
G Major Scale
G (Thumb+1,2,3) → A (Thumb+1,2) → B (Thumb+1) → C (Thumb+2) → D (Thumb+1,2,3, R1,2,3) → E (Thumb+1,2,3, R1,2) → F♯ (Thumb+1,2, R1) → G (Thumb+1,2,3)
(One sharp: F♯)
C Major Scale
C (Thumb+2) → D (Thumb+1,2,3, R1,2,3) → E (Thumb+1,2,3, R1,2) → F (Thumb+1,2,3, R1) → G (Thumb+1,2,3) → A (Thumb+1,2) → B (Thumb+1) → C (Thumb+2)
(No sharps or flats - Start with C6)
A Major Scale
A (Thumb+1,2) → B (Thumb+1) → C♯ (Thumb+1,2,3, R1,2,3) → D (Thumb+1,2,3, R1,2,3) → E (Thumb+1,2,3, R1,2) → F♯ (Thumb+1,2, R1) → G♯ (Thumb+1, R1) → A (Thumb+1,2)
(Three sharps: F♯, C♯, G♯)
F Major Scale
F (Thumb+1,2,3, R1) → G (Thumb+1,2,3) → A (Thumb+1,2) → B♭ (Thumb+2, R1) → C (Thumb+2) → D (Thumb+1,2,3, R1,2,3) → E (Thumb+1,2,3, R1,2) → F (Thumb+1,2,3, R1)
(One flat: B♭)
3. Simple Practice Melodies
(Great for beginners to practice fingerings and rhythm! Start in comfortable register.)
"Hot Cross Buns" (Traditional):
E (Thumb+1,2,3, R1,2) → D (Thumb+1,2,3, R1,2,3) → C (Thumb+2) → E (Thumb+1,2,3, R1,2) → D (Thumb+1,2,3, R1,2,3) → C (Thumb+2) → C C C C → D D D D → E (Thumb+1,2,3, R1,2) → D (Thumb+1,2,3, R1,2,3) → C (Thumb+2)
(Practice slowly, focusing on clean finger transitions and controlled air)
"Mary Had a Little Lamb" (Traditional):
E (Thumb+1,2,3, R1,2) → D (Thumb+1,2,3, R1,2,3) → C (Thumb+2) → D (Thumb+1,2,3, R1,2,3) → E (Thumb+1,2,3, R1,2) → E (Thumb+1,2,3, R1,2) → E (Thumb+1,2,3, R1,2) → D (Thumb+1,2,3, R1,2,3) → D (Thumb+1,2,3, R1,2,3) → D (Thumb+1,2,3, R1,2,3) → E (Thumb+1,2,3, R1,2) → G (Thumb+1,2,3) → G (Thumb+1,2,3) → E (Thumb+1,2,3, R1,2) → D (Thumb+1,2,3, R1,2,3) → C (Thumb+2)
(Perfect for learning basic fingerings - use controlled, focused air)
"Twinkle Twinkle Little Star" (Traditional):
C (Thumb+2) → C (Thumb+2) → G (Thumb+1,2,3) → G (Thumb+1,2,3) → A (Thumb+1,2) → A (Thumb+1,2) → G (Thumb+1,2,3) → F (Thumb+1,2,3, R1) → F (Thumb+1,2,3, R1) → E (Thumb+1,2,3, R1,2) → E (Thumb+1,2,3, R1,2) → D (Thumb+1,2,3, R1,2,3) → D (Thumb+1,2,3, R1,2,3) → C (Thumb+2)
(Practice with steady rhythm and clear notes - avoid overblowing)
4. Fingering Tips for Beginners
- Keep fingers curved and relaxed—press keys gently, not forcefully.
- Cover tone holes completely—incomplete coverage causes air leaks and poor sound.
- Use less air than flute—piccolo requires a smaller, more focused air stream.
- Control your embouchure—lips should be tighter than flute for higher register.
- Practice finger transitions slowly at first—focus on accuracy before speed!
- Keep your left thumb on the thumb key—it supports the piccolo and controls the B key.
- Practice scales daily to build muscle memory for common fingerings.
- Use a metronome to maintain steady rhythm while practicing fingerings.
- Remember: piccolo sounds one octave higher than written—adjust your ear accordingly.
- Start with flute experience—most successful piccolo players master flute first.
- Control dynamics—practice playing softly to avoid shrill, piercing tone.
- Check intonation frequently—piccolo can easily go sharp, especially in high register.
Understanding the Piccolo Fingering
Piccolo Anatomy and Parts
Before learning fingerings, familiarize yourself with the piccolo's components. The piccolo is essentially a smaller version of the flute, pitched an octave higher.
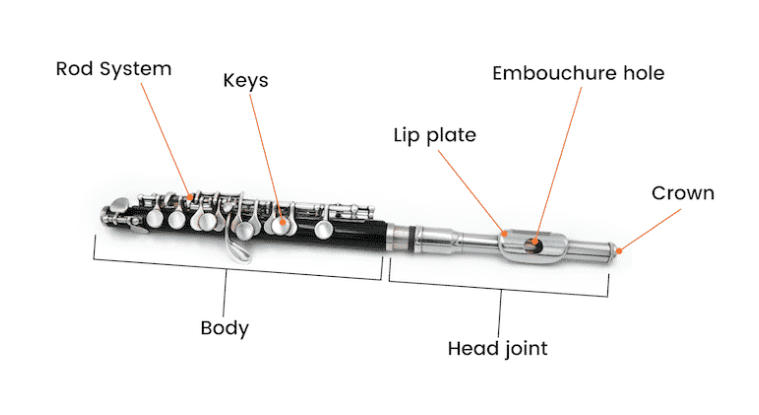
Key Components:
- Headjoint: Contains the embouchure hole where you blow
- Body: Main section with most keys and tone holes
- Footjoint: Not always present on piccolo (optional)
- Embouchure Hole: Where air is directed to create sound
- Lip Plate: Curved plate that rests against your lower lip
- Keys and Pads: Cover tone holes to change pitch
- Crown: Top cap of headjoint for tuning adjustments
How the Piccolo Works
The piccolo produces sound when air is blown across the embouchure hole, creating vibrations inside the tube. The shorter tube length (about half the length of a flute) causes it to sound an octave higher. By opening and closing keys, you change the effective length of the vibrating air column, producing different pitches.
Understanding Musical Notes
Musical notes are the building blocks of music. The piccolo uses the same note names as other instruments but sounds an octave higher than written.
Want a deeper primer? Read our Music Notes Guide for beginners.

The Musical Alphabet:
- Seven natural notes: A, B, C, D, E, F, G
- Five sharps/flats: A♯/B♭, C♯/D♭, D♯/E♭, F♯/G♭, G♯/A♭
- 12 total pitches in Western music (chromatic scale)
- Piccolo transposition: Sounds one octave higher than written
Half Steps and Whole Steps
Understanding intervals is crucial for mastering piccolo fingerings and music theory.

Half Step (Semitone):
- The smallest interval in Western music
- Example: C to C♯ or E to F
- On piano: distance between adjacent keys
Whole Step (Tone):
- Two half steps combined
- Example: C to D or F to G
- Skips one key on the piano
Piccolo Range and Registers
The piccolo has a range of approximately 3 octaves, from D5 to C8 (sounding pitch). Its bright, piercing tone makes it ideal for high passages in orchestral and band music.

Piccolo Range:
- Lowest note: D5 (written D4)
- Highest common note: C8 (written C7)
- Total span: About 3 octaves
- Sweet spot: G5-C7 (most comfortable range)
Common Piccolo Fingering Patterns Chart
Here are fundamental fingering patterns to get you started. Mastering these will build a solid foundation.
| Note | Fingering/Position |
|---|---|
| D5 | Left thumb + first 3 fingers, right first 3 fingers |
| E5 | Left thumb + first 3 fingers, right first 2 fingers |
| F5 | Left thumb + first 3 fingers, right first finger |
| G5 | Left thumb + first 3 fingers |
| A5 | Left thumb + first 2 fingers |
| B5 | Left thumb + first finger |
| C6 | Left thumb + 2nd finger |
| D6 | Left thumb only (octave higher) |
How to Hold the Piccolo Correctly
Proper piccolo holding technique is crucial for developing good tone, technique, and preventing fatigue. The piccolo is held horizontally to the right side of your body, similar to the flute but with a more compact grip due to its smaller size.
For detailed guidance on proper piccolo holding technique, posture, and hand positions, read our comprehensive Complete Piccolo Fingering Guide.


Key points for proper piccolo holding technique:
- Left Hand Position: Left hand index finger supports the piccolo at the balance point, thumb rests under the first key
- Right Hand Position: Right thumb supports underneath, fingers curve naturally over keys
- Embouchure Placement: Lip plate rests on chin, embouchure hole aligns with center of lips
- Piccolo Angle: Hold horizontally to the right, slightly downward angle (about 5-10 degrees)
- Posture: Sit or stand up straight with shoulders relaxed and level
- Arms: Elbows slightly away from body, wrists relatively straight and relaxed
- Compact Grip: Due to smaller size, fingers stay closer together
How to Learn to Play the Piccolo
- Master the flute first: Most piccolo players start on flute to develop embouchure and technique
- Start with basics: Learn proper posture, hand position, and sound production
- Practice scales: Build finger dexterity and note recognition in all registers
- Use this chart: Reference fingerings until they become automatic
- Play simple melodies: Apply fingerings in musical context
- Control your air: Piccolo requires less air but more focused stream
- Develop your ear: Intonation is critical on piccolo
- Listen actively: Study professional piccolo recordings
- Be patient: Consistent daily practice yields best results
- Find a teacher: Professional guidance accelerates progress
Best Beginner Piccolo Brands and Models
Quality student piccolos from trusted manufacturers make learning easier and more enjoyable. For a comprehensive beginner's guide covering embouchure, breathing techniques, and step-by-step learning instructions, check out our Complete Piccolo Fingering Guide.
- Yamaha YPC-32: Popular student model with good intonation ($400-600)
- Jupiter JPC1000E: Reliable entry-level piccolo ($350-500)
- Gemeinhardt 4P: Solid student choice with good tone ($500-700)
- Pearl PFP-105E: Excellent beginner model with consistent quality ($450-650)
- Selmer Prelude PC711: Budget-friendly option for beginners ($300-450)
Practice Tips
- Warm up properly: Start with long tones in comfortable register
- Practice scales daily: All major and minor scales build technique
- Use a metronome: Develop steady rhythm and timing
- Record yourself: Identify areas for improvement
- Control dynamics: Practice playing softly to avoid shrillness
- Check tuning: Use a tuner to develop good intonation
- Short, focused sessions: 15-20 minutes is better than one long session
Common Mistakes to Avoid
- Blowing too hard: Piccolo needs controlled, focused air not force
- Poor embouchure: Lips too tight or too loose affects tone quality
- Incorrect hand position: Tense fingers slow down technique
- Bad posture: Slouching restricts breathing and affects tone
- Playing too loud: Piccolo can easily sound shrill if overblown
- Inconsistent practice: Regular short sessions better than irregular long ones
- Skipping flute: Most successful piccolo players are skilled flutists first