Clarinet Fingering Chart
Comprehensive fingering guide + technique tips + beginner learning resources + free PDF download
Interactive Clarinet Fingering Chart
🎵 How to Use This Interactive Chart
Step 1: Choose Key Signature
Select your desired key signature from the dropdown menu. This will show you which notes are sharp or flat in that key.
Step 2: Click on a Note
Click any note button below to see the correct key fingering. The clarinet diagram will highlight the keys you need to press.
Step 3: Learn the Fingering
Study the highlighted keys on the clarinet and read the fingering description. Practice until it becomes automatic!
Select a Note
Clarinet Fingering Chart Image (PRINTABLE)
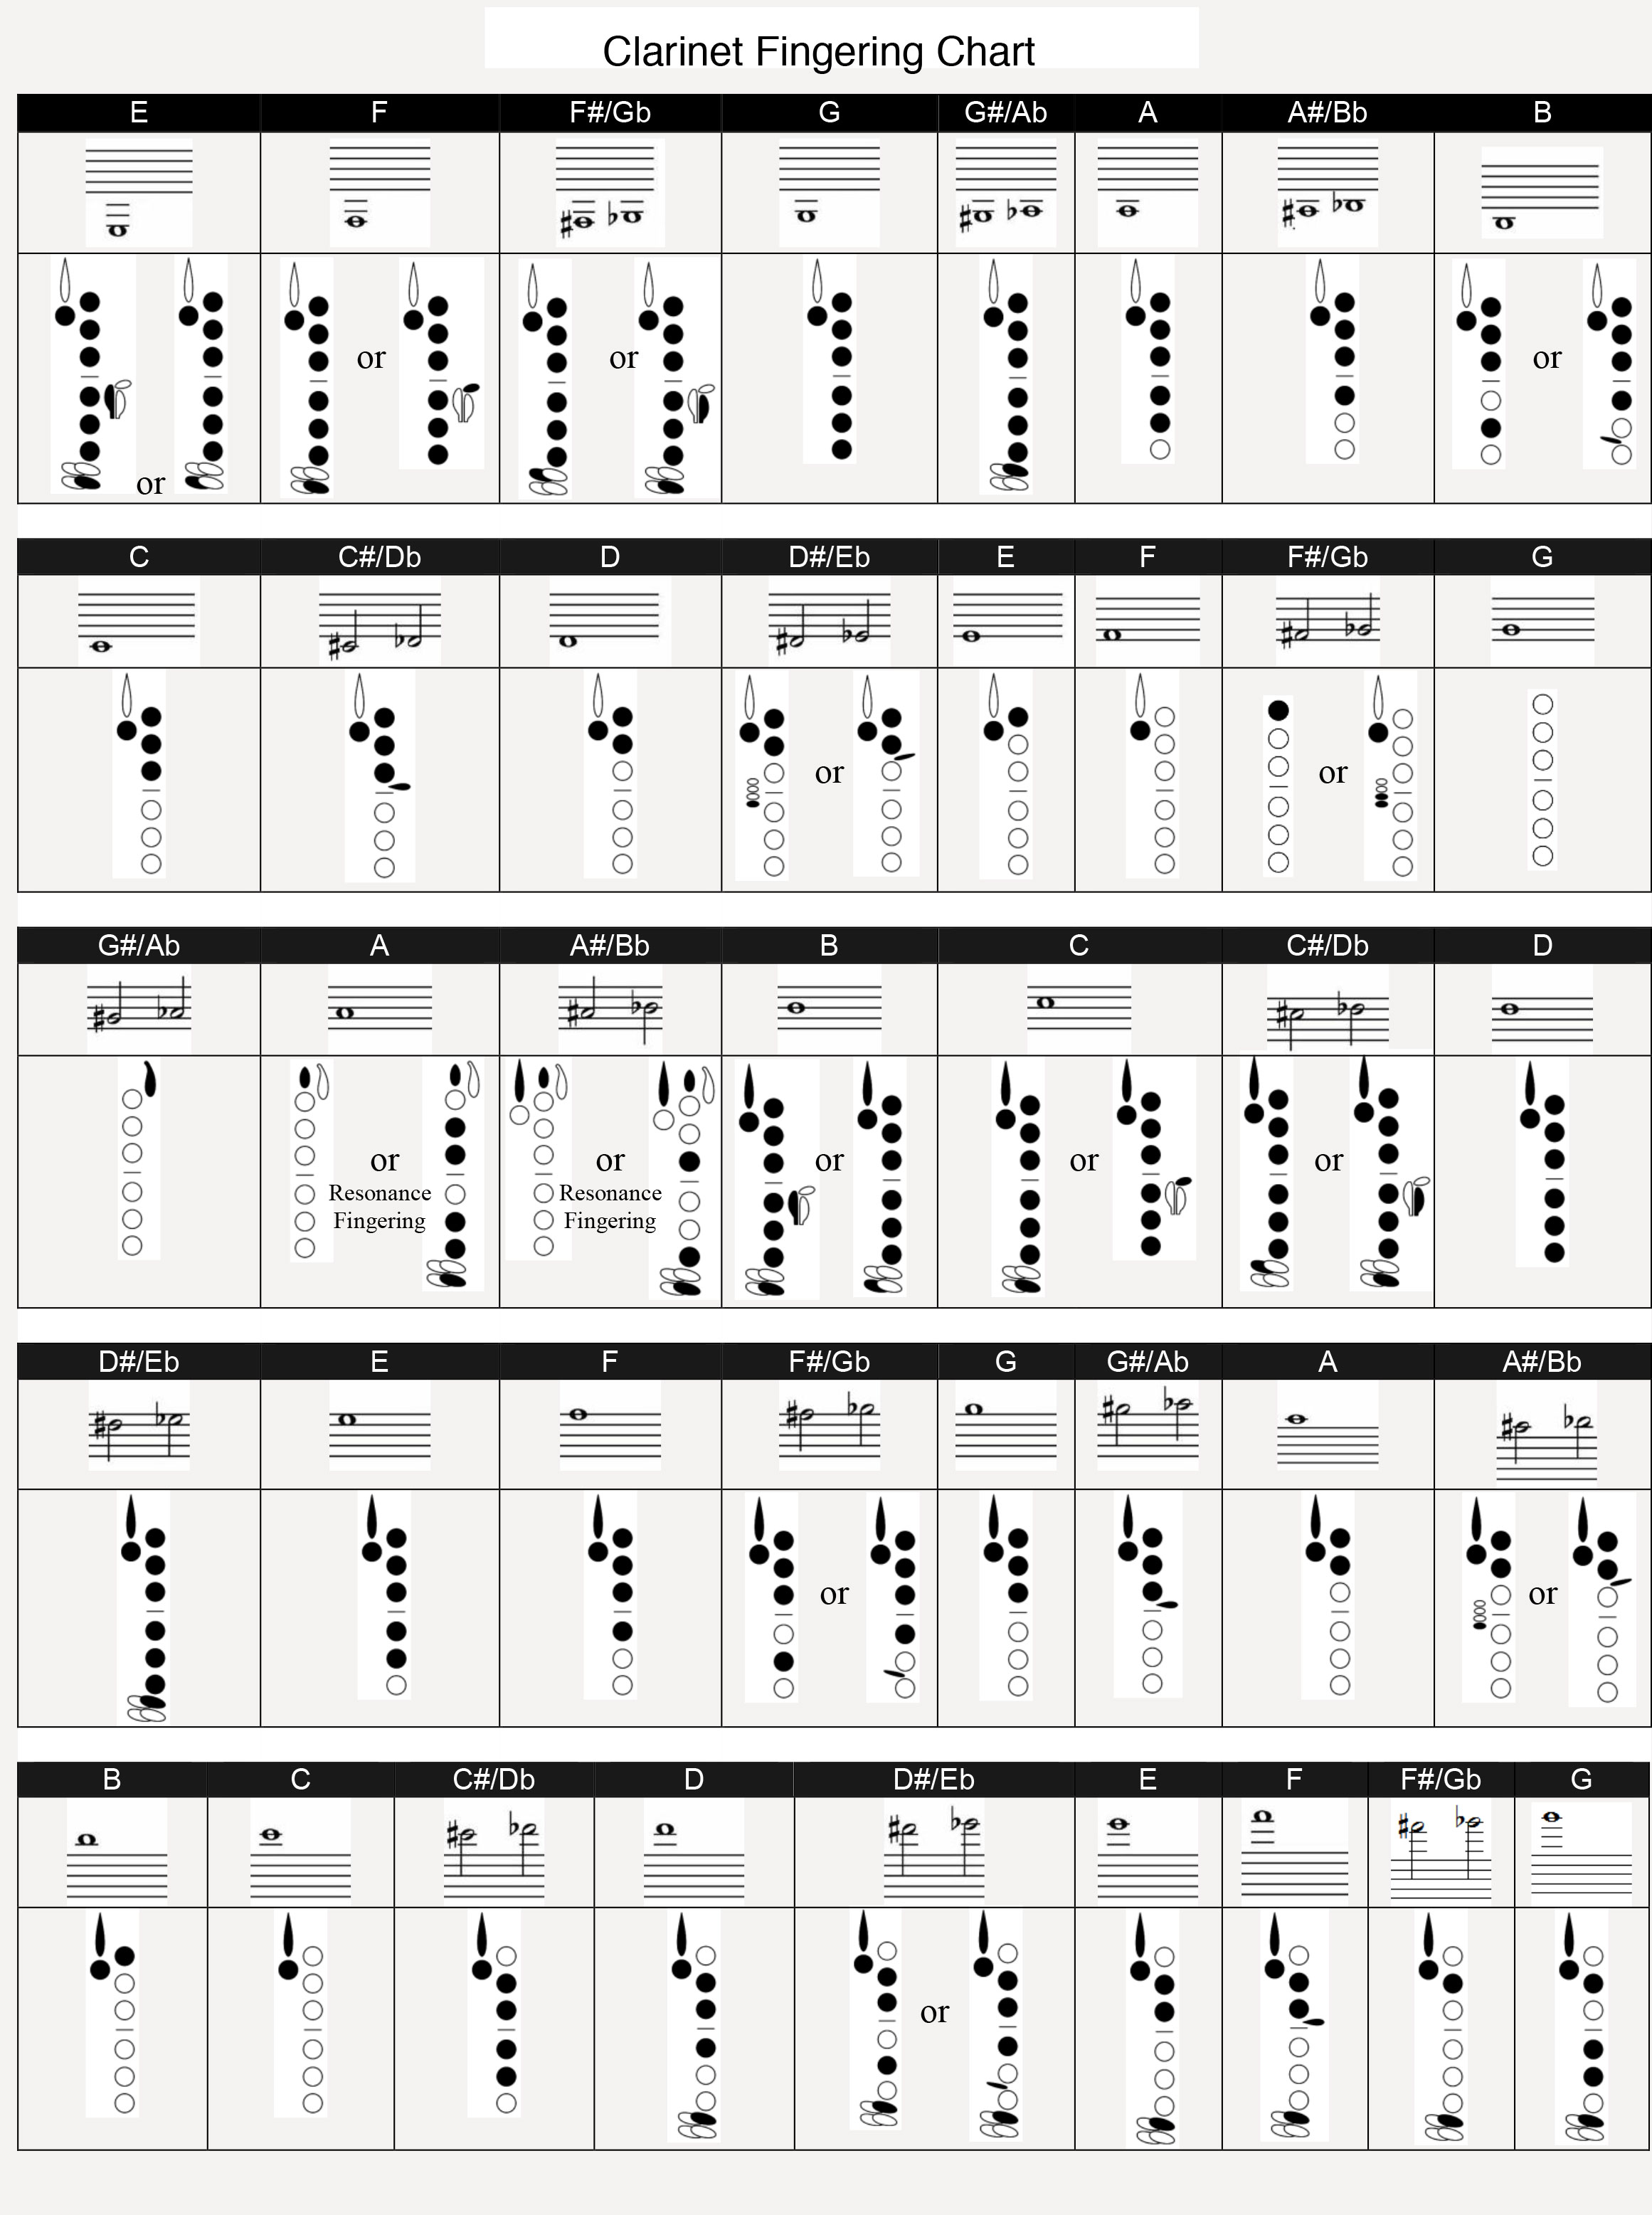
High-quality fingering chart perfect for practice and reference. Download PDF
📚 Complete Clarinet Fingering Guide
Looking for a comprehensive guide to master every clarinet note? Our detailed guide covers register breaks, advanced techniques, and professional fingerings:
BEGINNER CLARINET FINGERING CHART
(B♭ Clarinet | Boehm System)
1. Basic Fingering Combinations
| Note | Left Hand | Right Hand | Description |
|---|---|---|---|
| E3 | T1, L1, L2, L3, L4 | R1, R2, R3, R4 | All fingers down + thumb |
| F3 | T1, L1, L2, L3, L4 | R1, R2, R3 | All left, first 3 right |
| G3 | T1, L1, L2, L3, L4 | R1, R2 | All left, first 2 right |
| A3 | T1, L1, L2, L3, L4 | R1 | All left, first right |
| B3 | T1, L1, L2, L3, L4 | - | All left fingers |
| C4 | T1, L1, L2, L3 | - | Left thumb + first 3 fingers |
| D4 | T1, L1, L2 | - | Left thumb + first 2 fingers |
| E4 | T1, L1 | - | Left thumb + first finger |
| F4 | T1, L1, L2, L3, L4 | R1, R2, R3 | All left, first 3 right |
| G4 | T1, L1, L2, L3, L4 | R1, R2 | All left, first 2 right |
| A4 | T1, L1, L2, L3, L4 | R1 | All left, first right |
| B4 | T1, L1, L2, L3, L4 | - | All left fingers |
| C5 | T1, L1, L2, L3 | - | Left thumb + first 3 fingers |
Tip: Use the register key (REG) for notes above the break (B4 and higher).
2. Essential Beginner Scales
Practice these scales to develop finger dexterity and smooth transitions.
C Major Scale
C4 (T1, L1, L2, L3) - D4 (T1, L1, L2) - E4 (T1, L1) - F4 (T1, L1, L2, L3, L4, R1, R2, R3) - G4 (T1, L1, L2, L3, L4, R1, R2) - A4 (T1, L1, L2, L3, L4, R1) - B4 (T1, L1, L2, L3, L4) - C5 (T1, L1, L2, L3)
G Major Scale
G4 (T1, L1, L2, L3, L4, R1, R2) - A4 (T1, L1, L2, L3, L4, R1) - B4 (T1, L1, L2, L3, L4) - C5 (T1, L1, L2, L3) - D5 (T1, L1, L2) - E5 (T1, L1) - F#5 (T1, L1, L2, L3, L4, R1, R2, R3) - G5 (T1, L1, L2, L3, L4, R1, R2)
F Major Scale
F4 (T1, L1, L2, L3, L4, R1, R2, R3) - G4 (T1, L1, L2, L3, L4, R1, R2) - A4 (T1, L1, L2, L3, L4, R1) - Bb4 (T1, L1, L2, L3, L4) - C5 (T1, L1, L2, L3) - D5 (T1, L1, L2) - E5 (T1, L1) - F5 (T1, L1, L2, L3, L4, R1, R2, R3)
3. Simple Practice Melodies
(Great for applying new fingerings!)
"Hot Cross Buns":
B4 (T1, L1, L2, L3, L4) - A4 (T1, L1, L2, L3, L4, R1) - G4 (T1, L1, L2, L3, L4, R1, R2)
B4 (T1, L1, L2, L3, L4) - A4 (T1, L1, L2, L3, L4, R1) - G4 (T1, L1, L2, L3, L4, R1, R2)
G4 (T1, L1, L2, L3, L4, R1, R2) - G4 (T1, L1, L2, L3, L4, R1, R2) - G4 (T1, L1, L2, L3, L4, R1, R2) - G4 (T1, L1, L2, L3, L4, R1, R2)
A4 (T1, L1, L2, L3, L4, R1) - A4 (T1, L1, L2, L3, L4, R1) - A4 (T1, L1, L2, L3, L4, R1) - A4 (T1, L1, L2, L3, L4, R1)
B4 (T1, L1, L2, L3, L4) - A4 (T1, L1, L2, L3, L4, R1) - G4 (T1, L1, L2, L3, L4, R1, R2)
"Mary Had a Little Lamb":
E4 (T1, L1) - D4 (T1, L1, L2) - C4 (T1, L1, L2, L3) - D4 (T1, L1, L2) - E4 (T1, L1) - E4 (T1, L1) - E4 (T1, L1)
D4 (T1, L1, L2) - D4 (T1, L1, L2) - D4 (T1, L1, L2)
E4 (T1, L1) - G4 (T1, L1, L2, L3, L4, R1, R2) - G4 (T1, L1, L2, L3, L4, R1, R2)
4. Clarinet Fingering Tips for Beginners
- Form a proper embouchure: place the reed on your lower lip, top teeth on the mouthpiece.
- Keep fingers curved and close to the keys for quick, efficient movement.
- Ensure tone holes are completely covered to avoid airy or squeaky sounds.
- Use the register key (thumb key) for notes above the break (B4 and higher).
- Support the clarinet with your right thumb on the thumb rest, don't grip too tightly.
- Practice long tones to develop a consistent, clear sound and breath control.
- Breathe deeply from your diaphragm for good breath support.
- Start slowly with a metronome and gradually increase tempo.
- Listen carefully to your tone and intonation, use a tuner regularly.
- Keep reeds properly moistened and maintained for best sound quality.
- Clean your clarinet regularly, especially after each practice session.
- Master the "break" between B4 and C5 - this is a challenging transition for beginners.
Common Clarinet Fingering Patterns Chart
Here are fundamental fingering patterns to get you started. Mastering these will build a solid foundation.
| Note/Pattern | Fingering/Position |
|---|---|
| Low E | Left thumb + all fingers + right pinky on low E key |
| F | Left thumb + all fingers except right pinky |
| G | Left thumb + first 3 fingers of each hand |
| A | Left thumb + first 3 fingers of left hand, first 2 of right |
| B | Left thumb + first 3 fingers of left hand, first finger of right |
| C | Left thumb + first 3 fingers of left hand |
| D | Left thumb + first 2 fingers of left hand |
| E | Left thumb + first finger of left hand |
