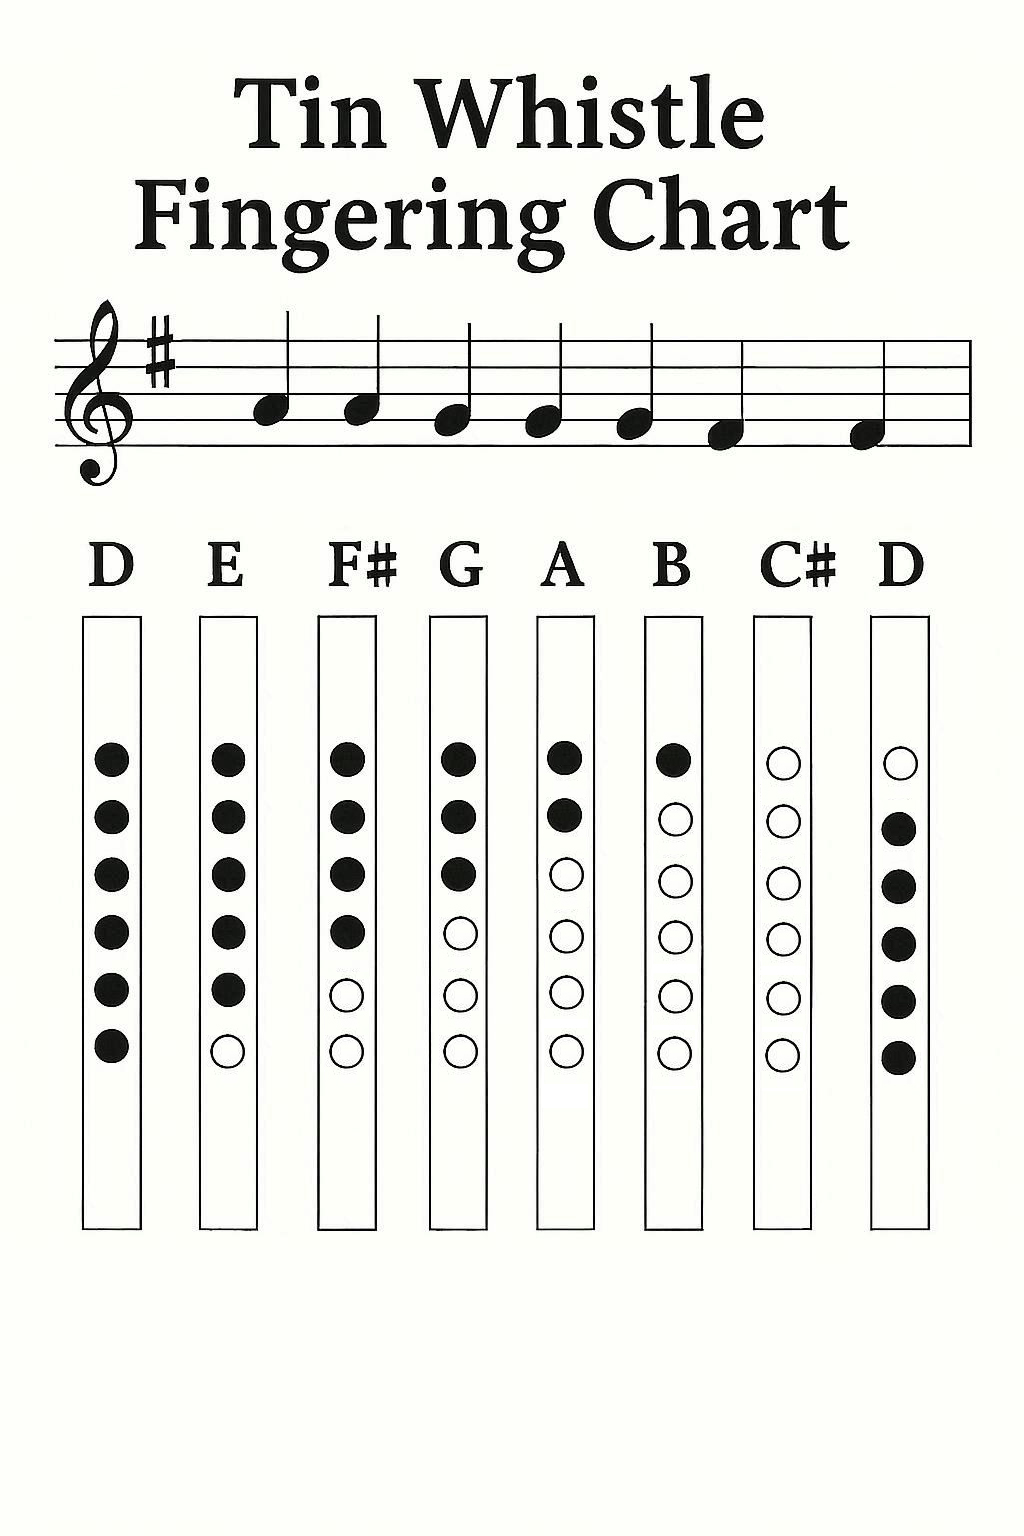
Tin Whistle Fingering Chart
Interactive fingering demonstration + beginner learning guide + free PDF download
Interactive Tin Whistle Fingering Chart
🎵 How to Use This Interactive Chart
Step 1: Choose Key Signature
Select your desired key signature from the dropdown menu. This will show you which notes are sharp or flat in that key.
Step 2: Click on a Note
Click any note button below to see the correct hole fingering. The tin whistle diagram will highlight the holes you need to cover.
Step 3: Learn the Fingering
Study the highlighted holes on the tin whistle and read the fingering description. Practice until it becomes automatic!
Select a Note
Tin Whistle Fingering Chart Image (PRINTABLE)
High-quality color PDF perfect for printing and carrying with you. Go to Download Page or open PDF directly: Open PDF
BEGINNER TIN WHISTLE FINGERING CHART
(6-Hole Tin Whistle | Standard D Whistle)
1. Basic Fingering Combinations
| Note | Hole Pattern | Left Hand | Right Hand | Description |
|---|---|---|---|---|
| D5 | ●●●●●● | 1, 2, 3 | 4, 5, 6 | All 6 holes covered (lowest note) |
| E5 | ●●●●●○ | 1, 2, 3 | 4, 5 | Hole 6 open |
| F#5 | ●●●●○○ | 1, 2, 3 | 4 | Holes 5,6 open |
| G5 | ●●●○○○ | 1, 2, 3 | - | Holes 4,5,6 open |
| A5 | ●●○○○○ | 1, 2 | - | Holes 3,4,5,6 open |
| B5 | ●○○○○○ | 1 | - | Holes 2,3,4,5,6 open |
| C6 | ○○○○○○ | - | - | All holes open |
| D6 | ●●●●●● | 1, 2, 3 | 4, 5, 6 | All holes covered (octave higher) |
Tip: Remember - more holes covered = lower pitch. Cover holes completely with fingertips for clear sound. Use increased air pressure for the second octave.
2. Essential Beginner Scales
Practice these scales to develop finger dexterity and smooth transitions.
D Major Scale
D5 (all covered) - E5 (6 open) - F#5 (5,6 open) - G5 (4,5,6 open) - A5 (3,4,5,6 open) - B5 (2,3,4,5,6 open) - C#6 (half-hole technique) - D6 (all covered, octave)
G Major Scale
G5 - A5 - B5 - C6 - D6 - E6 - F#6 - G6
A Major Scale
A5 - B5 - C#6 - D6 - E6 - F#6 - G#6 - A6
3. Simple Practice Melodies
(Great for applying new fingerings!)
"Danny Boy":
D5 - F#5 - G5 - A5 - B5 - A5 - G5 - F#5
D5 - D5 - F#5 - G5 - A5 - B5 - D6
"The Irish Washerwoman":
D5 - E5 - F#5 - G5 - A5 - G5 - F#5 - E5
D5 - D5 - E5 - F#5 - G5 - A5 - B5 - A5
"Twinkle Twinkle Little Star":
D5 - D5 - A5 - A5 - B5 - B5 - A5
G5 - G5 - F#5 - F#5 - E5 - E5 - D5
4. Tin Whistle Fingering Tips for Beginners
- Cover holes completely with your fingertips - any air leak will affect the sound.
- Hold the tin whistle vertically with both hands, keeping your posture relaxed.
- Use steady, controlled breath - don't blow too hard or too soft.
- Start with the first octave (D5-C6) before exploring the second octave.
- Practice one note at a time, ensuring each note sounds clear before moving on.
- Use a mirror to check your finger position and hole coverage.
- Keep your fingers curved and close to the holes for quick transitions.
- Practice scales slowly with a metronome to develop consistent timing.
- Listen carefully to your intonation - use a tuner if available.
- For the second octave, use increased air pressure and slightly tighter embouchure.
- Learn half-hole techniques for playing C natural and other accidentals.
- Clean your tin whistle regularly, especially the mouthpiece and holes.
- Be patient - mastering hole coverage and breath control takes time.
- Experiment with different air pressures to find the sweet spot for each note.
- Listen to traditional Irish music to develop your sense of style and ornamentation.
Understanding Tin Whistle Fingerings
Tin Whistle Anatomy and Parts
Before learning fingerings, it's essential to understand the tin whistle's simple construction and how it produces its distinctive bright, clear sound.
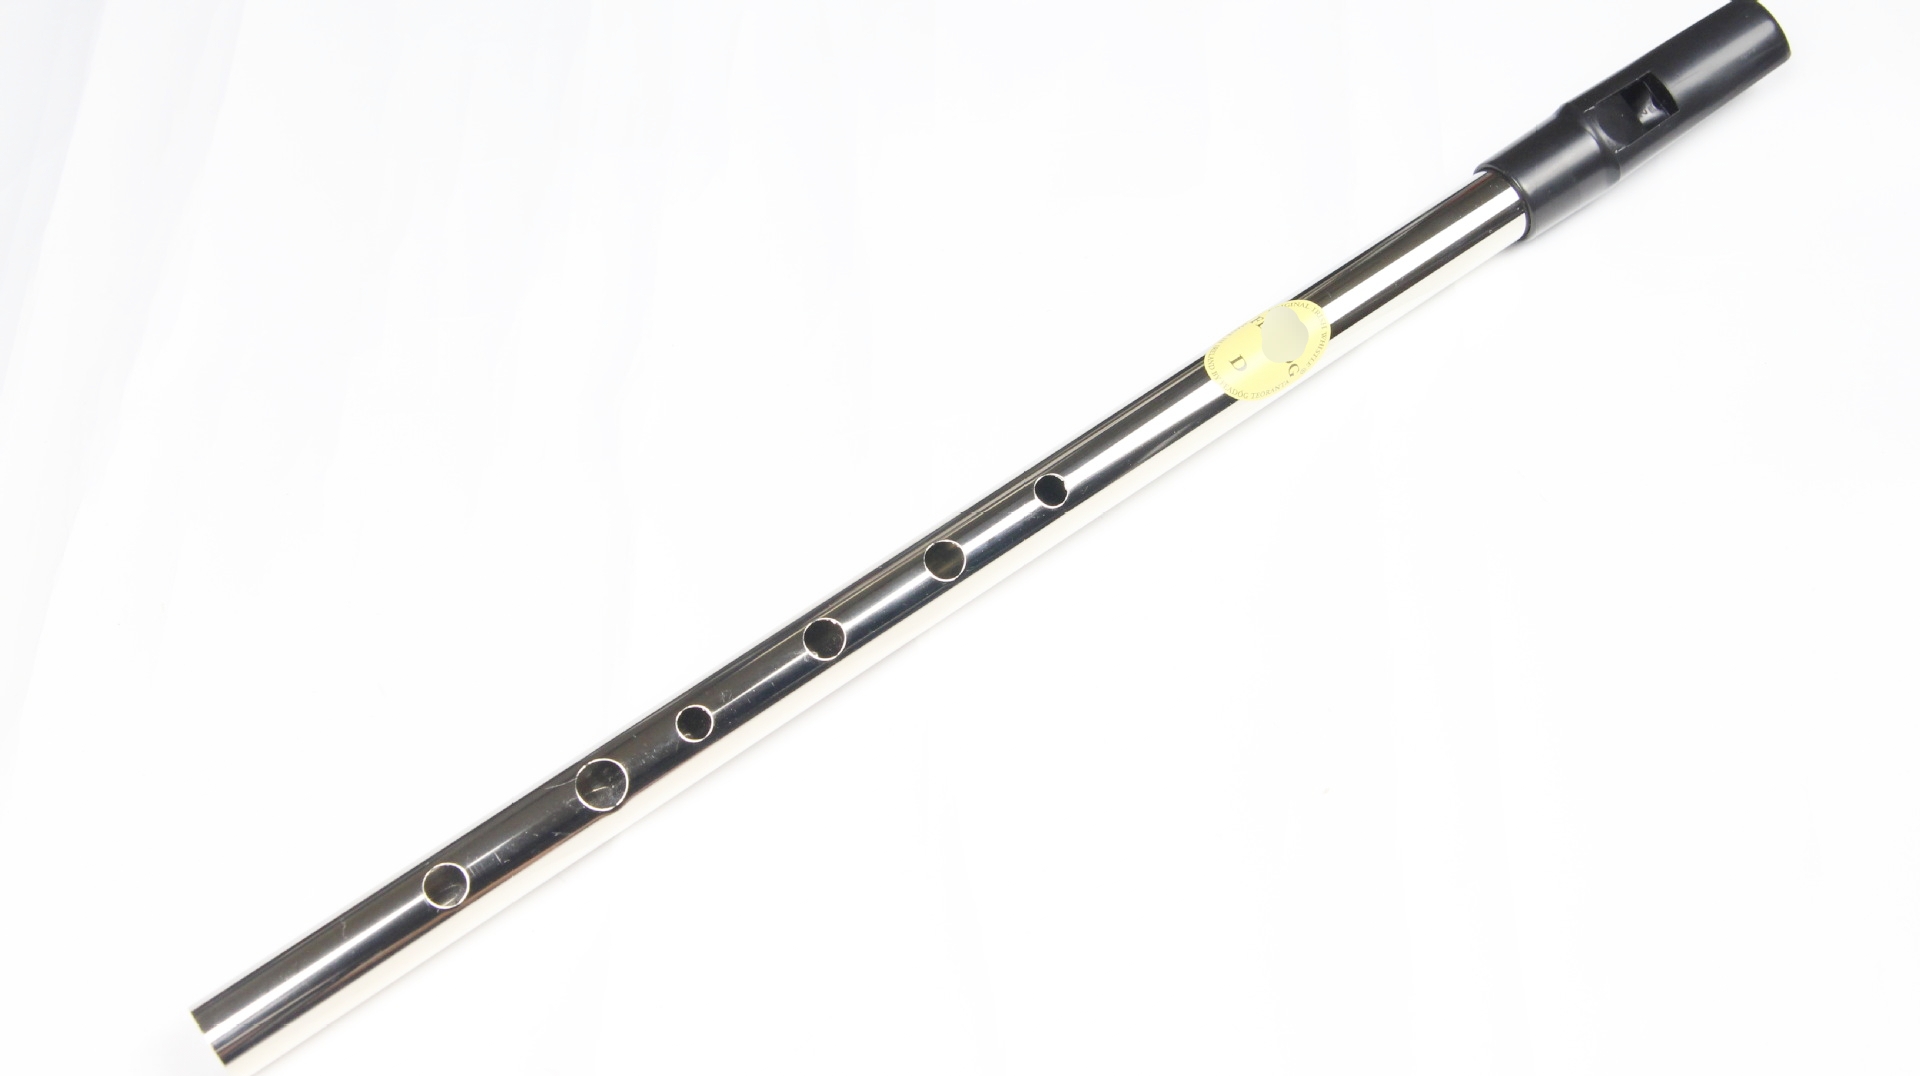
Key Components:
- Body: Cylindrical tube made of tin, brass, or plastic
- Mouthpiece: Small opening where you blow to create sound
- Finger holes: Six holes that are covered to change pitch
- Material: Traditionally made from tin-plated brass
- Length: Typically 12-14 inches long
- Bore: Cylindrical bore for bright, clear sound
How Finger Holes Change Tin Whistle Pitch
The tin whistle has six finger holes that change the effective length of the air column to alter pitch. When you cover holes, you make the instrument longer and lower the pitch. The tin whistle works on the same principle as other woodwind instruments but with a simpler design.
Hole Functions:
- Hole 1: Covered by left thumb
- Hole 2: Covered by left index finger
- Hole 3: Covered by left middle finger
- Hole 4: Covered by right index finger
- Hole 5: Covered by right middle finger
- Hole 6: Covered by right ring finger
Understanding Musical Notes
Musical notes are organized in a specific pattern. Understanding this pattern is crucial for reading music and learning fingerings.
Want a deeper primer? Read our Music Notes Guide for beginners.
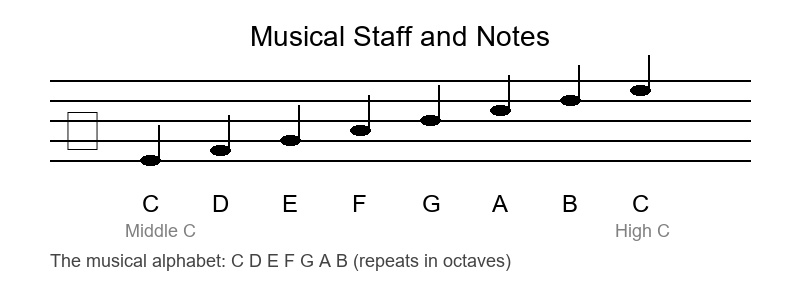
The Musical Alphabet:
Musical notes use the letters A, B, C, D, E, F, G, then repeat. In tin whistle music, the lowest note is typically D5.
- Natural Notes: C, D, E, F, G, A, B
- Sharp (♯): Raises a note by one half step (e.g., F♯)
- Flat (♭): Lowers a note by one half step (e.g., B♭)
Note: The tin whistle is typically pitched in D, meaning when you play "D", it sounds as D on piano.
Half Steps and Whole Steps
Understanding the distance between notes is essential for learning scales and fingering patterns.
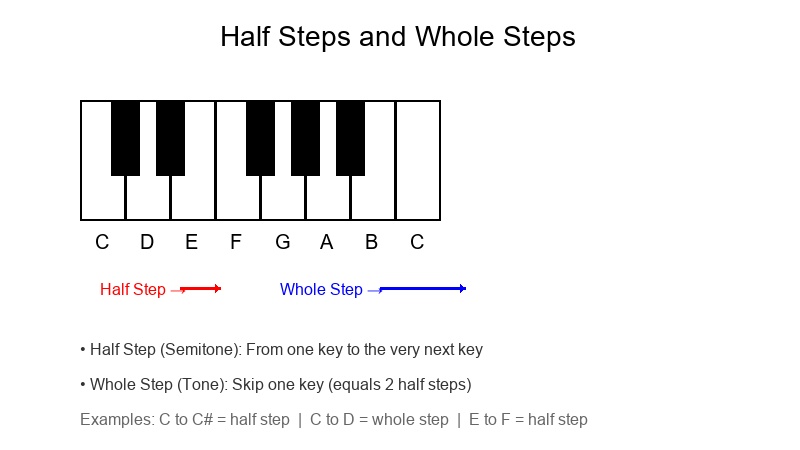
Half Step (Semitone):
The smallest distance between two notes. On a piano, it's from one key to the very next key (including black keys).
Examples:
- E to F
- B to C
- F to F♯
Whole Step (Tone):
Equal to two half steps. Skip one key on the piano.
Examples:
- D to E (2 half steps)
- G to A (2 half steps)
- A to B (2 half steps)
Tin Whistle Octaves and Pitch Ranges
An octave is the interval between one note and another with the same letter name but different pitch. The tin whistle typically covers about 2 octaves.
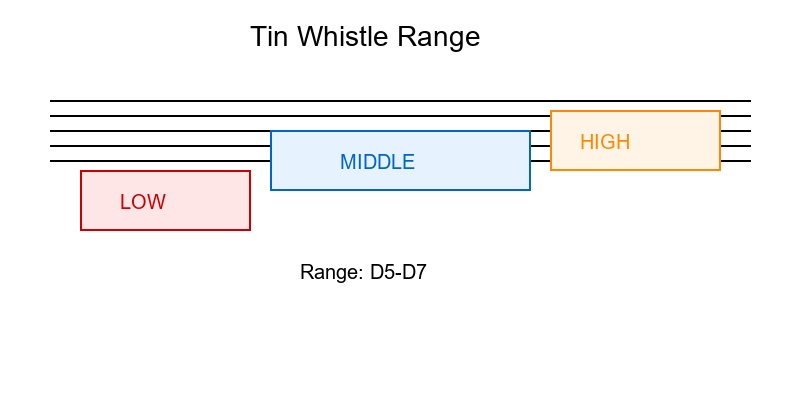
Tin Whistle Range:
- Low Register: D5 to G5 (fundamental notes)
- Middle Register: A5 to C6 (most comfortable for beginners)
- High Register: D6 to D7 (requires advanced technique)
Octave Example: D5 to D6 is one octave. Same fingering, different air pressure and embouchure.
Common Tin Whistle Fingering Combinations Chart
Here are the most frequently used tin whistle fingering combinations. The same fingering can produce different notes depending on your air pressure and embouchure.
| Note | Fingering | Hole Pattern | Description |
|---|---|---|---|
| D (D5) | ●●●●●● | All holes covered | Lowest note |
| E (E5) | ●●●●●○ | Hole 6 open | One whole step up from D |
| F♯ (F♯5) | ●●●●○○ | Holes 5,6 open | Major third from D |
| G (G5) | ●●●○○○ | Holes 4,5,6 open | Perfect fourth from D |
| A (A5) | ●●○○○○ | Holes 3,4,5,6 open | Perfect fifth from D |
| B (B5) | ●○○○○○ | Holes 2,3,4,5,6 open | Major sixth from D |
| C (C6) | ○○○○○○ | All holes open | Major seventh from D |
Tip: Notice how the fingering pattern follows a logical sequence - opening holes from bottom to top raises the pitch!
Harmonic Series on Tin Whistle
The tin whistle produces notes based on the harmonic series. With changes in lip tension and air flow, the same fingering can produce different harmonic levels.

The harmonic series for all holes covered (●●●●●●):
- 1st harmonic: D5 - fundamental, easy to produce
- 2nd harmonic: D6 - octave above D5
- 3rd harmonic: A6 - perfect fifth above D6
- 4th harmonic: D7 - octave above D6
- 5th harmonic: F♯7 - major third above D7
- 6th harmonic: A7 - perfect fifth above D7
Each fingering pattern has its own harmonic series, giving the tin whistle its full range of notes.
How to Hold the Tin Whistle Correctly
Left hand: covers holes 1, 2, 3 (top three holes) with thumb, index, and middle fingers. Right hand: covers holes 4, 5, 6 (bottom three holes) with index, middle, and ring fingers. Hold the tin whistle vertically, with the mouthpiece positioned at the center of your lips. Keep your posture straight and shoulders relaxed.

How to Learn to Play the Tin Whistle
- Start with basic notes: establish steady breath support and embouchure, focus on middle register (D5-G5).
- Practice fingerings: use the interactive chart above to click through fingerings while practicing sound production.
- Scale practice: work on D major and G major scales to reinforce fingerings and improve intonation.
- Keep fingering chart handy: reference during lessons and practice to avoid developing bad habits.
- Practice simple melodies: like "Danny Boy" and "The Irish Washerwoman" to improve musical flow.
- Expand range: gradually explore higher and lower notes while maintaining relaxation.
- Use interactive tools: utilize this page's interactive chart or other fingering simulators for practice.
Best Beginner Tin Whistle Brands and Models
High-value beginner options: Clarke Original, Generation, Waltons, Susato, Feadóg. Before purchasing, check build quality, hole alignment, intonation, and warranty. We recommend trying instruments in person with guidance from a teacher or professional.
Practice Tips and Common Mistakes
- Incorrect hole coverage: ensure holes are completely covered with fingertips, avoid air leaks.
- Too much or too little air pressure: aim for steady, controlled air stream, avoid forcing sound.
- Lack of practice structure: set weekly goals (scales, pieces, long tones) and track progress.