Trumpet Fingering Chart
Interactive fingering demonstration + beginner learning guide + free PDF download
Interactive Trumpet Fingering Chart
🎺 How to Use This Interactive Chart
Step 1: Choose Key Signature
Select your desired key signature from the dropdown menu. This will show you which notes are sharp or flat in that key.
Step 2: Click on a Note
Click any note button below to see the correct valve fingering. The trumpet diagram will highlight the valves you need to press.
Step 3: Learn the Fingering
Study the highlighted valves on the trumpet and read the fingering description. Practice until it becomes automatic!
Select a Note
Trumpet Fingering Chart Image (PRINTABLE)
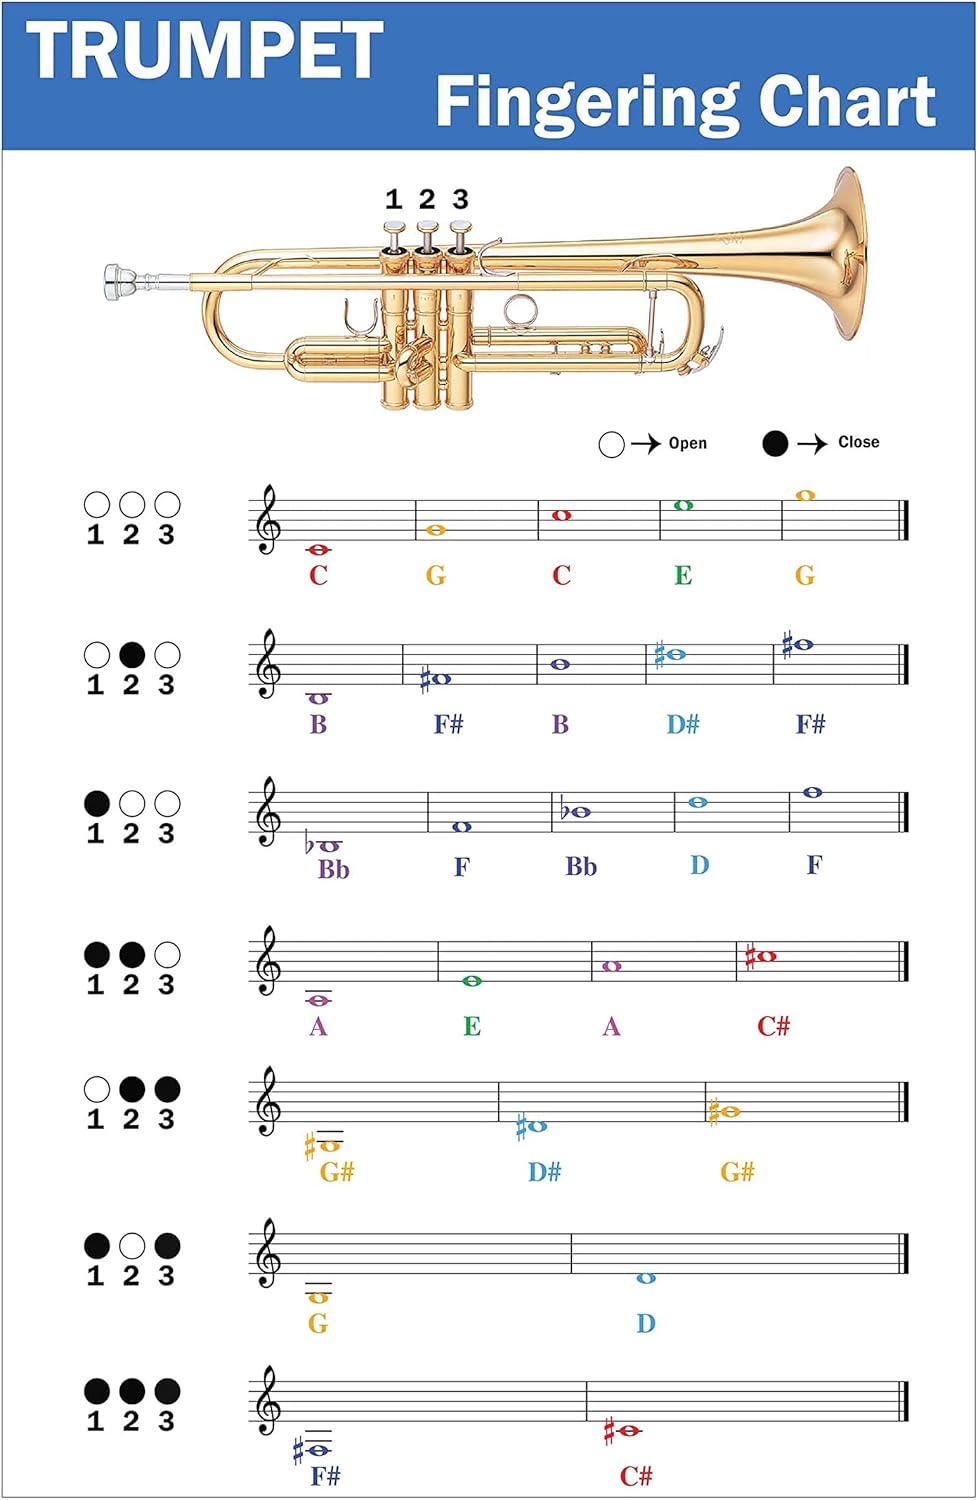
High-quality color PDF perfect for printing and carrying with you. Go to Download Page or open PDF directly: Open PDF
📚 Complete Trumpet Fingering Guide
For a comprehensive deep-dive into trumpet fingerings, valve combinations, and advanced techniques, check out our detailed guide:
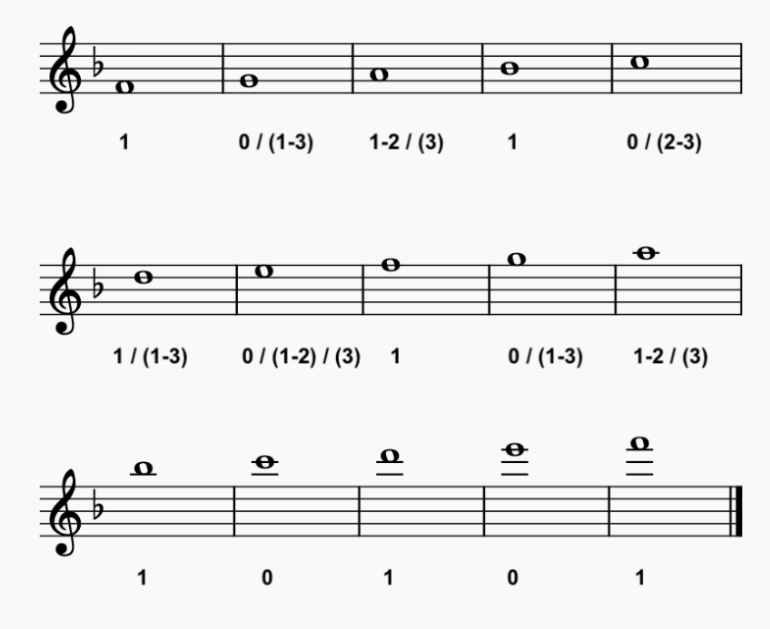
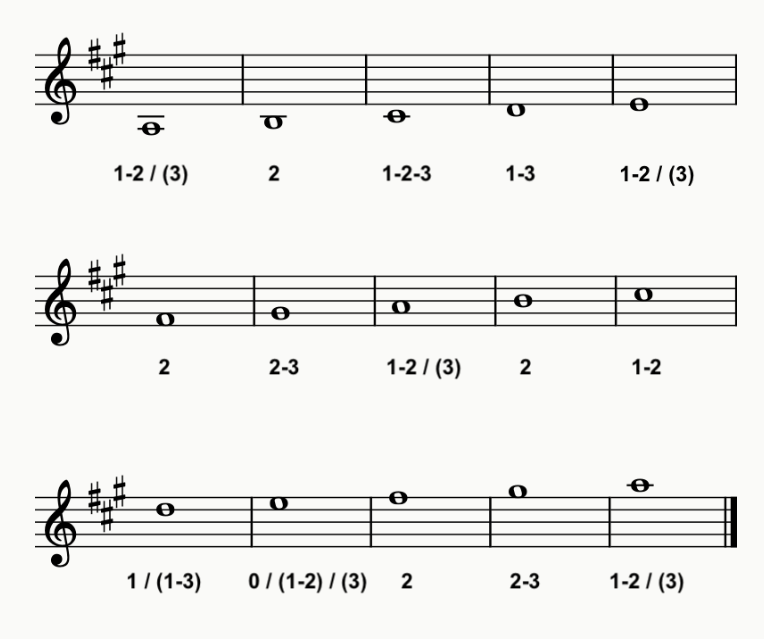
Ab Major Scale Trumpet Fingering Chart
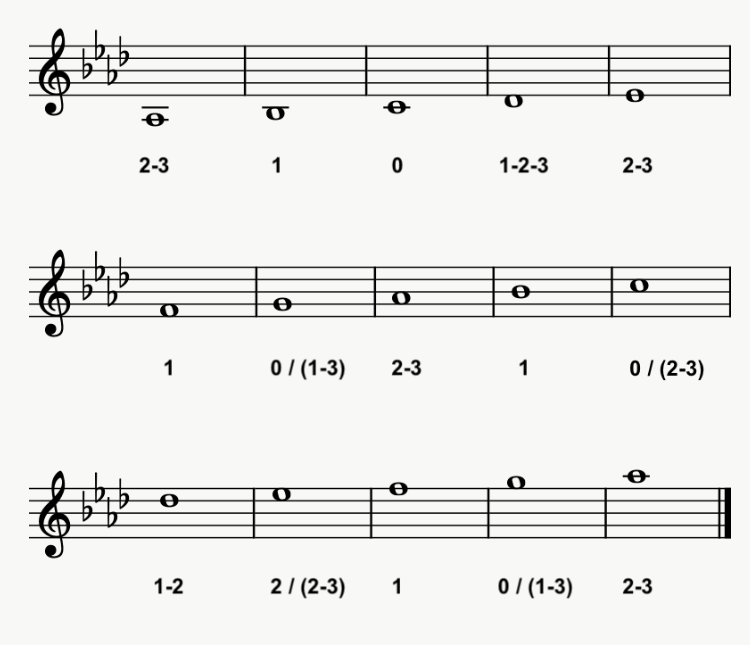
This is an Ab Major Scale fingering exercise sheet designed for trumpet, notated in treble clef with four flats in the key signature, which aligns perfectly with the pitch system of Ab Major. The sheet is divided into three lines, fully presenting the complete note sequence of the Ab Major Scale (Ab, Bb, C, Db, Eb, F, G, Ab). Beneath each note, the valve fingering numbers for trumpet are marked: 0 means no valves are pressed, 1 indicates pressing the first valve, 2-3 means pressing the second and third valves at the same time, and optional fingerings such as 0/(1-3) are also provided in some positions, allowing players to choose flexibly according to intonation or personal playing habits. This sheet helps trumpet players accurately master the corresponding relationship between fingerings and pitches for this scale.
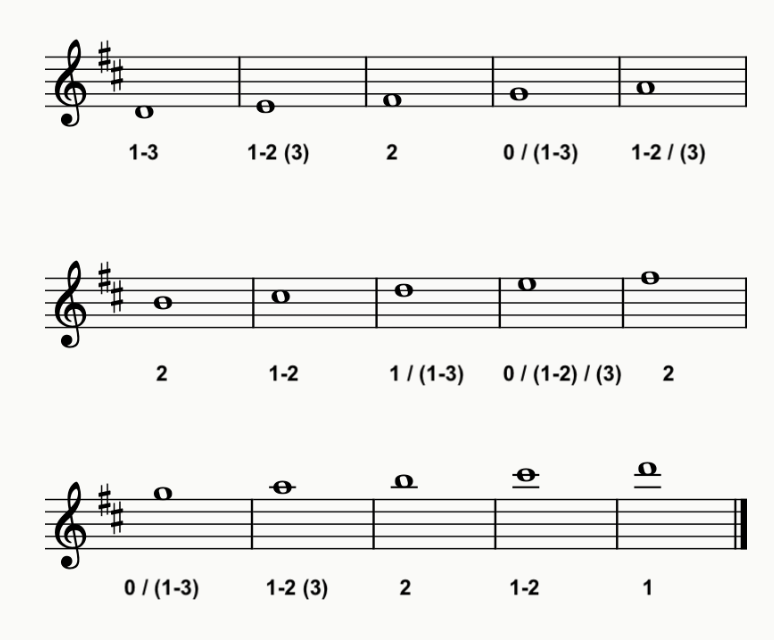
Eb Major Scale Trumpet Fingering Chart
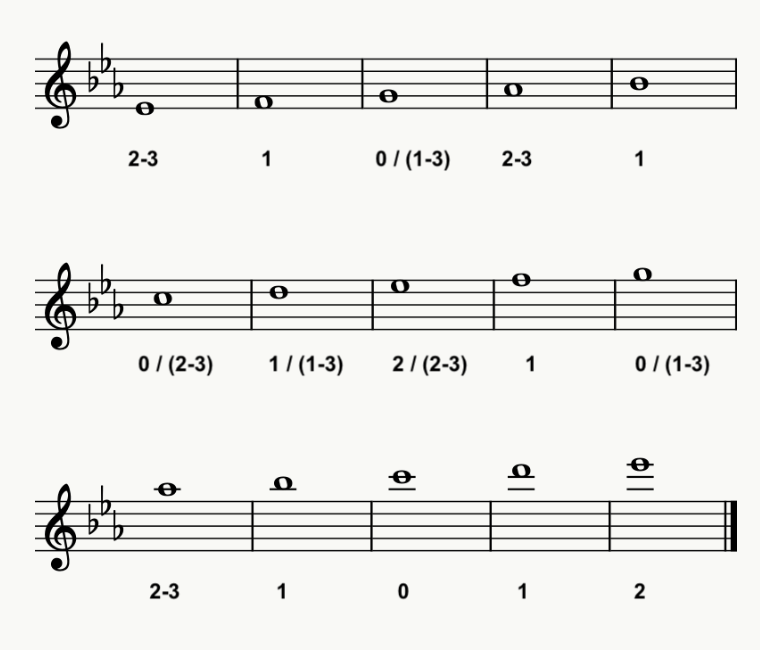
Bb Major Scale Trumpet Fingering Chart
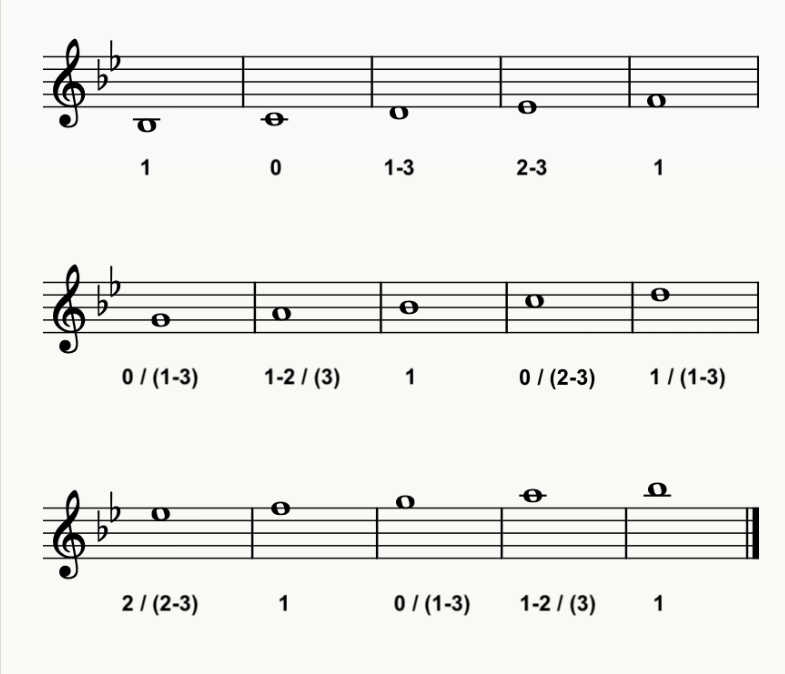
F Major Scale Trumpet Fingering Chart
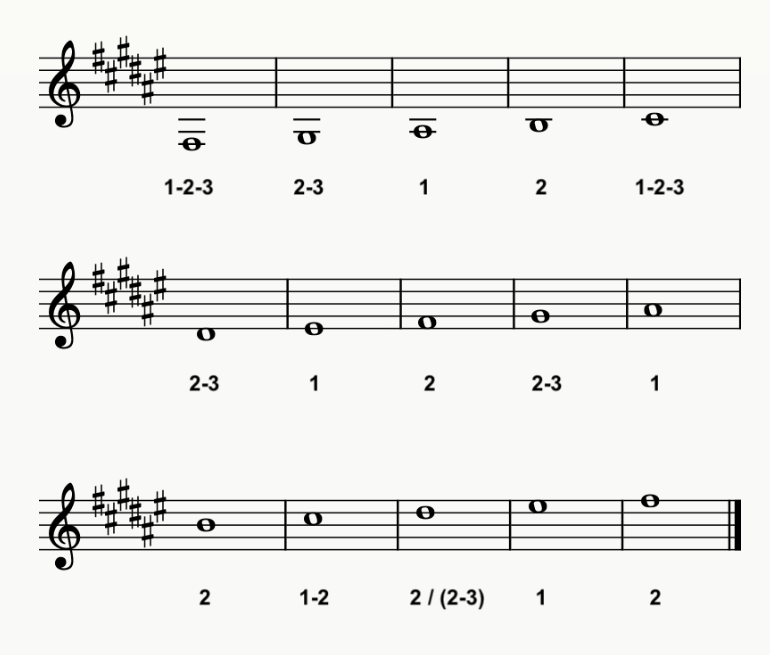
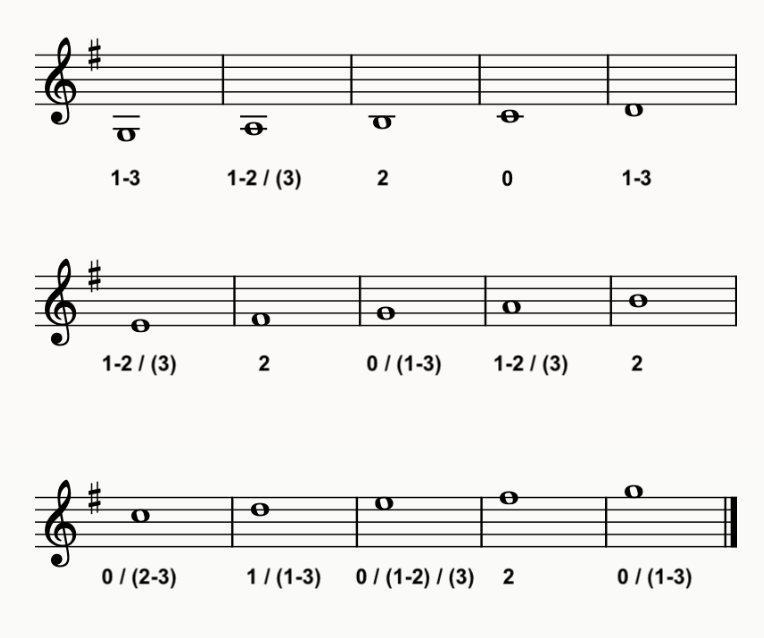
C# Major Scale Trumpet Fingering Chart

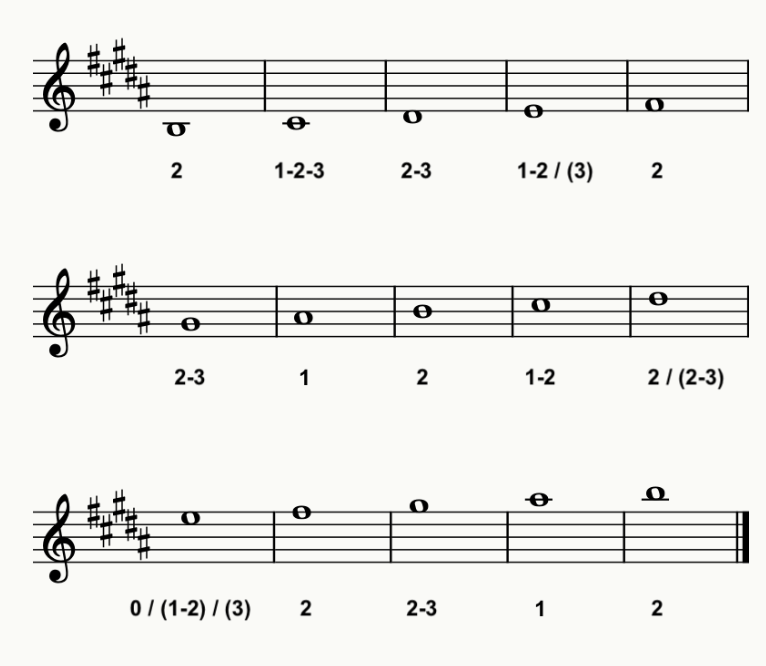
F# Major Scale Trumpet Fingering Chart
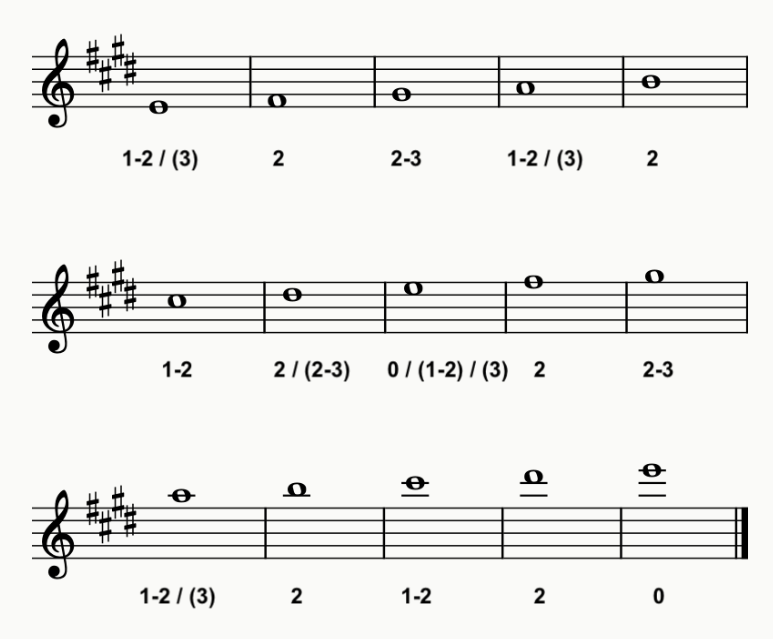
B Major Scale Trumpet Fingering Chart
E Major Scale Trumpet Fingering Chart
A Major Scale Trumpet Fingering Chart
D Major Scale Trumpet Fingering Chart
G Major Scale Trumpet Fingering Chart
C Major Scale Trumpet Fingering Chart

12 Major Scales Trumpet Fingering Chart

High-quality color PDF perfect for printing and carrying with you. Go to Download Page or open PDF directly: Open PDF
BEGINNER TRUMPET FINGERING CHART
(3-Valve Trumpet | Standard B♭ Trumpet)
1. Basic Valve Combinations & Note Chart
| Note | Fingering | Valve Combination | Octave (C4-C6) | Description |
|---|---|---|---|---|
| C | O | Open (no valves) | C4, G4, C5, C6 | Fundamental note - easiest to play |
| D | 1-3 | First + Third | D4, D5 | One whole step up from C |
| E | 1-2 | First + Second | E4, E5 | Major third from C |
| F | 1 | First valve only | F4, F5 | Perfect fourth from C |
| G | O | Open (no valves) | G4, G5 | Perfect fifth from C |
| A | 1-2 | First + Second | A4, A5 | Major sixth from C |
| B | 2 | Second valve only | B4, B5 | Major seventh from C |
| C♯/D♭ | 2-3 | Second + Third | C♯4, C♯5 | Half step above C |
| E♭ | 2-3 | Second + Third | E♭4, E♭5 | Minor third from C |
| F♯/G♭ | 2 | Second valve only | F♯4, F♯5 | Tritone from C |
Tip: O = Open (no valves pressed). Numbers indicate which valves to press: 1 = First valve, 2 = Second valve, 3 = Third valve. Press valves down quickly and evenly.
2. Essential Beginner Scales
(Practice these scales daily to build finger dexterity and muscle memory)
C Major Scale
C (O) → D (1-3) → E (1-2) → F (1) → G (O) → A (1-2) → B (2) → C (O)
(Start with C4, then practice C5 octave)
G Major Scale
G (O) → A (1-2) → B (2) → C (O) → D (1-3) → E (1-2) → F♯ (2) → G (O)
(One sharp: F♯)
F Major Scale
F (1) → G (O) → A (1-2) → B♭ (1) → C (O) → D (1-3) → E (1-2) → F (1)
(One flat: B♭)
B♭ Major Scale
B♭ (1) → C (O) → D (1-3) → E♭ (2-3) → F (1) → G (O) → A (1-2) → B♭ (1)
(Two flats: B♭, E♭)
D Major Scale
D (1-3) → E (1-2) → F♯ (2) → G (O) → A (1-2) → B (2) → C♯ (2-3) → D (1-3)
(Two sharps: F♯, C♯)
3. Simple Practice Melodies
(Great for beginners to practice fingerings and rhythm!)
"Hot Cross Buns" (Traditional):
E (1-2) → D (1-3) → C (O) → E (1-2) → D (1-3) → C (O) → C (O) C (O) C (O) C (O) → D (1-3) D (1-3) D (1-3) D (1-3) → E (1-2) → D (1-3) → C (O)
(Practice slowly, focusing on clean valve transitions)
"Mary Had a Little Lamb" (Traditional):
E (1-2) → D (1-3) → C (O) → D (1-3) → E (1-2) → E (1-2) → E (1-2) → D (1-3) → D (1-3) → D (1-3) → E (1-2) → G (O) → G (O) → E (1-2) → D (1-3) → C (O)
(Perfect for learning basic fingerings)
"Twinkle Twinkle Little Star" (Traditional):
C (O) → C (O) → G (O) → G (O) → A (1-2) → A (1-2) → G (O) → F (1) → F (1) → E (1-2) → E (1-2) → D (1-3) → D (1-3) → C (O)
(Practice with steady rhythm and clear notes)
4. Fingering Tips for Beginners
- Keep fingers curved and relaxed—press valves straight down, not at an angle.
- Press valves quickly and evenly—avoid "slamming" them down or pressing too slowly.
- Use the pads of your fingers (not fingertips) on the valve buttons for better control.
- Practice valve combinations slowly at first—focus on accuracy before speed!
- Keep your right-hand pinky on the pinky hook (don't press down—just rest it there).
- Practice scales daily to build muscle memory for common fingerings.
- Use a metronome to maintain steady rhythm while practicing fingerings.
- Remember: the same fingering can produce different notes depending on your embouchure (lip position).
Common Trumpet Fingering Combinations Chart
Here are the most frequently used trumpet fingering combinations. The same fingering can produce different notes depending on your embouchure (lip position and tension).
| Note | Fingering | Valve Combination | Description |
|---|---|---|---|
| C (C4) | O | Open (no valves) | Beginner starting note |
| D (D4) | 1-3 | First + Third | One whole step up from C |
| E (E4) | 1-2 | First + Second | Major third from C |
| F (F4) | 1 | First valve only | Perfect fourth from C |
| G (G4) | O | Open (no valves) | Same as C, higher octave |
| A (A4) | 1-2 | First + Second | Major sixth from C |
| B (B4) | 2 | Second valve only | Major seventh from C |
| C (C5) | O | Open (no valves) | One octave above C4 |
Tip: Notice how open fingering (O) can produce C4, G4, and C5 - the difference is in your embouchure and air support!