Recorder Fingering Chart
Master the recorder with our comprehensive fingering guide, interactive charts, and expert learning resources
Interactive Recorder Fingering Chart
🎵 How to Use This Interactive Chart
Step 1: Choose Key Signature
Select your desired key signature from the dropdown menu. This will show you which notes are sharp or flat in that key.
Step 2: Click on a Note
Click any note button below to see the correct fingering. The recorder diagram will highlight the holes you need to cover.
Step 3: Learn the Fingering
Study the highlighted holes on the recorder and read the fingering description. Practice until it becomes automatic!
Select a Note
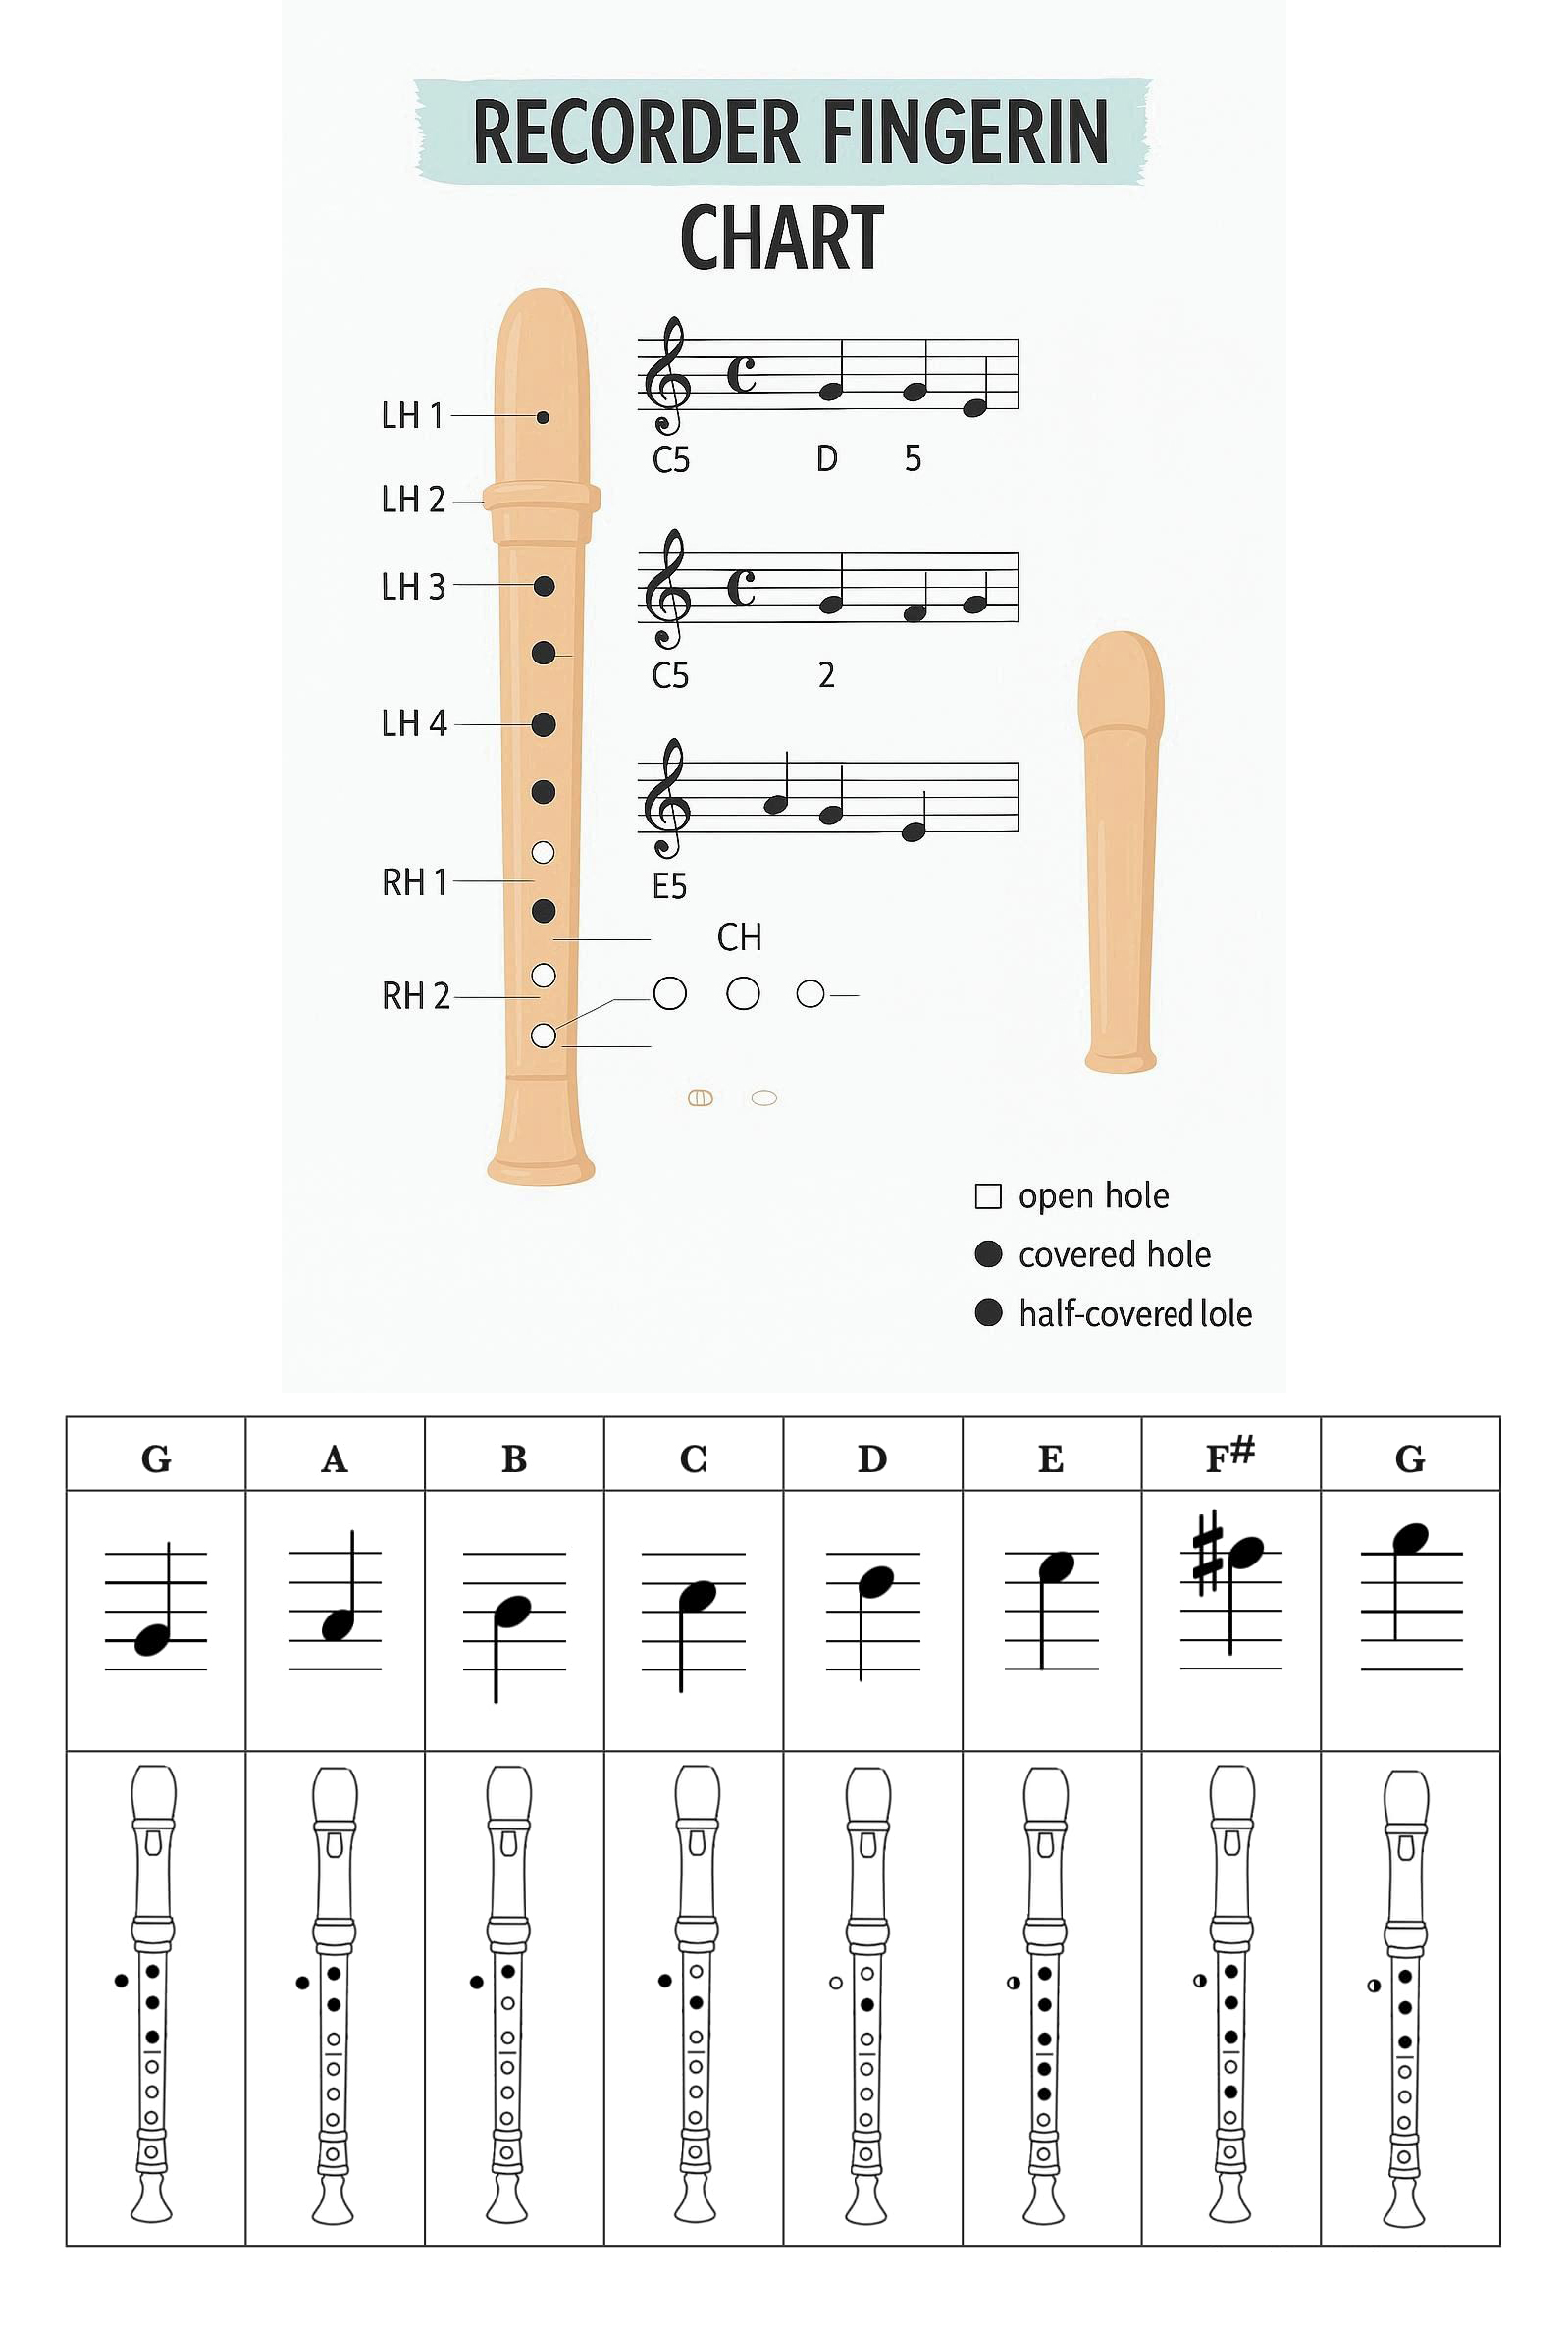
Recorder Fingering Chart Image (PRINTABLE)
Download our comprehensive recorder fingering chart for offline reference. For detailed fingering techniques, register breaks, and advanced patterns, explore our comprehensive Complete Recorder Fingering Guide.
BEGINNER RECORDER FINGERING CHART
(Soprano Recorder | Standard C Recorder)
1. Basic Fingering Combinations
| Note | Thumb | Left Hand | Right Hand | Description |
|---|---|---|---|---|
| C4 | ● | L1, L2, L3 | R1, R2, R3, R4 | All holes covered |
| D4 | ○ | L1, L2, L3 | R1, R2, R3, R4 | Thumb hole open |
| E4 | ○ | L2, L3 | R1, R2, R3, R4 | Thumb and L1 open |
| F4 | ○ | L3 | R1, R2, R3, R4 | Thumb, L1, L2 open |
| G4 | ○ | - | R1, R2, R3, R4 | Thumb and left hand open |
| A4 | ○ | - | R2, R3, R4 | Thumb, left hand, R1 open |
| B4 | ○ | - | R3, R4 | Thumb, left hand, R1, R2 open |
| C5 | ○ | - | R4 | Only R4 covered |
Legend: ● = Cover hole, ○ = Open hole. Tip: Ensure all holes are completely covered for clear sound.
2. Essential Beginner Scales
Practice these scales to develop finger dexterity and smooth transitions.
C Major Scale
C4 (all covered) - D4 (thumb open) - E4 (thumb, L1 open) - F4 (thumb, L1, L2 open) - G4 (thumb, left open) - A4 (thumb, left, R1 open) - B4 (thumb, left, R1, R2 open) - C5 (only R4 covered)
G Major Scale
G4 (thumb, left open) - A4 (thumb, left, R1 open) - B4 (thumb, left, R1, R2 open) - C5 (only R4 covered) - D5 (all open) - E5 (R4 covered, overblown) - F#5 (R3, R4 covered, overblown) - G5 (R2, R3, R4 covered, overblown)
F Major Scale
F4 (thumb, L1, L2 open) - G4 (thumb, left open) - A4 (thumb, left, R1 open) - Bb4 (thumb, L1, L2, L3, R1, R2, R3, R4) - C5 (only R4 covered) - D5 (all open) - E5 (R4 covered, overblown) - F5 (R3, R4 covered, overblown)
3. Simple Practice Melodies
(Great for applying new fingerings!)
"Hot Cross Buns":
B4 (thumb, left, R1, R2 open) - A4 (thumb, left, R1 open) - G4 (thumb, left open)
B4 (thumb, left, R1, R2 open) - A4 (thumb, left, R1 open) - G4 (thumb, left open)
G4 (thumb, left open) - G4 (thumb, left open) - G4 (thumb, left open) - G4 (thumb, left open)
A4 (thumb, left, R1 open) - A4 (thumb, left, R1 open) - A4 (thumb, left, R1 open) - A4 (thumb, left, R1 open)
B4 (thumb, left, R1, R2 open) - A4 (thumb, left, R1 open) - G4 (thumb, left open)
"Mary Had a Little Lamb":
E4 (thumb, L1 open) - D4 (thumb open) - C4 (all covered) - D4 (thumb open) - E4 (thumb, L1 open) - E4 (thumb, L1 open) - E4 (thumb, L1 open)
D4 (thumb open) - D4 (thumb open) - D4 (thumb open)
E4 (thumb, L1 open) - G4 (thumb, left open) - G4 (thumb, left open)
4. Recorder Fingering Tips for Beginners
- Cover finger holes completely - any gaps will cause airy or squeaky sounds.
- Use the pads of your fingers, not the tips, to cover holes for better seal.
- Keep fingers curved and relaxed - avoid pressing too hard.
- Left hand goes on top (thumb hole and L1, L2, L3), right hand on bottom (R1, R2, R3, R4).
- Practice each fingering slowly and separately before combining them.
- Use steady, gentle breath - recorder doesn't need much air pressure.
- Start with long tones on each note to develop good tone quality.
- Practice scales daily to build muscle memory for fingerings.
- Use a mirror to check your finger position and posture.
- Clean your recorder regularly, especially after each practice session.
- Master the thumb hole technique - it's essential for octave changes.
- Practice half-holing technique for sharps and flats (partially covering holes).
- Listen carefully to your tone and intonation - use a tuner if needed.
- Be patient - consistent daily practice yields the best results.
- Start with simple songs like "Hot Cross Buns" before moving to more complex pieces.
Understanding Recorder Fingerings
Recorder Anatomy and Parts
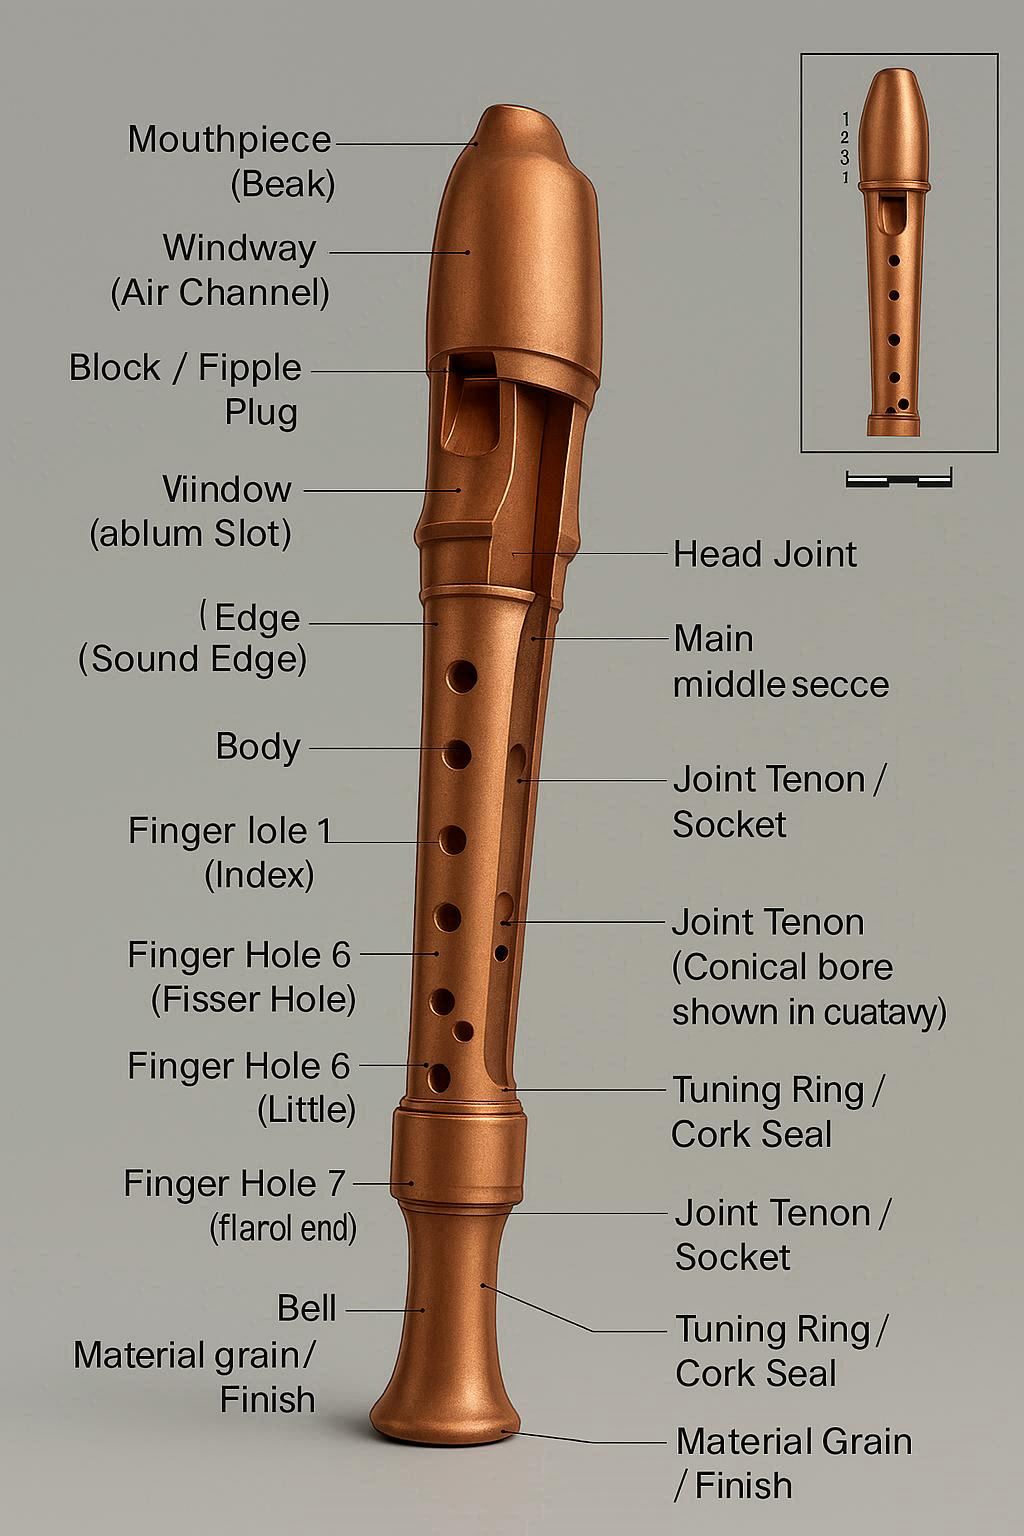
Key Components:
- Head Joint: Contains the mouthpiece and windway
- Body: Main section with finger holes
- Foot Joint: Bottom section (on larger recorders)
- Finger Holes: Seven holes for finger placement
- Thumb Hole: Single hole on the back for the left thumb
How Finger Holes Change Recorder Pitch
Understanding how finger holes change pitch is fundamental to recorder playing. The recorder's pitch is determined by the effective length of the air column inside the instrument.
🎼 New to the Recorder?
Just starting your recorder journey? Our comprehensive guide covers everything from breath control to fingering techniques:
Finger Hole Functions:
- Covering holes: Lowers the pitch by shortening the air column
- Opening holes: Raises the pitch by lengthening the air column
- Thumb hole: Controls octave changes and certain note variations
- Half-holing: Technique for playing sharps and flats
Understanding Musical Notes
Want a deeper primer? Read our Music Notes Guide for beginners.
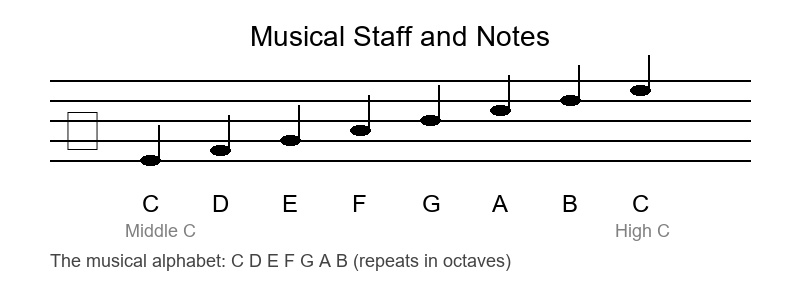
The Musical Alphabet:
- A, B, C, D, E, F, G: The seven letter names for notes
- Sharp (#): Raises a note by a half step
- Flat (b): Lowers a note by a half step
- Natural (♮): Cancels a sharp or flat
Half Steps and Whole Steps
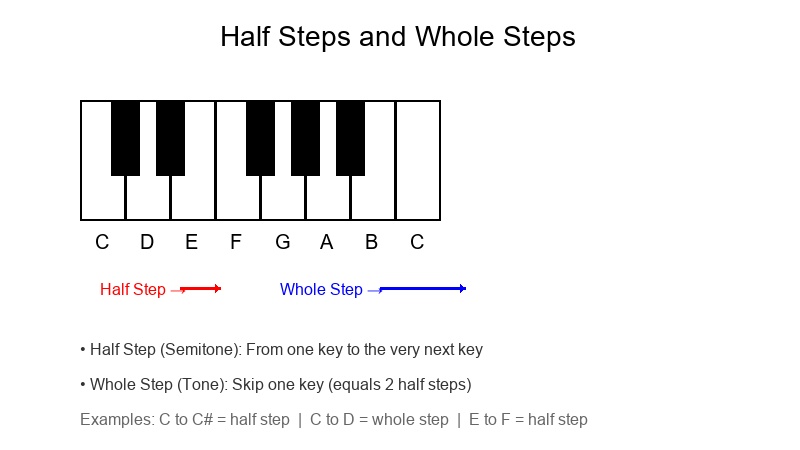
Half Step (Semitone):
Examples: C to C#, E to F, B to C
Whole Step (Tone):
Examples: C to D, E to F#, A to B
Recorder Range and Registers
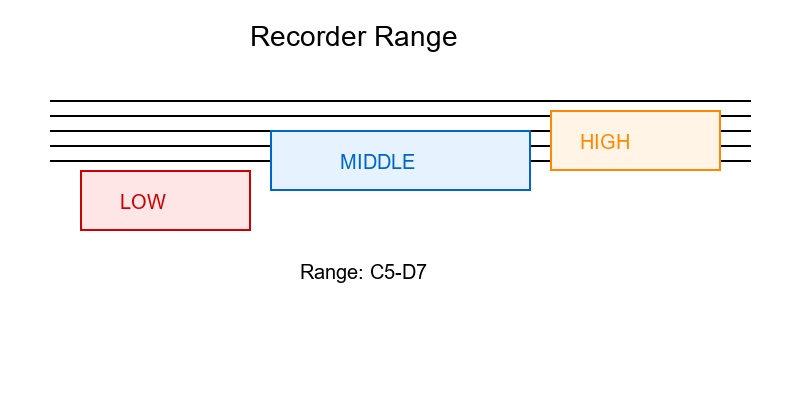
Recorder Range:
- Soprano Recorder: C5 to D7 (two octaves plus a ninth)
- Alto Recorder: F4 to G6 (two octaves plus a second)
- Tenor Recorder: C4 to D6 (two octaves plus a ninth)
- Bass Recorder: F3 to G5 (two octaves plus a second)
Common Recorder Fingering Combinations Chart
Legend: ● = Cover hole, ○ = Open hole
Harmonic Series on Recorder

Harmonic Levels:
- Fundamental: Basic note with all holes covered
- First Harmonic: Octave above fundamental
- Second Harmonic: Perfect fifth above first harmonic
- Third Harmonic: Perfect fourth above second harmonic
How to Hold the Recorder Correctly
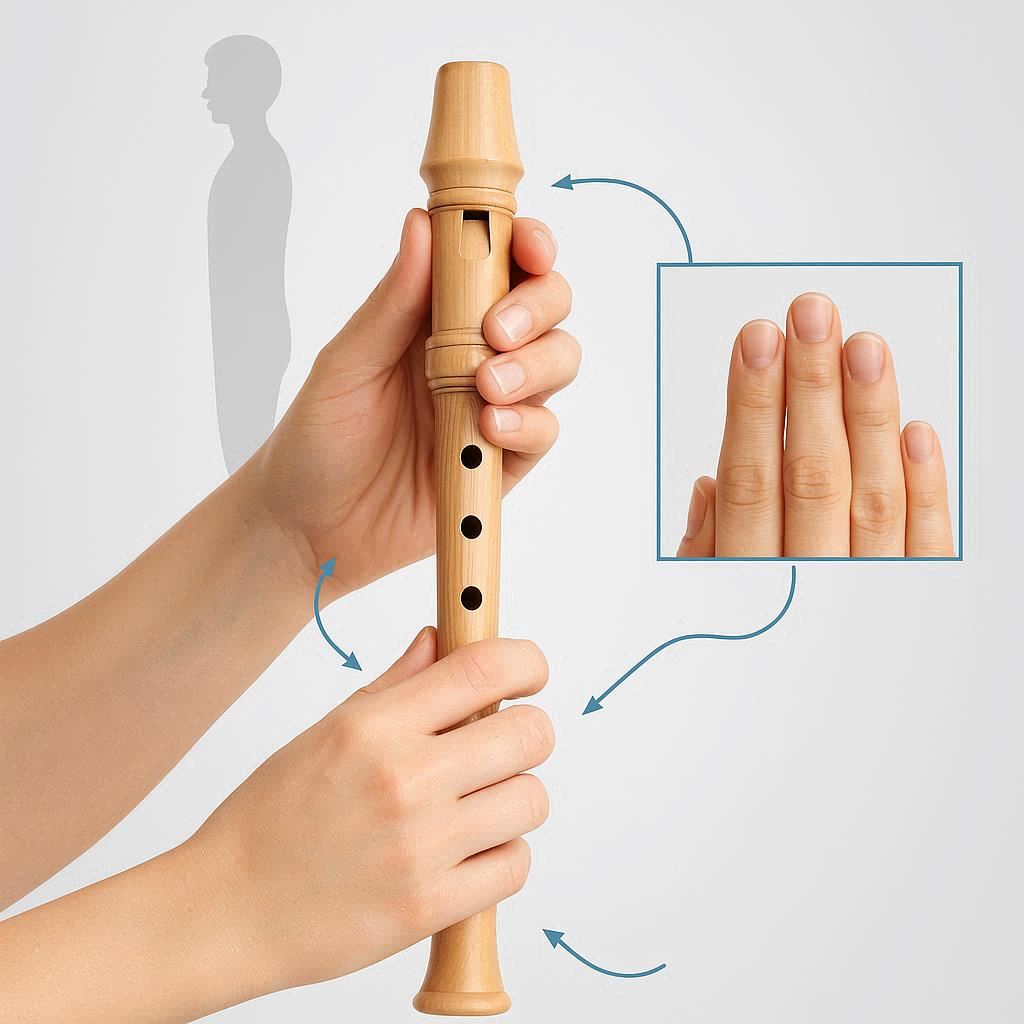
Proper recorder holding technique is fundamental to developing good tone, technique, and preventing fatigue. The recorder's simple design and lightweight construction make it accessible to beginners, but mastering the correct holding position requires specific knowledge and practice. For comprehensive guidance on proper hand position, posture, breath support, and advanced techniques, explore our detailed Complete Recorder Fingering Guide.
Key Points for Proper Holding:
- Left Hand: Thumb covers thumb hole, fingers cover L1, L2, L3
- Right Hand: Fingers cover R1, R2, R3, R4
- Posture: Sit or stand straight, recorder at 45-degree angle
- Breathing: Use diaphragm breathing for steady air flow
- Finger Position: Curved fingers, relaxed grip
How to Learn to Play the Recorder
- Start with Basic Notes: Begin with C, D, E, F, G
- Practice Fingerings: Master each fingering pattern
- Learn Simple Songs: Start with "Hot Cross Buns" and "Mary Had a Little Lamb"
- Develop Breath Control: Practice long tones and breath support
- Study Music Theory: Learn note reading and rhythm
- Join a Group: Play with others for motivation
Best Beginner Recorder Brands and Models
- Yamaha: YRS-23 (soprano), YRA-28B (alto) - Excellent quality and tone
- Aulos: 209B (soprano), 309B (alto) - Professional sound, German fingering
- Zen-on: Bressan (soprano) - Baroque-style, warm tone
- Mollenhauer: Dream (soprano) - Modern design, easy to play
- Woodi: Eco Recorder - Sustainable materials, good for beginners
Practice Tips and Common Mistakes
- Daily Practice: 15-30 minutes daily is better than long sessions
- Warm-up Routine: Start with long tones and scales
- Finger Independence: Practice each finger separately
- Breath Support: Use diaphragm, not chest breathing
- Common Mistakes: Avoid covering holes partially, maintain steady air flow
- Recording Practice: Record yourself to identify areas for improvement
Advanced Recorder Techniques
Once you've mastered basic fingerings, these advanced techniques will enhance your playing and musical expression.
Articulation Techniques
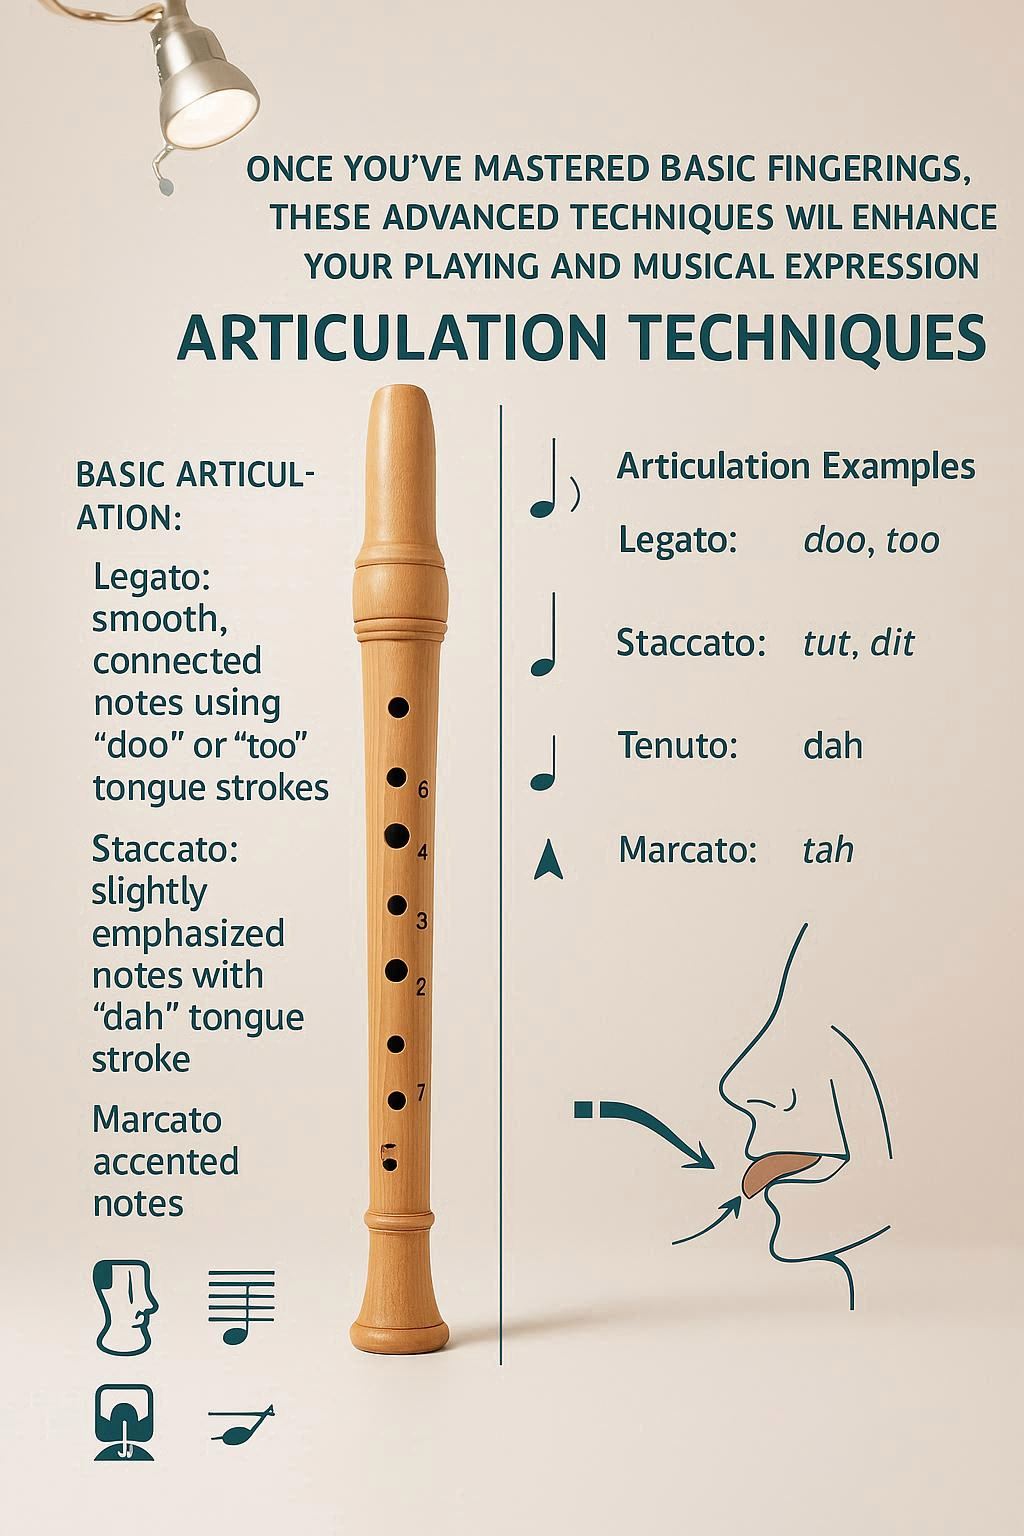
Basic Articulation:
- Legato: Smooth, connected notes using "doo" or "too" tongue strokes
- Staccato: Short, detached notes with "tut" or "dit" tongue strokes
- Tenuto: Slightly emphasized notes with "dah" tongue stroke
- Marcato: Accented notes with "tah" tongue stroke
Vibrato and Expression
Vibrato Techniques:
- Breath Vibrato: Subtle air pressure variations for warmth
- Diaphragm Vibrato: Controlled breathing for consistent vibrato
- Finger Vibrato: Slight finger movements for trill-like effects
- Dynamic Control: Varying air pressure for musical expression
Ornamentation and Embellishments
Register-Specific Techniques
Low Register (C4-B4):
- Breath Support: Steady, warm air stream for rich tone
- Finger Coverage: Complete hole coverage for clear notes
- Intonation: Listen carefully and adjust air pressure
- Dynamics: Control volume with breath, not embouchure
Middle Register (C5-B5):
- Thumb Hole Control: Half-open for clean octave breaks
- Air Speed: Slightly faster air for projection
- Finger Coordination: Smooth transitions between fingerings
- Expression: Most comfortable range for musical expression
High Register (C6 and above):
- Thumb Hole: Fully open for high notes
- Air Focus: Faster, more focused air stream
- Finger Pressure: Lighter touch for quick finger movements
- Intonation: Use tuner for accurate pitch control
Recorder Maintenance and Care
Proper maintenance ensures your recorder performs at its best and lasts for years.
Daily Care Routine
- Before Playing: Warm up the instrument in your hands
- During Playing: Avoid excessive moisture buildup
- After Playing: Clean thoroughly with a cleaning rod and cloth
- Storage: Store in a case with proper ventilation
Cleaning and Maintenance
Essential Cleaning Tools:
- Cleaning Rod: Flexible rod for internal cleaning
- Cleaning Cloth: Soft, absorbent cloth for moisture removal
- Cotton Swabs: For detailed cleaning of holes and joints
- Joint Grease: For smooth assembly and disassembly
Weekly Maintenance:
- Deep Cleaning: Disassemble and clean all parts
- Joint Care: Apply grease to joints for smooth operation
- Hole Inspection: Check for debris or damage
- Storage Check: Ensure case is clean and dry
Troubleshooting Common Issues
Sound Problems:
- Airy Sound: Check for moisture in windway or incomplete hole coverage
- Weak High Notes: Increase air speed and check thumb hole position
- Intonation Issues: Use tuner and adjust breath pressure
- Sticky Keys: Clean and lubricate moving parts
Physical Problems:
- Cracks: Professional repair needed immediately
- Loose Joints: Apply appropriate joint grease
- Blocked Holes: Clean with appropriate tools
- Warped Parts: Professional assessment required
Recorder Repertoire and Learning Path
Building a solid repertoire is essential for musical growth and motivation.
Beginner Repertoire
Essential First Pieces:
- "Hot Cross Buns" - Perfect for learning C, D, E
- "Mary Had a Little Lamb" - Introduces G and A
- "Twinkle, Twinkle, Little Star" - Full scale practice
- "Ode to Joy" - Classical melody with good technique
- "Amazing Grace" - Beautiful melody for expression
Intermediate Repertoire
Classical Pieces:
- Bach: "Minuet in G" and "Bourrée"
- Handel: "Largo" and "Sarabande"
- Telemann: "Sonata in F" movements
- Vivaldi: "Spring" from Four Seasons (arranged)
Advanced Repertoire
Professional Level:
- Bach: Complete Sonatas and Partitas
- Handel: Complete Sonatas
- Telemann: Complete Sonatas and Fantasias
- Modern Works: Contemporary compositions and arrangements
Performance Tips and Stage Presence
Effective performance skills enhance your musical communication and audience engagement.
Pre-Performance Preparation
- Warm-up Routine: 15-20 minutes of scales and long tones
- Mental Preparation: Visualization and positive thinking
- Equipment Check: Ensure recorder is clean and ready
- Breathing Exercises: Calm nerves and prepare breath support
Performance Techniques
Stage Presence:
- Posture: Stand tall with relaxed shoulders
- Eye Contact: Connect with audience when appropriate
- Facial Expression: Show musical emotion and engagement
- Movement: Subtle body language that enhances music
Musical Communication:
- Phrasing: Shape musical lines with breath and dynamics
- Articulation: Clear, consistent articulation throughout
- Dynamics: Use volume changes for musical expression
- Tempo: Maintain steady rhythm with appropriate rubato
Recorder Ensembles and Group Playing
Playing with others develops ensemble skills and musical understanding.
Ensemble Types
Recorder Consorts:
- Soprano-Alto-Tenor-Bass: Traditional SATB consort
- Mixed Sizes: Various recorder sizes for different ranges
- Large Ensembles: Multiple players per part
- Chamber Groups: Small, intimate ensemble playing
Ensemble Skills
Essential Skills:
- Listening: Awareness of other parts and overall sound
- Balance: Adjusting volume to blend with ensemble
- Intonation: Matching pitch with other players
- Rhythm: Maintaining steady tempo and coordination
Rehearsal Techniques
- Sectional Practice: Work on individual parts before full ensemble
- Slow Practice: Learn difficult passages at reduced tempo
- Counting Out Loud: Ensure rhythmic accuracy
- Recording Rehearsals: Listen back for improvement areas