Mastering recorder fingerings is the foundation of becoming a skilled recorder player. Whether you're a beginner learning your first notes or an advanced player seeking to perfect your technique, understanding the complete range of recorder fingerings will transform your playing. This comprehensive guide covers everything from basic hole combinations to advanced alternate fingerings and register techniques.
For interactive practice with detailed fingerings, use our Interactive Recorder Fingering Chart alongside this guide.
Essential Foundations for Recorder Playing
Before you can play beautiful melodies, you need to master four fundamental aspects of recorder playing: proper breath control, correct posture, accurate fingering techniques, and basic articulation.
1. Mastering Breath Control
Unlike other woodwind instruments, the recorder requires precise breath control for both tone quality and intonation. The key is to use a steady, gentle air stream that's neither too strong nor too weak.
Breathing Technique:
- Breathe from your diaphragm, allowing your abdomen to expand outward
- Keep your chest and shoulders relaxed and still
- Exhale with a consistent, gentle air stream, as if fogging a mirror
- Practice breathing exercises without the instrument to build capacity
Common Mistakes to Avoid:
- Blowing too hard, which creates a harsh, out-of-tune sound
- Blowing too softly, resulting in weak or airy notes
- Using chest breathing instead of diaphragmatic breathing
- Holding your breath instead of maintaining steady airflow
2. Developing Proper Posture
Good posture is essential for comfortable playing and proper breath support. The recorder should be held at a comfortable angle that allows natural hand positioning and easy access to all holes.
Posture Setup:
- Sit or stand with your back straight and shoulders relaxed
- Hold the recorder at a 45-degree angle from your body
- Keep your head level and look straight ahead, not down at the instrument
- Ensure your arms are comfortable and not raised too high
How to Hold a Recorder Correctly
Proper recorder holding technique is fundamental to developing good tone, technique, and preventing fatigue. The recorder's simple design and lightweight construction make it accessible to beginners, but mastering the correct holding position requires specific knowledge and practice. Correct recorder posture affects every aspect of your playing.
Why Proper Recorder Holding Matters
Correct recorder holding technique provides numerous benefits that directly impact your playing ability:
- Tone Quality: Proper positioning allows for optimal breath control and air flow
- Technique Development: Correct hand placement enables smooth finger movement and hole coverage
- Endurance: Proper posture prevents neck, shoulder, and arm strain during long practice sessions
- Intonation: Stable holding position supports consistent breath support and finger placement
- Musical Expression: Comfortable posture allows for relaxed, expressive playing
- Learning Efficiency: Good habits established early prevent the need for later correction
Basic Recorder Holding Position
The recorder should be held at a comfortable angle that allows natural hand positioning and easy access to all holes. The instrument's lightweight design means it requires minimal support, but proper positioning is crucial for good technique.
Step-by-Step Setup:
- Body Position: Sit or stand with your back straight and shoulders relaxed
- Instrument Angle: Hold the recorder at a 45-degree angle from your body
- Head Position: Keep your head level and look straight ahead, not down at the instrument
- Arm Position: Keep your arms comfortable and not raised too high
- Breath Support: Maintain good posture to support diaphragmatic breathing
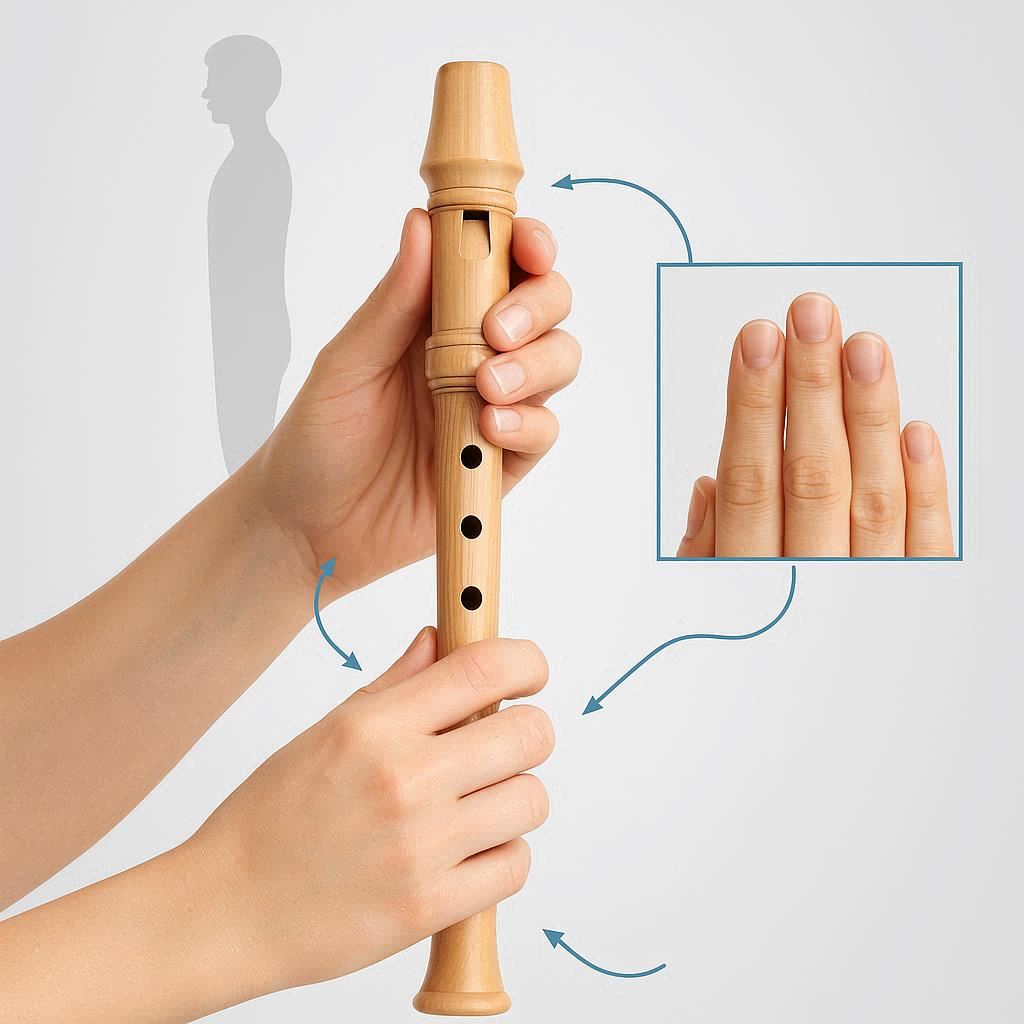
Left Hand Position
The left hand controls the upper register holes and the thumb hole. Proper positioning is crucial for smooth technique and easy hole access.
Left Hand Setup:
- Thumb Position: Place your left thumb on the thumb hole on the back of the recorder
- Finger Curvature: Keep fingers naturally curved and close to the holes
- Hole Coverage: Use the pads of your fingers, not the tips, for complete hole coverage
- Finger Assignment: L1 (index) covers the first hole, L2 (middle) covers the second hole, L3 (ring) covers the third hole
- Relaxation: Keep your hand relaxed and avoid tension in the wrist
Left Hand Common Mistakes:
- Using Fingertips: This creates air leaks and poor tone quality
- Flat Fingers: Makes it difficult to cover holes completely
- Too Much Pressure: Can cause fatigue and poor technique
- Incorrect Thumb Position: Thumb should be directly behind the instrument, not to the side
Right Hand Position
The right hand controls the lower register holes and provides additional support for the instrument. Proper positioning ensures smooth finger movement and stability.
Right Hand Setup:
- Finger Placement: Position fingers over the lower holes with natural curvature
- Hole Coverage: Use finger pads to completely cover holes
- Finger Assignment: R1 (index) covers the fourth hole, R2 (middle) covers the fifth hole, R3 (ring) covers the sixth hole, R4 (pinky) covers the seventh hole
- Wrist Alignment: Keep your wrist straight and avoid bending it excessively
- Support Function: The right hand helps support the recorder's weight
Right Hand Common Mistakes:
- Incomplete Hole Coverage: Results in airy, out-of-tune notes
- Bent Wrists: Can cause strain and poor technique
- Finger Spacing: Fingers should be positioned directly over their respective holes
- Excessive Tension: Can lead to fatigue and poor sound quality
Breath Support and Posture
Unlike other woodwind instruments, the recorder requires precise breath control for both tone quality and intonation. Good posture is essential for effective breath support.
Breathing Technique:
- Diaphragmatic Breathing: Breathe from your diaphragm, allowing your abdomen to expand
- Steady Air Stream: Maintain a consistent, gentle air flow
- Posture Support: Good posture allows for proper breath support
- Relaxed Shoulders: Keep shoulders down and relaxed
Common Breathing Mistakes:
- Chest Breathing: Shallow breathing that doesn't provide adequate support
- Holding Breath: Can cause tension and poor tone quality
- Inconsistent Air Flow: Results in unstable pitch and tone
- Over-blowing: Too much air pressure creates harsh, out-of-tune sounds
Common Holding Mistakes and Solutions
Many beginners develop poor holding habits that can limit their progress. Here are the most common issues and how to fix them:
Mistake: Incorrect Finger Placement
Problem: Using fingertips instead of finger pads, or not covering holes completely
Solution: Practice covering holes with the pads of your fingers, ensuring complete coverage. Use a mirror to check your finger placement.
Mistake: Poor Posture
Problem: Slouching, raising shoulders, or tilting head down to see the instrument
Solution: Practice holding the recorder while looking straight ahead. Use a mirror to check your posture regularly.
Mistake: Incorrect Instrument Angle
Problem: Holding the recorder too vertically or too horizontally
Solution: Maintain a 45-degree angle from your body. This allows for comfortable hand positioning and good breath support.
Mistake: Tension in Hands and Arms
Problem: Gripping the recorder too tightly or holding arms too high
Solution: Practice holding the recorder with relaxed hands and arms. The instrument should feel comfortable and natural.
Mistake: Inconsistent Thumb Position
Problem: Thumb not properly positioned on the thumb hole
Solution: Ensure your left thumb is directly behind the instrument, covering the thumb hole completely when needed.
Advanced Holding Techniques
Once you've mastered basic holding technique, these advanced concepts will improve your playing:
Dynamic Hand Movement
Learn to move your hands smoothly between different hole combinations without losing stability or changing your basic holding position.
Thumb Hole Control
Develop the ability to use the thumb hole effectively for register changes and certain note variations while maintaining proper hand position.
Half-Holing Technique
Practice the advanced technique of partially covering holes to play sharps and flats while maintaining good hand position.
Finger Independence
Develop the ability to move individual fingers independently while keeping other fingers in their correct positions.
Recorder-Specific Considerations
The recorder has unique characteristics that affect holding technique:
Hole-Based System
Unlike keyed instruments, the recorder requires precise finger placement over holes. This demands more attention to finger positioning and hole coverage.
Breath Control
The recorder requires precise breath control for intonation and tone quality. Good posture is essential for effective breath support.
Thumb Hole Technique
The thumb hole is crucial for register control and certain note variations. Proper thumb positioning is essential for good technique.
Lightweight Design
The recorder's lightweight design means it requires minimal support, but proper positioning is still crucial for good technique and comfort.
Practice Exercises for Proper Holding
These exercises will help you develop and maintain proper holding technique:
Basic Position Practice:
- Hold the recorder in playing position without playing for 5 minutes
- Practice moving your fingers over the holes without pressing them
- Work on smooth transitions between different hand positions
- Practice holding while standing and sitting to develop versatility
Finger Independence Exercises:
- Practice covering and uncovering individual holes one at a time
- Work on moving fingers in different combinations
- Practice thumb hole control separately from other fingers
- Develop smooth finger transitions between notes
Endurance Building:
- Gradually increase practice time while maintaining proper posture
- Take breaks every 20-30 minutes to prevent fatigue
- Focus on relaxation and efficient movement
- Monitor for tension and adjust your position as needed
Troubleshooting Common Holding Issues
If you're experiencing discomfort or technique problems, these solutions can help:
Hand and Finger Fatigue:
Check your finger positioning and ensure you're using the pads of your fingers, not the tips. Avoid excessive tension in your hands.
Neck and Shoulder Pain:
Ensure you're maintaining good posture and not raising your shoulders. Keep your head level and look straight ahead.
Difficulty Reaching Holes:
Check that your recorder is the right size for your hands. Ensure your hands are positioned correctly and your fingers are curved properly.
Poor Tone Quality:
Ensure all holes are completely covered with the pads of your fingers. Check your breath support and air flow.
Inconsistent Intonation:
Use a tuner regularly and ensure consistent finger placement. Check that all holes are covered completely.
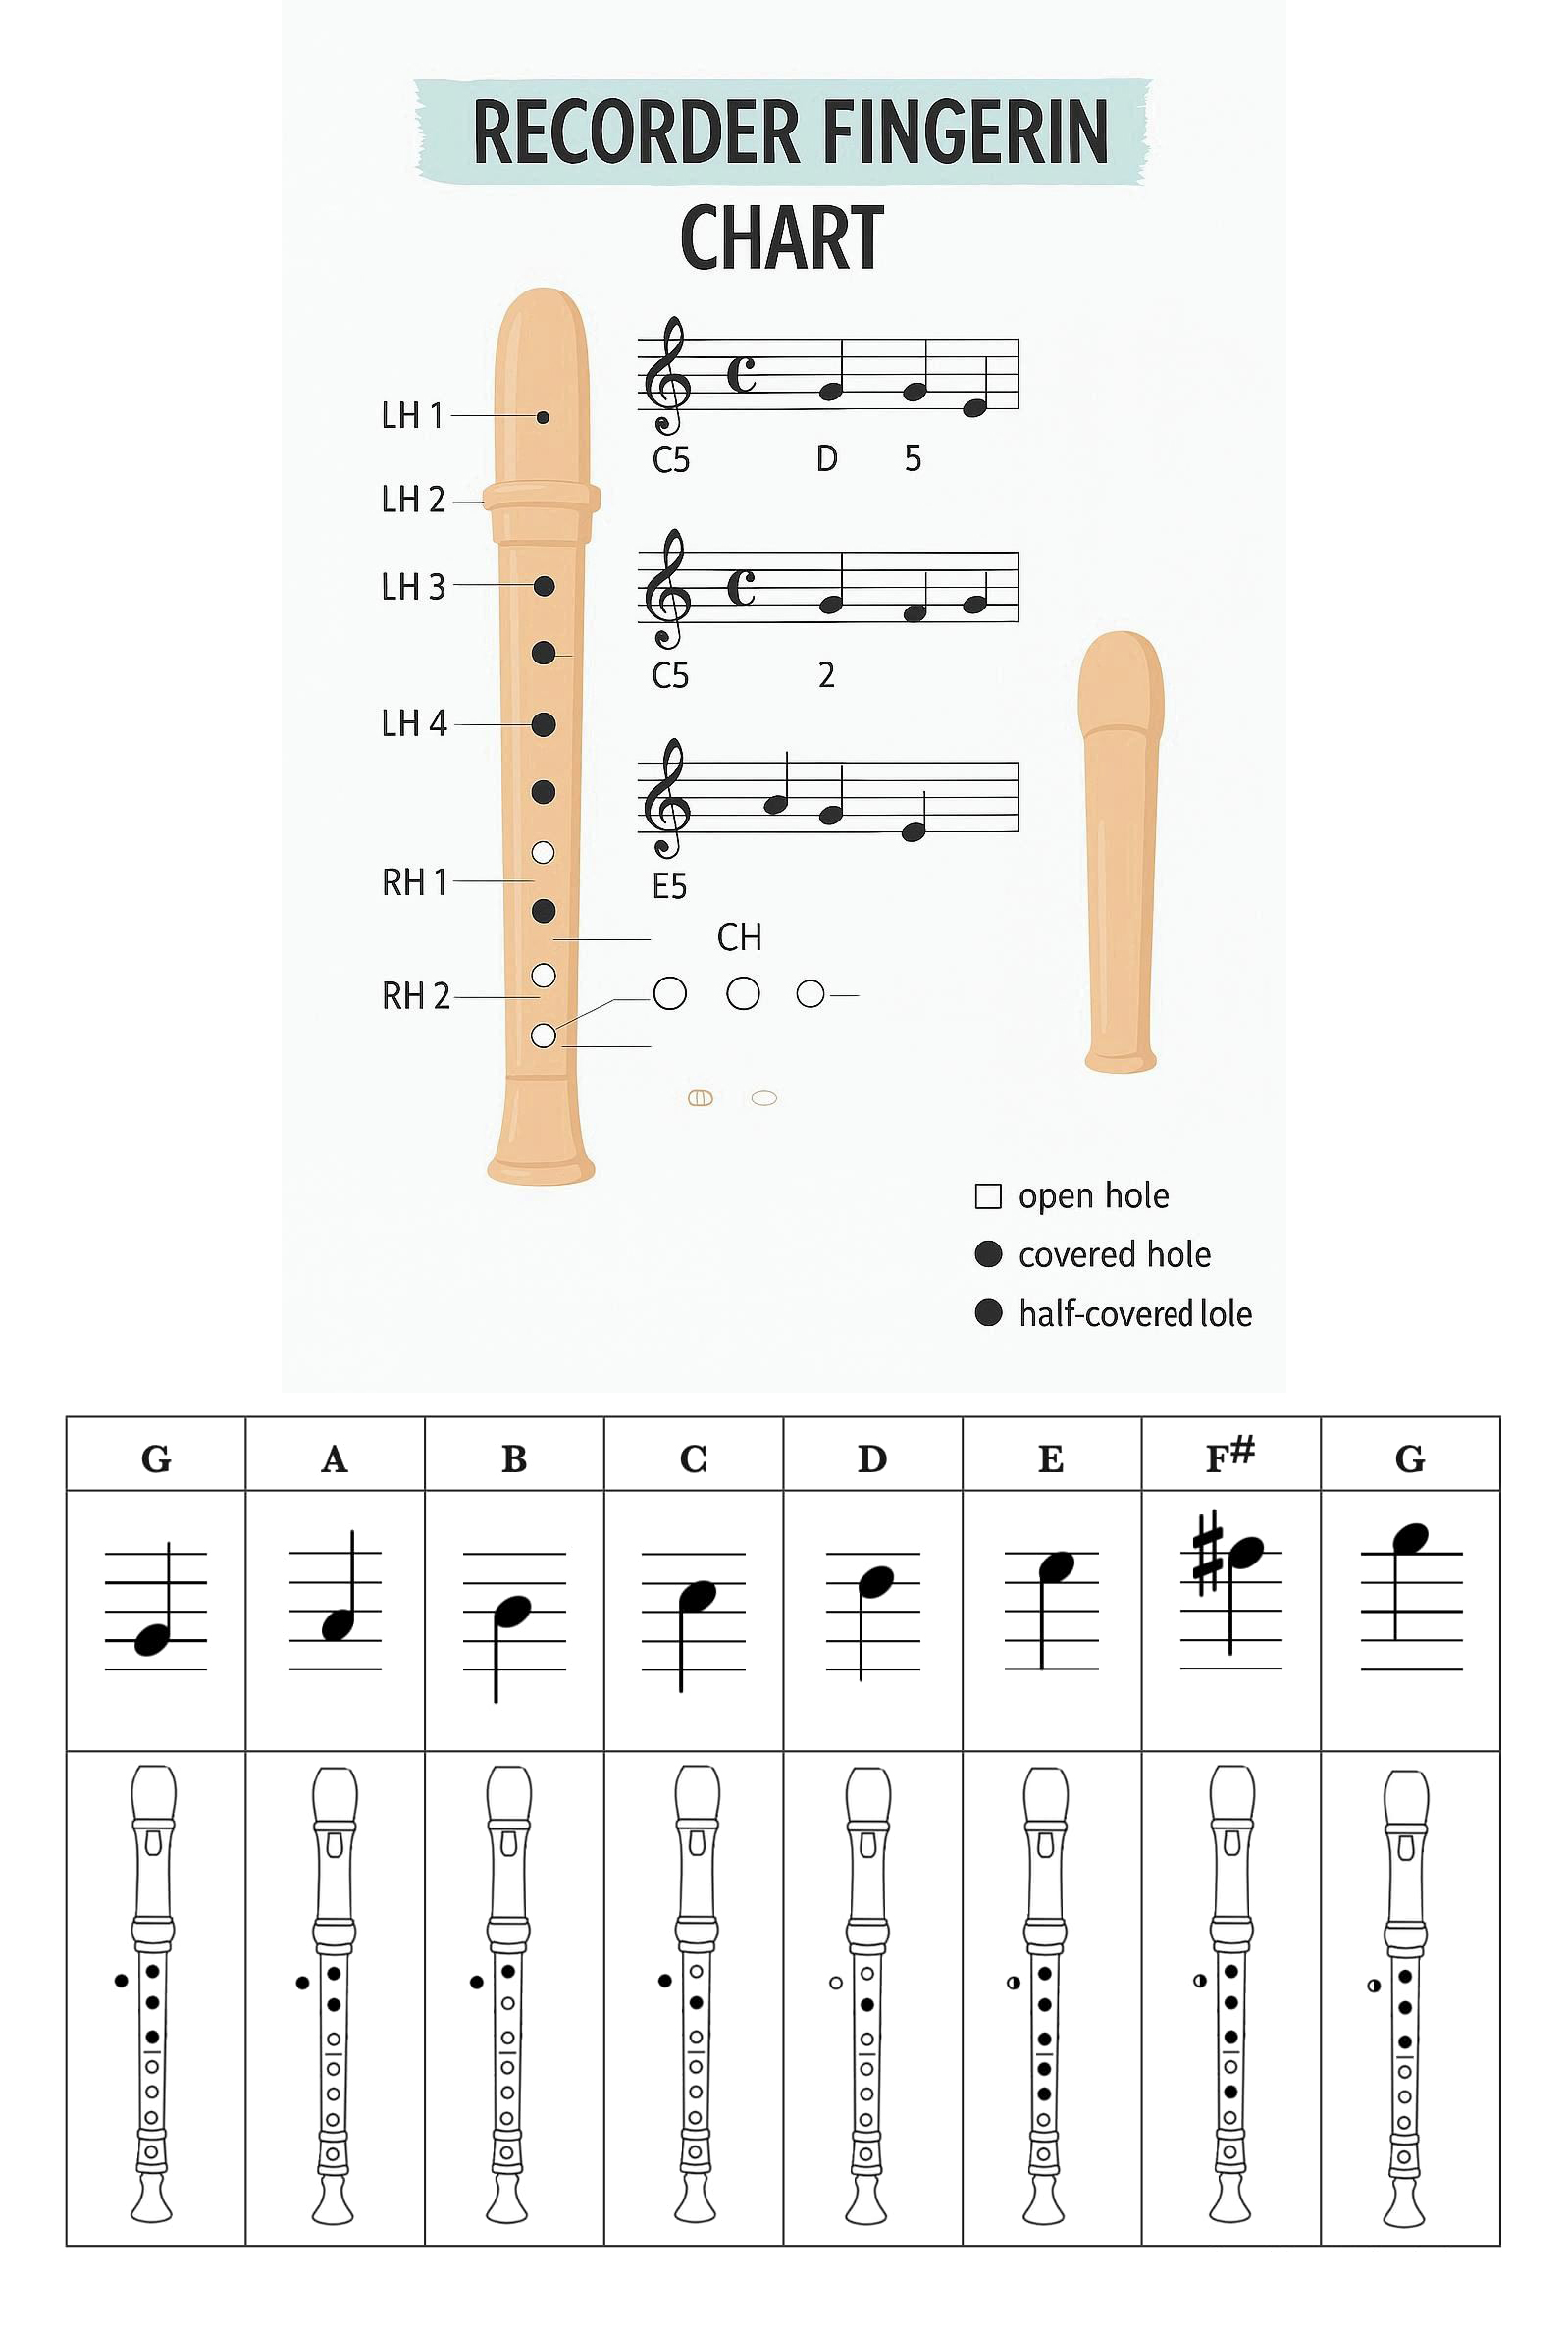
3. Understanding Basic Recorder Fingering
The recorder's fingering system is based on covering and uncovering holes to change the pitch. For a comprehensive guide to all finger positions, check out our Recorder Fingering Chart. Here's the basic fingering pattern:
Basic Fingering:
- Left Hand (LH) Holes: Control upper notes (B, A, G)
- Right Hand (RH) Holes: Control lower notes (F, E, D)
- Thumb Hole: Controls register changes and certain note variations
- Pinky Holes: Provide additional low notes and trill options
Recommended Starting Notes:
Begin with G (LH 1-2-3, RH 4-5-6, thumb hole closed) and work your way through the middle register. Practice each note for 4 beats, focusing on steady tone and proper breath support.
4. Basic Articulation Techniques
Articulation is how you start and stop notes. Mastering these techniques will make your playing clear and expressive:
- Long Tones: Sustained notes for breath control and tone quality
- Legato: Smooth, connected notes, achieved by seamless finger transitions
- Staccato: Short, detached notes, using a light "doo" or "too" tongue stroke
- Tonguing: Using the tip of your tongue to lightly touch the roof of your mouth to start notes cleanly
Understanding the Recorder
The recorder is a woodwind instrument with a simple yet elegant design. Its unique construction makes it perfect for beginners while offering rich musical possibilities for advanced players.
Recorder Anatomy
- Head Joint: Contains the mouthpiece and windway where you blow
- Body: Main section with most finger holes
- Foot Joint: Bottom section (on larger recorders) with additional holes
- Finger Holes: Seven holes for finger placement (six on front, one on back)
- Thumb Hole: Single hole on the back for the left thumb
- Windway: Channel that directs air across the labium to create sound
- Labium: Sharp edge that splits the air stream to produce sound
Daily Practice Routine for Beginners
Structure your practice sessions for maximum effectiveness and to build consistent habits:
5-Minute Warm-up
- Breathing Exercises (2 min): Focus on deep, diaphragmatic breaths. Inhale slowly for 4 counts, hold for 2, exhale slowly for 6 counts.
- Posture Check (3 min): Practice holding the recorder in playing position without playing. Focus on relaxed shoulders and comfortable hand position.
10-Minute Technique Practice
- Long Tones (5 min): Play sustained notes (e.g., G, A, B) from the middle register. Focus on a steady, clear tone and consistent breath support.
- Simple Scales (5 min): Practice the C major or G major scale slowly. Focus on even finger transitions and smooth articulation.
10-Minute Song Practice
- Choose a simple melody (e.g., "Hot Cross Buns," "Mary Had a Little Lamb").
- Focus on playing notes accurately and with a good tone, rather than speed.
- Break the song into small sections and master each before combining.
Important: Keep practice sessions to 20-30 minutes initially to avoid fatigue and maintain focus. Consistency is more important than duration.
Troubleshooting Common Beginner Problems
Problem: Squeaking or Squawking Sounds
Solution: This often indicates too much air pressure or incorrect finger placement. Reduce breath pressure and ensure all holes are completely covered with the pads of your fingers.
Problem: Weak or Airy Tone
Solution: Focus on a more directed and supported air stream from the diaphragm. Ensure your breath is steady and consistent, not too gentle.
Problem: Difficulty with High Notes
Solution: Ensure the thumb hole is functioning correctly. Increase air speed slightly but avoid blowing too hard. Practice overtones to develop better control over the upper partials.
Problem: Inconsistent Intonation
Solution: Use a tuner regularly. Adjust pitch with subtle breath pressure changes and ensure all holes are completely covered. Listen carefully to your sound.
Essential Equipment for Beginners
- Recorder: Start with a soprano recorder in C (Yamaha YRS-23 or similar quality instrument)
- Cleaning Kit: Cleaning rod, soft cloth, and cotton swabs for maintenance
- Music Stand: For proper posture and comfortable reading
- Tuner & Metronome: Crucial for developing good intonation and rhythm
- Method Book: A beginner recorder method book provides structured lessons
- Case: Protective case for storage and transport
Setting Realistic Expectations
- Week 1-2: Focus on producing a consistent, clear tone on a few basic notes (G, A, B).
- Week 3-4: Begin playing simple scales and short, familiar melodies.
- Month 2-3: Start exploring more notes, basic articulation, and longer musical phrases.
- Beyond: Progress is continuous. Celebrate small victories and enjoy the journey!
Remember, learning an instrument is a marathon, not a sprint. Consistent, focused practice, even in short bursts, is far more effective than infrequent long sessions.
Quick Improvement Tips
1. Recorder Care and Maintenance
Keep your recorder clean and well-maintained. Clean it after each use with a cleaning rod and cloth. Store it in a case to protect it from damage.
2. Listen and Emulate
Listen to professional recorder players across various musical styles. Try to emulate their tone, articulation, and phrasing. This develops your musical ear and stylistic understanding.
3. Record Yourself
Record your practice sessions. Listening back objectively helps identify areas for improvement in tone, rhythm, and intonation that you might miss while playing.
4. Practice with a Metronome
Use a metronome to develop steady rhythm and timing. Start slow and gradually increase tempo as you become more comfortable with the music.
Recorder Range and Registers
Understanding the recorder's range helps you choose appropriate music and develop technique across all registers:
Soprano Recorder Range
- Low Register: C5 to B5 (one octave)
- Middle Register: C6 to B6 (one octave)
- High Register: C7 to D7 (one octave plus a ninth)
- Total Range: Two octaves plus a ninth
Register Characteristics
- Low Register: Warm, mellow tone, requires gentle breath support
- Middle Register: Clear, bright tone, most comfortable for beginners
- High Register: Brilliant, penetrating tone, requires increased air speed
The Science Behind Recorder Fingerings
Recorder fingerings work on the principle of changing the instrument's effective tube length. Each hole combination opens or closes tone holes, effectively making the recorder longer or shorter and changing the pitch. Understanding this fundamental concept helps you memorize fingerings more effectively.
Hole Functions Explained
- Left Hand Holes: Control upper register notes (B, A, G)
- Right Hand Holes: Control lower register notes (F, E, D)
- Thumb Hole: Controls register breaks and octave changes
- Pinky Holes: Provide additional low notes and trill options
When holes are combined, their effects work together to create the full chromatic scale. For example, covering the B hole alone produces a B note, while combining it with other holes creates different pitches.
Complete Fingering Chart by Register
For an interactive experience with our detailed fingering charts, visit our Interactive Recorder Fingering Chart page.
Low Register (C4 to B4)
The low register requires covering most holes and using the thumb hole for register control. These notes form the foundation of recorder playing.
| Note | Fingering | Hole Combination | Description |
|---|---|---|---|
| C (C4) | All holes covered | All holes closed | Lowest note on soprano recorder |
| D (D4) | Bottom hole open | Right hand pinky hole | One whole step up from C |
| E (E4) | Bottom two holes open | Right hand pinky and ring finger | Major second from D |
| F (F4) | Bottom three holes open | Right hand bottom three | Perfect fourth from C |
| G (G4) | Bottom four holes open | Right hand all holes | Perfect fifth from C |
| A (A4) | Bottom five holes open | Right hand + left pinky | Major sixth from C |
| B (B4) | Bottom six holes open | Right hand + left pinky and ring | Major seventh from C |
Middle Register (C5 to B5)
The middle register uses the thumb hole to create the octave jump. This register is the most comfortable for beginners and forms the core of most recorder music.
| Note | Fingering | Thumb Hole | Description |
|---|---|---|---|
| C (C5) | All holes covered | Half open | One octave above low C |
| D (D5) | Bottom hole open | Half open | One whole step up from C5 |
| E (E5) | Bottom two holes open | Half open | Major second from D5 |
| F (F5) | Bottom three holes open | Half open | Perfect fourth from C5 |
| G (G5) | Bottom four holes open | Half open | Perfect fifth from C5 |
| A (A5) | Bottom five holes open | Half open | Major sixth from C5 |
| B (B5) | Bottom six holes open | Half open | Major seventh from C5 |
High Register (C6 to C7)
The high register requires precise thumb hole control and often uses alternate fingerings for better intonation and response.
| Note | Primary Fingering | Thumb Hole | Description |
|---|---|---|---|
| C (C6) | All holes covered | Fully open | Two octaves above low C |
| D (D6) | Bottom hole open | Fully open | One whole step up from C6 |
| E (E6) | Bottom two holes open | Fully open | Major second from D6 |
| F (F6) | Bottom three holes open | Fully open | Perfect fourth from C6 |
| G (G6) | Bottom four holes open | Fully open | Perfect fifth from C6 |
| A (A6) | Bottom five holes open | Fully open | Major sixth from C6 |
| B (B6) | Bottom six holes open | Fully open | Major seventh from C6 |
| C (C7) | All holes covered | Fully open | Three octaves above low C |
Advanced Fingering Techniques
Once you've mastered basic fingerings, these advanced techniques will enhance your playing:
Alternate Fingerings
Alternate fingerings can improve intonation, facilitate difficult passages, or create different tone colors:
- F# (F#5): Use left hand ring finger + right hand pinky for better intonation
- G# (G#5): Half-hole the G hole for smoother transitions
- High C (C6): Use thumb hole + left hand index finger for stability
- High D (D6): Alternate with thumb hole + right hand pinky for trills
Trill Fingerings
Special fingerings designed for smooth, fast trills between adjacent notes:
- C-D Trill: Use thumb hole + left hand index finger
- D-E Trill: Alternate between right hand pinky and ring finger
- F-G Trill: Use half-hole technique on the F hole
- G-A Trill: Alternate between right hand index and left hand pinky
Register Breaks
Understanding register breaks helps you navigate octave changes smoothly:
- Low to Middle: Open thumb hole halfway for clean octave jumps
- Middle to High: Open thumb hole fully and adjust air speed
- Breath Support: Increase air speed for higher registers
- Embouchure: Slightly tighten lips for high notes
Common Fingering Mistakes and Solutions
Even experienced players can develop bad habits. Here's how to identify and fix common issues:
Mistake: Incomplete Hole Coverage
Problem: Not fully covering holes, resulting in airy or out-of-tune notes
Solution: Practice covering holes completely with the pads of your fingers, not the tips
Mistake: Incorrect Thumb Hole Usage
Problem: Using thumb hole inconsistently or incorrectly for register changes
Solution: Practice thumb hole exercises and understand its role in register control
Mistake: Poor Finger Coordination
Problem: Fingers moving at different speeds or not coordinating properly
Solution: Practice slow, deliberate finger movements and gradually increase speed
Mistake: Neglecting Alternate Fingerings
Problem: Always using the same fingering, even when alternatives would be better
Solution: Learn and practice alternate fingerings for common notes and passages
Practice Strategies for Mastery
Effective practice is key to mastering recorder fingerings. Here are proven strategies:
Daily Fingering Practice
- Scale Practice: Play major and minor scales in all keys
- Arpeggio Studies: Practice chord arpeggios for finger independence
- Interval Training: Practice large leaps and interval jumps
- Trill Exercises: Work on trills between all adjacent notes
Technical Exercises
- Hole Coverage Drills: Practice covering and uncovering holes slowly
- Register Break Practice: Work on smooth octave transitions
- Alternate Fingering Studies: Learn multiple fingerings for each note
- Speed Building: Gradually increase tempo while maintaining accuracy
Recorder-Specific Considerations
The recorder has unique characteristics that affect fingering technique:
Breath Control
Unlike other woodwinds, the recorder requires precise breath control for intonation and tone quality. Practice breathing exercises and learn to control air speed for different registers.
Thumb Hole Technique
The thumb hole is crucial for register control. Practice opening it halfway for middle register and fully for high register notes.
Hole Size and Coverage
Recorder holes vary in size, requiring different finger techniques. Larger holes need more finger coverage, while smaller holes require precise placement.
Equipment and Maintenance
Proper equipment and maintenance are essential for good fingering technique:
Recorder Selection
- Quality Instruments: Invest in a good-quality recorder for consistent response
- Proper Size: Choose the right size for your hand span and playing level
- Hole Alignment: Ensure holes are properly aligned and sized
- Thumb Hole Position: Check that the thumb hole is positioned correctly
Maintenance Tips
- Regular Cleaning: Clean your recorder after each use
- Proper Storage: Store in a case to protect from damage
- Hole Care: Keep holes clean and free from debris
- Professional Service: Have your recorder serviced regularly
Conclusion
Mastering recorder fingerings is a journey that requires patience, consistent practice, and a systematic approach. Whether you're a complete beginner learning your first notes or an advanced player seeking to perfect your technique, this comprehensive guide provides everything you need to develop the finger dexterity and muscle memory needed for recorder playing.
By understanding the science behind fingerings, practicing systematically, and avoiding common mistakes, you'll develop the skills needed for expressive, musical playing. Remember that good fingering technique is not just about covering holes correctly—it's about understanding how fingerings work together to create music. Combine your fingering practice with work on breath control, posture, articulation, and musical expression to become a well-rounded recorder player.
Start with the fundamentals, build your skills progressively, and celebrate small victories along the way. With dedication and the right approach, you'll be playing beautiful music on the recorder in no time. The recorder's rich, expressive sound and accessible nature make it a perfect instrument for musicians of all levels, and your dedication to learning will be rewarded with years of musical enjoyment.