Piano Fingering Chart
Interactive keyboard guide • hand position • finger numbering • scale fingerings • PDF download
Interactive Piano Keyboard
🎹 How to Use This Interactive Keyboard
Step 1: Select a Note
Click any note button to see its position on the keyboard and recommended fingering (1-5, thumb=1).
Step 2: View Keyboard
The keyboard diagram highlights the selected key. White and black keys are clearly labeled.
Step 3: Learn Fingering
See recommended finger numbers (1=thumb, 2=index, 3=middle, 4=ring, 5=pinky) for both hands.
Select a Note (C4-C6, Two Octaves)
Note: A full 88-key piano has 52 white keys and 36 black keys. Each octave contains 7 white keys and 5 black keys. This interactive display shows 2 octaves (14 white keys + 10 black keys).
Piano Fingering Chart Image
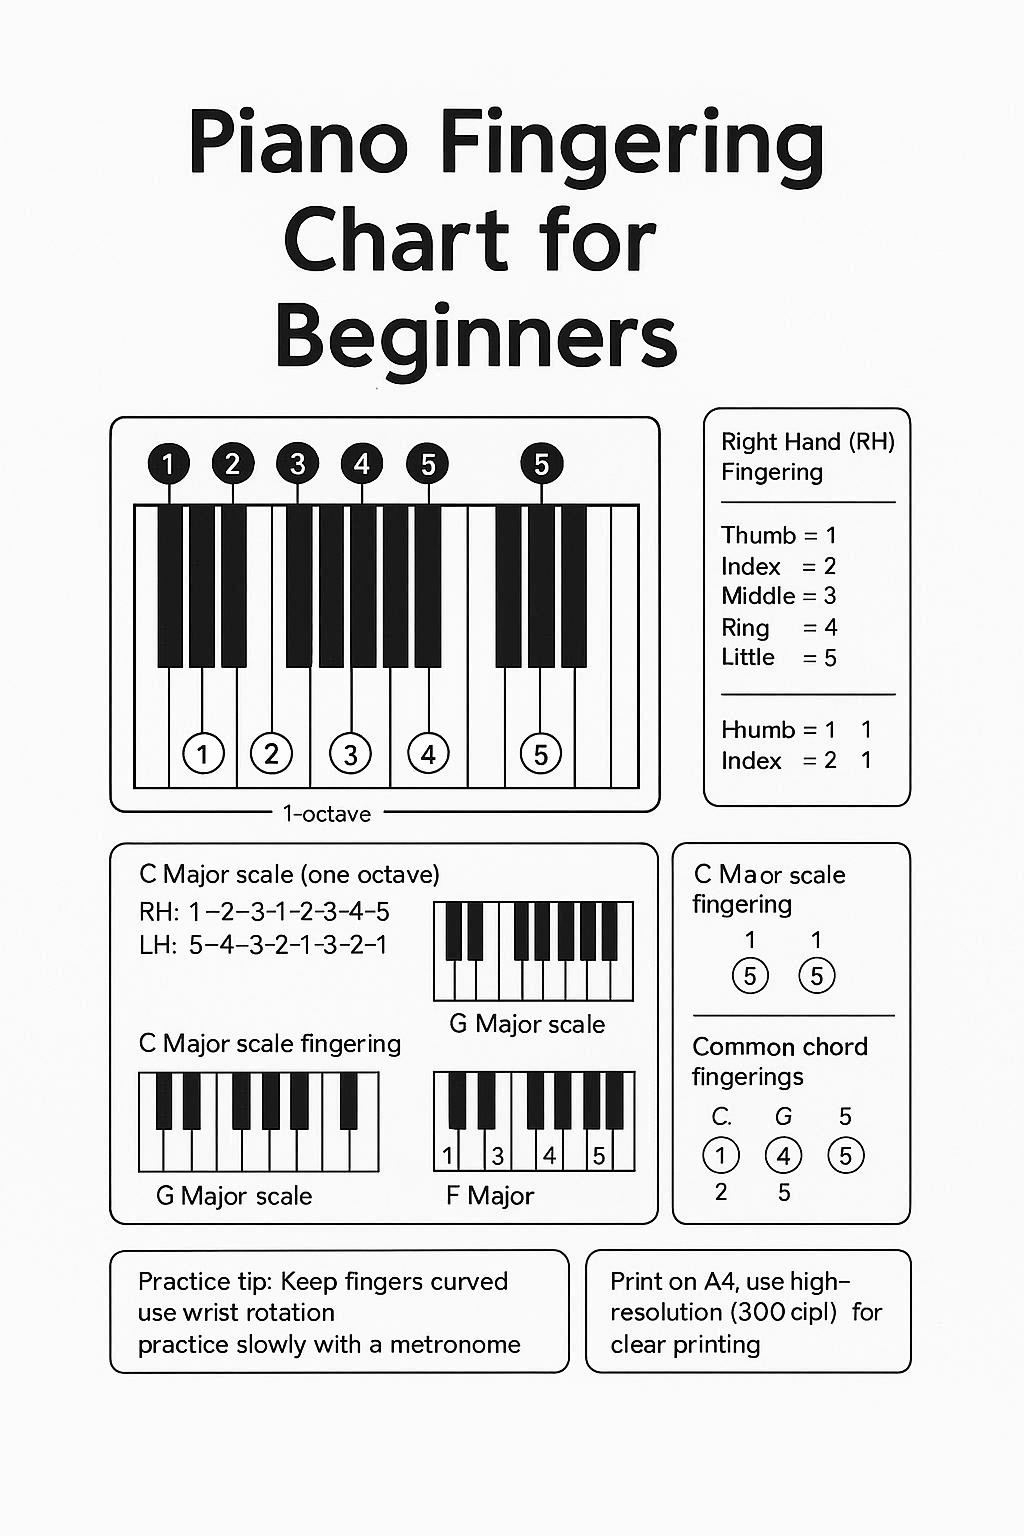
High-quality color PDF perfect for printing and carrying with you. Go to Download Page or open PDF directly: Open PDF
Understanding Piano Fingerings
Piano Anatomy and Parts
Before learning fingerings, familiarize yourself with the piano's components and how they work together to produce sound.

Key Components:
- Keyboard: 88 keys total (52 white keys and 36 black keys) arranged in a repeating pattern
- White Keys: 52 keys, physically longer, wider, and lower in height. Each octave contains 7 white keys (C, D, E, F, G, A, B)
- Black Keys: 36 keys total, physically shorter, narrower, and taller in height than white keys. Each octave contains 5 black keys (C♯/D♭, D♯/E♭, F♯/G♭, G♯/A♭, A♯/B♭). The black keys are arranged in groups of 2 and 3, creating a distinctive pattern
- Pedals: Sustain, Soft, and Sostenuto (from right to left)
- Hammers: Strike strings when keys are pressed
- Strings: Vibrate to produce sound when struck
- Soundboard: Amplifies string vibrations
- Action: Mechanism connecting keys to hammers
Black Key Characteristics:
Black keys on a piano keyboard have distinctive physical characteristics compared to white keys:
- Length: Black keys are shorter than white keys (typically extending about halfway down the white keys)
- Width: Black keys are narrower than white keys (about 60-70% of white key width)
- Height: Black keys are taller than white keys (positioned above the white keys)
- Pattern: Black keys are arranged in groups of 2 and 3 across the keyboard (2-3-2-3 pattern repeats)
- Total Count: A standard 88-key piano has 36 black keys distributed across approximately 7.25 octaves
The physical design of black keys allows pianists to navigate the keyboard by touch, using the raised black keys as tactile reference points. The alternating 2-3 pattern helps locate notes quickly without looking at the keyboard.
How the Piano Works
When you press a piano key, a complex mechanical action causes a felt hammer to strike one or more strings. The strings vibrate, and the soundboard amplifies these vibrations into audible sound. Pedals modify the sound by allowing strings to sustain or by reducing volume.
Understanding Musical Notes
Musical notes are organized in a specific pattern. Understanding this pattern is crucial for reading music and learning fingerings.
Want a deeper primer? Read our Music Notes Guide for beginners.
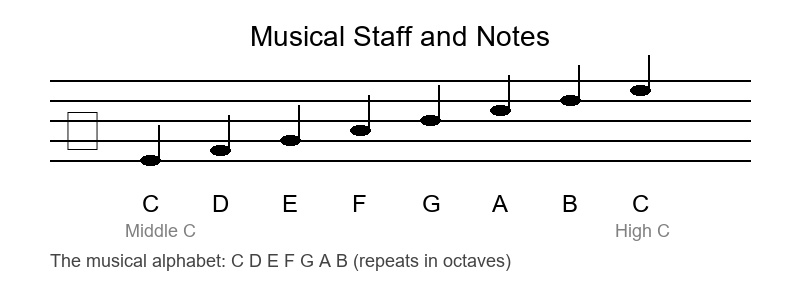
The Musical Alphabet:
Musical notes use the letters A, B, C, D, E, F, G, then repeat. In piano music, middle C is written as C4.
- Natural Notes: C, D, E, F, G, A, B
- Sharp (♯): Raises a note by one half step (e.g., C♯ is the black key above C)
- Flat (♭): Lowers a note by one half step (e.g., B♭ is the black key below B)
Note: The piano keyboard repeats the same pattern of 7 white keys and 5 black keys in each octave. This consistent layout makes learning scales and patterns easier once you understand one octave.
Half Steps and Whole Steps
Understanding the distance between notes is essential for learning scales and fingering patterns.
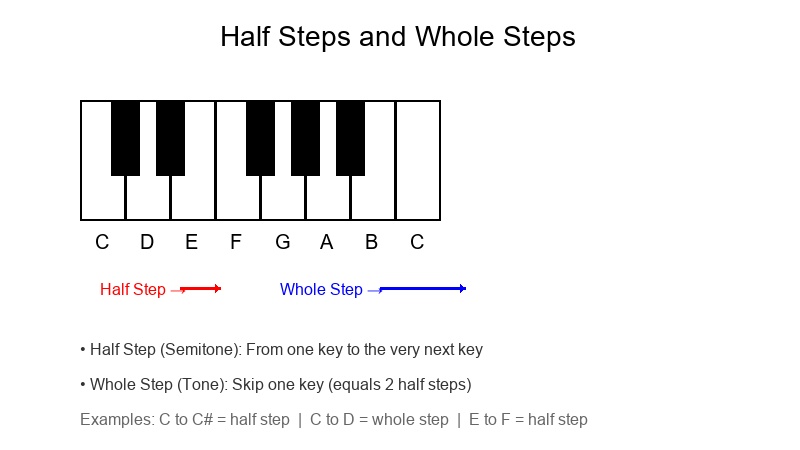
Half Step (Semitone):
The smallest distance between two notes. On a piano, it's from one key to the very next key (including black keys).
Examples:
- C to C♯ (or D♭) - adjacent keys
- E to F - natural half step (no black key between)
- B to C - natural half step (no black key between)
- F♯ to G - from black key to white key
Whole Step (Tone):
Equal to two half steps. Skip one key on the piano.
Examples:
- C to D (2 half steps, white to white)
- F to G (2 half steps, white to white)
- A to B (2 half steps, white to white)
- C♯ to D♯ (2 half steps, black to black)
Piano Octaves and Pitch Ranges
An octave is the interval between one note and another with the same letter name but different pitch. The piano typically covers approximately 7.25 octaves, from A0 to C8.

Piano Range:
- Low Register: A0 to B2 (bass notes, left hand territory)
- Middle Register: C3 to C5 (middle C area, most comfortable for beginners)
- High Register: C5 to C8 (treble notes, right hand territory, bright and brilliant)
Octave Example: C4 (middle C) to C5 is one octave. Same note name, different pitch level. The pattern of white and black keys repeats every octave.
Common Piano Fingering Patterns Chart
Here are the most frequently used piano fingering patterns. Mastering these will build a solid foundation for scales, chords, and pieces.
| Pattern | Fingering | Hand Position | Description |
|---|---|---|---|
| C Major Scale RH | 1-2-3-1-2-3-4-5 | C-D-E-F-G-A-B-C | Thumb crosses under at F |
| C Major Scale LH | 5-4-3-2-1-3-2-1 | C-D-E-F-G-A-B-C | Finger crosses over thumb at G |
| Thumb Under Technique | 1 crosses under | Scales ascending | Smooth scale playing, used in RH |
| Finger Over Technique | 3/4 crosses over | Scales ascending | Smooth scale playing, used in LH |
| C Major Chord RH | 1-3-5 | C-E-G | Basic triad fingering |
| C Major Chord LH | 5-3-1 | C-E-G | Mirror of RH pattern |
| G Major Scale RH | 1-2-3-1-2-3-4-5 | G-A-B-C-D-E-F♯-G | Thumb crosses under at C |
| F Major Scale RH | 1-2-3-4-1-2-3-4 | F-G-A-B♭-C-D-E-F | Thumb crosses under at B♭ |
Tip: The thumb-under (RH) and finger-over (LH) techniques are essential for smooth scale playing. Practice these transitions slowly at first, then gradually increase speed.
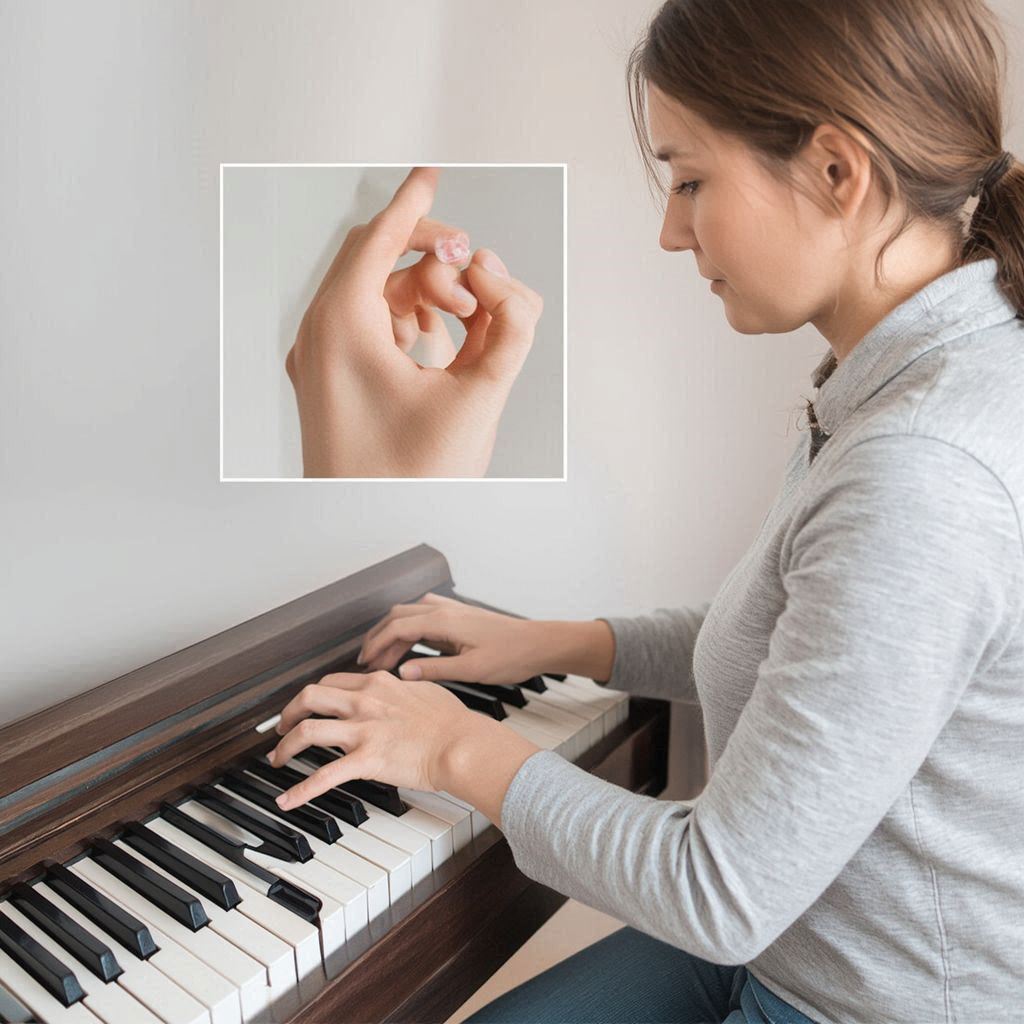
How to Position Your Hands Correctly
Sit at the correct height: forearms parallel to the floor when hands are on keys. Keep back straight, shoulders relaxed. Curve fingers naturally as if holding a ball. Thumb (finger 1) should be curved, not flat. Keep wrists level or slightly above keyboard.
How to Learn to Play the Piano
- Start with basics: Learn proper posture, hand position, and sound production
- Practice scales: Build finger dexterity and note recognition
- Use this chart: Reference fingerings until they become automatic
- Play simple melodies: Apply fingerings in musical context
- Listen actively: Study professional recordings
- Be patient: Consistent daily practice yields best results
- Find a teacher: Professional guidance accelerates progress
Best Beginner Piano Brands and Models
High-value beginner options: Yamaha P-45/P-125 (digital), Kawai ES110 (digital), Roland FP-30 (digital), Casio Privia PX-160 (digital). For acoustic pianos, Yamaha U1 and Kawai K300 are excellent upright options. Before purchasing, check build quality, key action (weighted keys for digital), touch sensitivity, and warranty. We recommend trying instruments in person with guidance from a teacher or professional.
Practice Tips and Common Mistakes
- Incorrect hand position: Sit at correct height (forearms parallel to floor), curve fingers naturally, keep wrists level.
- Flat fingers or collapsing knuckles: Maintain hand arch as if holding a ball, use finger pads not fingertips.
- Ignoring dynamics: Practice with varying volume (piano, forte), use arm weight not just finger strength.
- Lack of practice structure: Set weekly goals (scales, pieces, exercises), practice hands separately before combining, use metronome for steady rhythm.