Mastering piccolo fingerings requires a unique approach compared to other woodwind instruments. The piccolo's extreme high register, compact size, and demanding technical requirements make it one of the most challenging instruments to master. This comprehensive guide covers everything from fundamental techniques for complete beginners to advanced alternate fingerings and harmonic series.
Essential Foundations for Piccolo Playing
Before you can play beautiful melodies, you need to master four fundamental aspects of piccolo playing: proper embouchure, breath control, fingering techniques, and basic articulation.
1. Developing the Correct Embouchure
The embouchure is how you position your lips to direct air across the embouchure hole. Think of it as forming a small, focused opening - your lips should create a tiny, centered opening that directs air across the embouchure hole with precision.
Key Points:
- Keep your lips relaxed but firm
- Create a small, focused opening in the center of your lips
- Practice in front of a mirror for 5 minutes daily
- The goal is to create a focused, centered air stream
Common Mistakes to Avoid:
- Don't blow directly into the embouchure hole
- Avoid puffing out your cheeks
- Don't let your lips become too loose or too tight
- Avoid covering too much of the embouchure hole
2. Mastering Breath Control
Proper breathing is crucial for piccolo playing. You need to use diaphragmatic breathing (belly breathing) rather than shallow chest breathing, with special attention to the piccolo's high pitch requirements.
Breathing Technique:
- Inhale deeply, allowing your abdomen to expand
- Keep your shoulders relaxed and still
- Practice lying down with your hand on your stomach to feel the correct movement
- Exhale with steady, controlled air flow
Practice Exercise:
Try blowing air across the embouchure hole without making a sound first. Aim for a steady, consistent air stream that demonstrates good breath support.
3. Basic Articulation Techniques
Learn these fundamental articulation methods:
- Long tones: Sustained notes for breath control
- Legato: Smooth, connected notes
- Staccato: Short, detached notes
- Tonguing: Using the tongue to articulate notes (say "tu" while playing)
Understanding the Piccolo
The piccolo is essentially a small flute that sounds one octave higher than written. Its compact size and high pitch make it unique among woodwind instruments, requiring specialized techniques and approaches.
Key Characteristics of the Piccolo
- Size: Approximately half the length of a flute
- Pitch: Sounds one octave higher than written
- Range: From D5 to C8 (written)
- Material: Usually made of wood, plastic, or metal
- Keys: Similar to flute but smaller and more compact
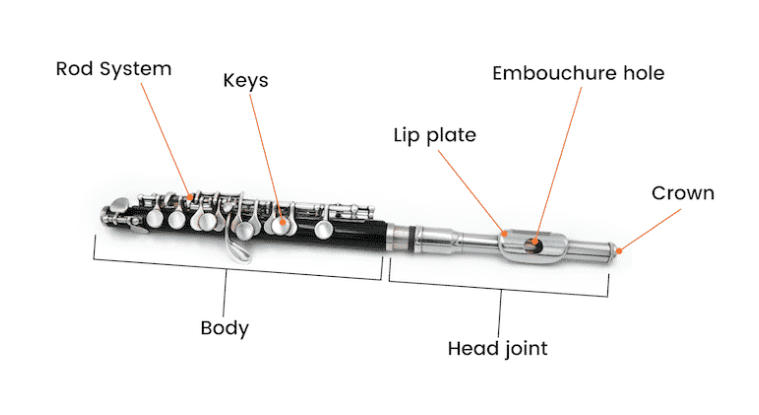
Understanding Piccolo Anatomy
Before learning fingerings, it's essential to understand the piccolo's main components and how they work together to produce sound.
Key Components:
- Head joint: Contains the embouchure hole where you blow
- Body: Main section with most of the keys
- Keys: Metal covers that open and close tone holes
- Embouchure hole: The opening you blow across
- Tone holes: Openings in the piccolo body
Understanding Musical Notes
Musical notes are organized in a specific pattern. Understanding this pattern is crucial for reading music and learning fingerings.
The Musical Alphabet:
Musical notes use the letters A, B, C, D, E, F, G, then repeat. In piccolo music, high C is written as C6.
- Natural Notes: C, D, E, F, G, A, B
- Sharp (♯): Raises a note by one half step (e.g., C♯)
- Flat (♭): Lowers a note by one half step (e.g., B♭)
Half Steps and Whole Steps
Understanding the distance between notes is essential for learning scales and fingering patterns.
Half Step (Semitone):
The smallest distance between two notes. On a piano, it's from one key to the very next key (including black keys).
Whole Step (Tone):
Equal to two half steps. Skip one key on the piano.
Piccolo Octaves and Pitch Ranges
An octave is the interval between one note and another with the same letter name but different pitch. The piccolo typically covers about 3 octaves.
Piccolo Range:
- Low Register: D5 to B5 (bottom of range)
- Middle Register: C6 to B6 (most comfortable for beginners)
- High Register: C7 to C8 and above (requires advanced technique)
Daily Practice Routine for Beginners
Structure your practice sessions for maximum effectiveness:
5-Minute Warm-up
- Breathing exercises: 2 minutes
- Embouchure practice: 3 minutes
10-Minute Technique Practice
- Long tones: Practice sustained notes from high C to G
- Simple scales: Try C-D-E-F-G-F-E-D-C pattern
- Breathing exercises: Focus on steady air flow
10-Minute Song Practice
- Start with simple melodies
- Focus on correct fingering and steady tone
- Don't worry about speed - accuracy comes first
Important: Practice no more than 40 minutes daily to avoid fatigue.
Troubleshooting Common Problems
Problem: Weak or Airy Sound
Solution: Check that your embouchure is focused and your air stream is directed across the embouchure hole, not into it.
Problem: Can't Reach High Notes
Solution: Focus your embouchure more and increase abdominal support. Avoid covering too much of the embouchure hole.
Problem: Inconsistent Tone
Solution: Focus on steady breath support and consistent embouchure formation.
Essential Equipment for Beginners
- Piccolo: Rent or purchase a student model piccolo
- Cleaning supplies: Cleaning rod, swab, and polishing cloth
- Metronome: For timing practice
- Music stand: For proper posture while reading music
- Method book: Choose a beginner piccolo method book
Best Beginner Piccolo Brands and Models
High-value beginner options: Yamaha YPC-32, Gemeinhardt 4P, Jupiter JPC700, Pearl PFP-105. Before purchasing, check build quality, key action, intonation, and warranty. We recommend trying instruments in person with guidance from a teacher or professional.
How to Hold a Piccolo Correctly
Mastering proper piccolo holding technique is crucial for successful piccolo playing. The piccolo's small size and high pitch require a completely different approach to posture and hand position compared to the flute. Correct piccolo holding technique provides numerous benefits that directly impact your playing ability.
Why Proper Piccolo Holding Matters
- Improved Intonation: Correct posture allows for better breath control and embouchure stability
- Enhanced Endurance: Proper positioning reduces muscle tension and fatigue
- Better Tone Quality: Optimal posture enables consistent air flow and embouchure formation
- Increased Technical Facility: Correct hand position allows for faster, more accurate finger movements
- Reduced Injury Risk: Proper posture prevents repetitive strain injuries
- Professional Appearance: Correct posture projects confidence and professionalism
Understanding Piccolo-Specific Challenges
The piccolo presents unique challenges that require specialized holding techniques. Unlike the flute, the piccolo's small size and high pitch demand extreme precision in posture and hand position.
Key Differences from Flute
- Smaller Instrument: Requires more compact hand positions
- Higher Pitch: Demands more focused embouchure and breath support
- Increased Sensitivity: Small movements have greater impact on sound
- Temperature Sensitivity: Requires constant posture adjustments
- Fatigue Factor: Small size can cause hand cramping if not held correctly
Basic Piccolo Holding Position
Start with the fundamental holding position that forms the foundation for all piccolo playing.
Body Posture
- Standing Position: Feet shoulder-width apart, weight evenly distributed
- Seated Position: Sit on the front half of your chair, feet flat on the floor
- Spine Alignment: Keep your spine straight but relaxed
- Shoulder Position: Shoulders relaxed and level
- Head Position: Head balanced naturally on your neck
Instrument Position
- Horizontal Alignment: Piccolo should be parallel to the floor
- Mouthpiece Position: Center the mouthpiece on your lips
- Instrument Angle: Slight downward angle (about 15 degrees)
- Distance from Body: Close enough for comfortable hand position
Left Hand Position
The left hand controls the upper register keys and provides stability for the instrument.
Left Hand Placement
- Thumb Position: Place thumb on the back of the instrument, supporting the weight
- Index Finger: Rest on the B key (first key from the top)
- Middle Finger: Position on the A key
- Ring Finger: Place on the G key
- Pinky Finger: Rest on the G# key (pinky key)
Left Hand Technique
- Finger Curvature: Maintain natural finger curve
- Key Pressure: Press keys with fingertips, not finger pads
- Thumb Support: Use thumb to balance the instrument
- Relaxation: Keep hand relaxed to prevent tension
Right Hand Position
The right hand controls the lower register keys and provides additional support.
Right Hand Placement
- Thumb Position: Place under the instrument for support
- Index Finger: Rest on the F key
- Middle Finger: Position on the E key
- Ring Finger: Place on the D key
- Pinky Finger: Rest on the C# key (pinky key)
Right Hand Technique
- Finger Alignment: Keep fingers perpendicular to keys
- Key Coverage: Ensure complete key coverage
- Thumb Support: Use thumb to stabilize the instrument
- Relaxation: Maintain relaxed hand position
Common Holding Mistakes and Solutions
Many piccolo players develop incorrect holding habits that can limit their progress and cause physical problems.
Mistake: Gripping Too Tightly
Problem: Holding the piccolo with excessive tension
Solution: Practice holding the instrument with minimal pressure, allowing it to rest naturally in your hands
Mistake: Incorrect Finger Position
Problem: Fingers not properly positioned on keys
Solution: Ensure each finger is centered on its respective key with proper curvature
Mistake: Poor Posture
Problem: Slouching or leaning while playing
Solution: Maintain straight spine and relaxed shoulders
Mistake: Instrument Angle
Problem: Holding piccolo at incorrect angle
Solution: Keep instrument parallel to floor with slight downward angle
Developing Proper Holding Technique
Building correct piccolo holding technique requires consistent practice and attention to detail.
Daily Practice Routine for Holding
- Posture Check (5 minutes): Begin each practice session with posture review
- Holding Position (10 minutes): Practice holding the piccolo without playing
- Finger Placement (15 minutes): Work on precise finger positioning
- Breath Support (10 minutes): Practice breathing while maintaining posture
- Long Tones (20 minutes): Play long tones while focusing on posture
Progressive Development
- Week 1-2: Focus on basic holding position
- Week 3-4: Develop finger independence
- Week 5-6: Work on breath support with posture
- Week 7-8: Integrate all elements for smooth playing
Advanced Piccolo Holding Techniques
Once you've mastered the basics, you can develop more advanced holding techniques for specific musical situations.
Orchestral Playing
- Standing Position: Maintain professional posture for extended periods
- Score Reading: Hold piccolo while reading music
- Conductor Awareness: Maintain posture while watching conductor
Solo Performance
- Stage Presence: Project confidence through posture
- Movement Integration: Maintain posture while moving
- Audience Connection: Balance posture with engagement
Maintaining Proper Technique
Consistent practice of proper holding technique is essential for long-term success on the piccolo.
Regular Check-ups
- Daily Review: Check posture at the beginning of each practice session
- Weekly Assessment: Evaluate your progress and make adjustments
- Monthly Evaluation: Review your overall technique development
Common Maintenance Issues
- Fatigue: Take breaks to prevent muscle tension
- Injury Prevention: Stop if you experience pain or discomfort
- Technique Refinement: Continuously work on improving your holding technique
How Keys Change Piccolo Pitch
The piccolo has a complex key system that changes the tube length to alter pitch. When you press a key, it closes a tone hole, making the instrument effectively longer and lowering the pitch.
Key Functions:
- Left hand keys: Control upper register notes (B, A, G)
- Right hand keys: Control lower register notes (F, E, D)
- Pinky keys: Provide additional low notes
- Thumb key: Controls B♭ and other alternate fingerings
Why Piccolo Fingerings Are Different
The piccolo presents unique challenges that set it apart from the flute family. Its small size, high pitch, and extreme sensitivity to embouchure changes require specialized fingerings and techniques that are essential for professional piccolo performance.
Piccolo-Specific Challenges
- Extreme High Register: Notes sound one octave higher than written, requiring exceptional breath control
- Microscopic Key Movements: The smallest finger adjustments can cause significant pitch changes
- Temperature Sensitivity: More affected by temperature changes than larger instruments
- Intonation Precision: Requires constant micro-adjustments for accurate pitch
- Embouchure Demands: Much smaller aperture needed for proper tone production
These unique characteristics mean that piccolo fingerings must be executed with surgical precision. Even experienced flutists often struggle with the piccolo's demanding requirements.
Complete Fingering Chart by Register
For an interactive experience with our detailed fingering charts, visit our Interactive Piccolo Fingering Chart page.
Low Register (D5 to C6) - The Foundation
The piccolo's low register is notoriously difficult to control. These notes require massive breath support and a very focused embouchure. Many piccolo players struggle with these fundamental notes, making them crucial to master.
| Note | Fingering | Key Combination | Tips |
|---|---|---|---|
| D5 | All keys down | All keys closed | Fundamental note |
| D#5 | All except D# | D# key open | Use D# trill key |
| E5 | All except E | E key open | Good for beginners |
| F5 | All except E, F | E, F keys open | Use F key |
| F#5 | All except F | F key open | Strong breath support |
| G5 | All except G | G key open | Use G key |
| G#5 | All except G, A | G, A keys open | Use G# key |
| A5 | All except A | A key open | Good for beginners |
| A#5 | All except A, B | A, B keys open | Use A# key |
| B5 | All except B | B key open | Fundamental note |
| C6 | Open | No keys pressed | Fundamental note |
Middle Register (C6 to B6) - The Sweet Spot
This is where the piccolo truly shines. Most orchestral piccolo parts are written in this register, and it's where the instrument produces its most characteristic sound. However, even these "comfortable" notes require constant attention to intonation.
| Note | Fingering | Key Combination | Alternate |
|---|---|---|---|
| C6 | Open | No keys pressed | - |
| C#6 | All except D# | D# key open | - |
| D6 | All except E | E key open | - |
| E♭6 | All except E, F | E, F keys open | - |
| E6 | All except F | F key open | - |
| F6 | All except G | G key open | - |
| F#6 | All except G, A | G, A keys open | - |
| G6 | All except A | A key open | - |
| G#6 | All except A, B | A, B keys open | - |
| A6 | All except B | B key open | - |
| B♭6 | Thumb key only | Thumb key closed | - |
| B6 | Open | No keys pressed | - |
High Register (C7 to C8+) - The Extreme Zone
This is where the piccolo becomes truly challenging. These notes are extremely sensitive to embouchure changes and require exceptional breath control. Only advanced players should attempt these notes, and even then, they require constant practice to maintain.
| Note | Fingering | Key Combination | Technique |
|---|---|---|---|
| C7 | Open | No keys pressed | Focused embouchure |
| C#7 | All except D# | D# key open | High air speed |
| D7 | All except E | E key open | Focused air stream |
| E♭7 | All except E, F | E, F keys open | Strong support |
| E7 | All except F | F key open | Controlled pressure |
| F7 | All except G | G key open | Precise embouchure |
| F#7 | All except G, A | G, A keys open | Advanced technique |
| G7 | All except A | A key open | Expert level |
| G#7 | All except A, B | A, B keys open | Professional level |
| A7 | All except B | B key open | Master level |
| B♭7 | Thumb key only | Thumb key closed | Elite level |
| B7 | Open | No keys pressed | Virtuoso level |
| C8 | Open | No keys pressed | Extreme technique |
Piccolo's Unique Harmonic Characteristics
The piccolo's harmonic series is fundamentally different from the flute due to its smaller size and higher pitch. Understanding these differences is crucial for controlling intonation and producing the characteristic piccolo sound.
Why Piccolo Harmonics Are Different
- Shorter Tube Length: Creates more pronounced harmonic differences
- Higher Fundamental: Makes overtones more audible and problematic
- Temperature Sensitivity: Small size makes harmonics more affected by temperature
- Embouchure Sensitivity: Tiny changes in embouchure dramatically affect harmonic content
- Intonation Challenges: Harmonics can interfere with accurate pitch production
Harmonic Series for Open Fingering (C6)
- 1st Harmonic: C6 - fundamental, requires focused embouchure
- 2nd Harmonic: C7 - octave, often sharp without proper control
- 3rd Harmonic: G7 - perfect fifth, can be unstable
- 4th Harmonic: C8 - two octaves, extremely challenging
- 5th Harmonic: E8 - major third, professional level only
- 6th Harmonic: G8 - perfect fifth, virtuoso territory
- 7th Harmonic: B♭8 - minor seventh, rarely used
- 8th Harmonic: C9 - three octaves, extreme technique required
Advanced Fingering Techniques
Alternate Fingerings
Some notes can be played with different fingerings, each offering unique advantages for specific musical contexts:
High C (C7) - Multiple Options
- Standard: Open fingering, requires focused embouchure
- Thumb B♭: Use thumb key for easier production
- Forked F: Alternative for certain passages
High D (D7) - Flexibility Options
- Standard: All except E key
- Thumb B♭: Alternative for certain passages
- Forked F: Useful in rapid sequences
Trill Fingerings
Many notes require specialized trill fingerings for smooth execution:
Common Trill Fingerings
- C to D trill: Use C# trill key
- D to E trill: Use D# trill key
- F to G trill: Use F# trill key
- G to A trill: Use G# trill key
The Piccolo's Unique Challenges
Intonation: The Piccolo's Greatest Challenge
Piccolo intonation is notoriously difficult to control. The instrument's small size makes it extremely sensitive to even the smallest changes in embouchure, breath pressure, or finger position.
- Microscopic Adjustments: The tiniest embouchure change can cause a 20-cent pitch shift
- Temperature Dependency: A 5-degree temperature change can affect intonation by 50 cents
- Breath Pressure Sensitivity: Slight changes in air speed dramatically affect pitch
- Finger Pressure Impact: Even the pressure of your fingers on the keys affects intonation
- Harmonic Interference: Overtones can interfere with fundamental pitch perception
Embouchure: The Piccolo's Most Demanding Requirement
The piccolo requires an embouchure that's completely different from the flute. The aperture must be much smaller and more focused, requiring years of specialized development.
- Microscopic Aperture: The opening must be much smaller than flute
- Extreme Focus: Air stream must be laser-focused
- Constant Adjustment: Embouchure must be constantly fine-tuned
- Fatigue Factor: The small aperture causes rapid embouchure fatigue
- Register Changes: Each register requires different embouchure adjustments
Breath Support Requirements
Piccolo playing requires exceptional breath control due to the instrument's high pitch and small size:
- High Air Speed: Faster air stream needed for high notes
- Controlled Pressure: Avoid overblowing which causes sharpness
- Consistent Support: Maintain steady air pressure throughout phrases
- Dynamic Control: Precise control over volume and intensity
Piccolo-Specific Practice Strategies
Essential Daily Piccolo Routine
- Intonation Foundation (20 minutes): Use a tuner constantly - piccolo intonation is unforgiving
- Embouchure Development (15 minutes): Focus on the tiny aperture needed for piccolo
- Breath Support (15 minutes): Develop the massive breath support required for low notes
- Scale Practice (20 minutes): Work through scales slowly, focusing on intonation
- Arpeggio Studies (15 minutes): Practice chord arpeggios with extreme precision
- High Register Work (15 minutes): Gradually work into the extreme high register
- Temperature Adaptation (10 minutes): Practice with different instrument temperatures
Memory Techniques
- Pattern Recognition: Notice that many fingerings follow logical patterns
- Visual Association: Create mental images of finger positions
- Muscle Memory: Practice until fingerings become automatic
- Progressive Learning: Master one octave before moving to the next
Common Fingering Mistakes and Solutions
Mistake: Inconsistent Finger Pressure
Problem: Some keys pressed harder than others
Solution: Practice with a mirror, ensuring all keys are pressed with equal pressure
Mistake: Slow Finger Transitions
Problem: Hesitation between fingerings
Solution: Practice slow, deliberate movements, then gradually increase speed
Mistake: Incorrect Finger Placement
Problem: Fingers not centered on keys
Solution: Use proper hand position with fingers perpendicular to keys
Mistake: Too Much or Too Little Finger Pressure
Problem: Aiming for quick, even pressure but "slamming" keys or not pressing firmly enough
Solution: Practice with consistent, moderate pressure - keys should close completely but not require excessive force
Mistake: Lack of Practice Structure
Problem: Not setting weekly goals for scales, pieces, and long tones
Solution: Create a structured practice plan with specific goals and track your progress regularly
Technology and Modern Learning Tools
Modern technology offers excellent resources for learning piccolo fingerings:
Interactive Fingering Charts
- Visual demonstration of each fingering
- Audio examples for each note
- Progressive difficulty levels
- Real-time feedback on accuracy
Mobile Apps and Software
- Metronome apps for timing practice
- Tuning apps for intonation work
- Recording software for self-assessment
- Virtual piccolo simulators
Building Speed and Accuracy
Progressive Speed Training
- Start Slow: Begin at 60 BPM, ensuring perfect accuracy
- Gradual Increase: Add 5 BPM each week
- Maintain Quality: Never sacrifice accuracy for speed
- Record Progress: Track your improvement over time
Accuracy Drills
- Random Note Practice: Have someone call out random notes
- Pattern Recognition: Practice common fingering sequences
- Blind Practice: Play without looking at your fingers
- Mirror Practice: Watch your finger movements for consistency
Setting Realistic Expectations
- Week 1-2: Focus on producing a clear, steady tone on a few notes
- Week 3-4: Begin playing simple scales and short melodies
- Month 2-3: Start working on more complex pieces and faster passages
Remember, progress varies for each individual. Consistent daily practice is more important than the amount of time spent in each session.
Quick Improvement Tips
1. Embouchure Flexibility Exercises
Practice directing air across the embouchure hole without the piccolo daily. This builds the muscle control needed for piccolo playing.
2. Long Tone Training
Spend 10 minutes daily on sustained notes from low to high register. This improves breath control and intonation.
3. Tonguing Practice
Use the "tu" syllable to practice clean articulation. This makes your notes crisp and clear.
4. High Note Technique
For higher notes, focus your embouchure more while increasing abdominal support. Avoid covering the embouchure hole.
Mastering the Piccolo's Unique Demands
Piccolo playing is not simply "flute playing in a higher register." It requires a completely different approach to embouchure, breath support, and finger technique. The piccolo's extreme sensitivity to temperature, embouchure changes, and finger pressure makes it one of the most demanding instruments in the woodwind family.
Success on the piccolo requires developing a specialized skill set that includes microscopic embouchure control, exceptional breath support, and surgical precision in finger movements. These skills take years to develop and require constant maintenance through regular practice.
Remember that the piccolo is not just a small flute - it's a completely different instrument with its own unique challenges and rewards. Approach it with respect for its demands, and you'll discover the joy of mastering one of music's most challenging instruments. Start with the fundamentals, build your skills progressively, and celebrate small victories along the way. With dedication and the right approach, you'll be playing beautiful music on the piccolo in no time.