If you are searching for piano scale fingerings, you probably want one thing above all else: a reliable, standard way to play scales without developing tension, hesitation, or awkward hand movements. This guide organizes the most important piano scale patterns in a practical format, with separate right hand and left hand fingerings, clear scale-type distinctions, and beginner-friendly progression.
Unlike random online charts that mix scale types together, this page separates the four essential families of tonal scales — major, natural minor, harmonic minor, and melodic minor — and also includes chromatic scale fingering and blues scale fingering. That means you can compare patterns, learn the correct cross-under and thumb-passing logic, and build solid technique from the start.
Why piano scale fingerings matter
Correct fingering is not just about memorizing numbers. It is about creating efficient motion, preserving hand shape, and making every scale sound even, connected, and musical. Good scale fingering helps you avoid finger collisions, unnecessary hand twists, and uneven tone changes when crossing the thumb or moving between black and white keys.
- Beginners: learn the standard hand pattern before bad habits form
- Intermediate players: correct uneven fingering and improve speed
- Advanced players: refine articulation, balance, and consistency
How this guide is organized
To make practice easier, the scale charts on this page are grouped by scale family and ordered from the most accessible keys to the more complex ones. Start with C Major, then move through keys with fewer accidentals before advancing to black-key-heavy signatures and minor variants.
Standard fingering conventions
- Finger numbers: 1 = thumb, 2 = index, 3 = middle, 4 = ring, 5 = pinky
- Right hand: thumb usually passes under during ascending motion
- Left hand: finger groups are often mirrored, but not always identical
- Ascending / descending: some scales use different fingerings in each direction
Major scale fingerings
Major scales are the foundation of piano technique. They are the best place to start because they establish the core thumb-under movement and teach you how to keep the hand relaxed while moving smoothly through the keyboard.
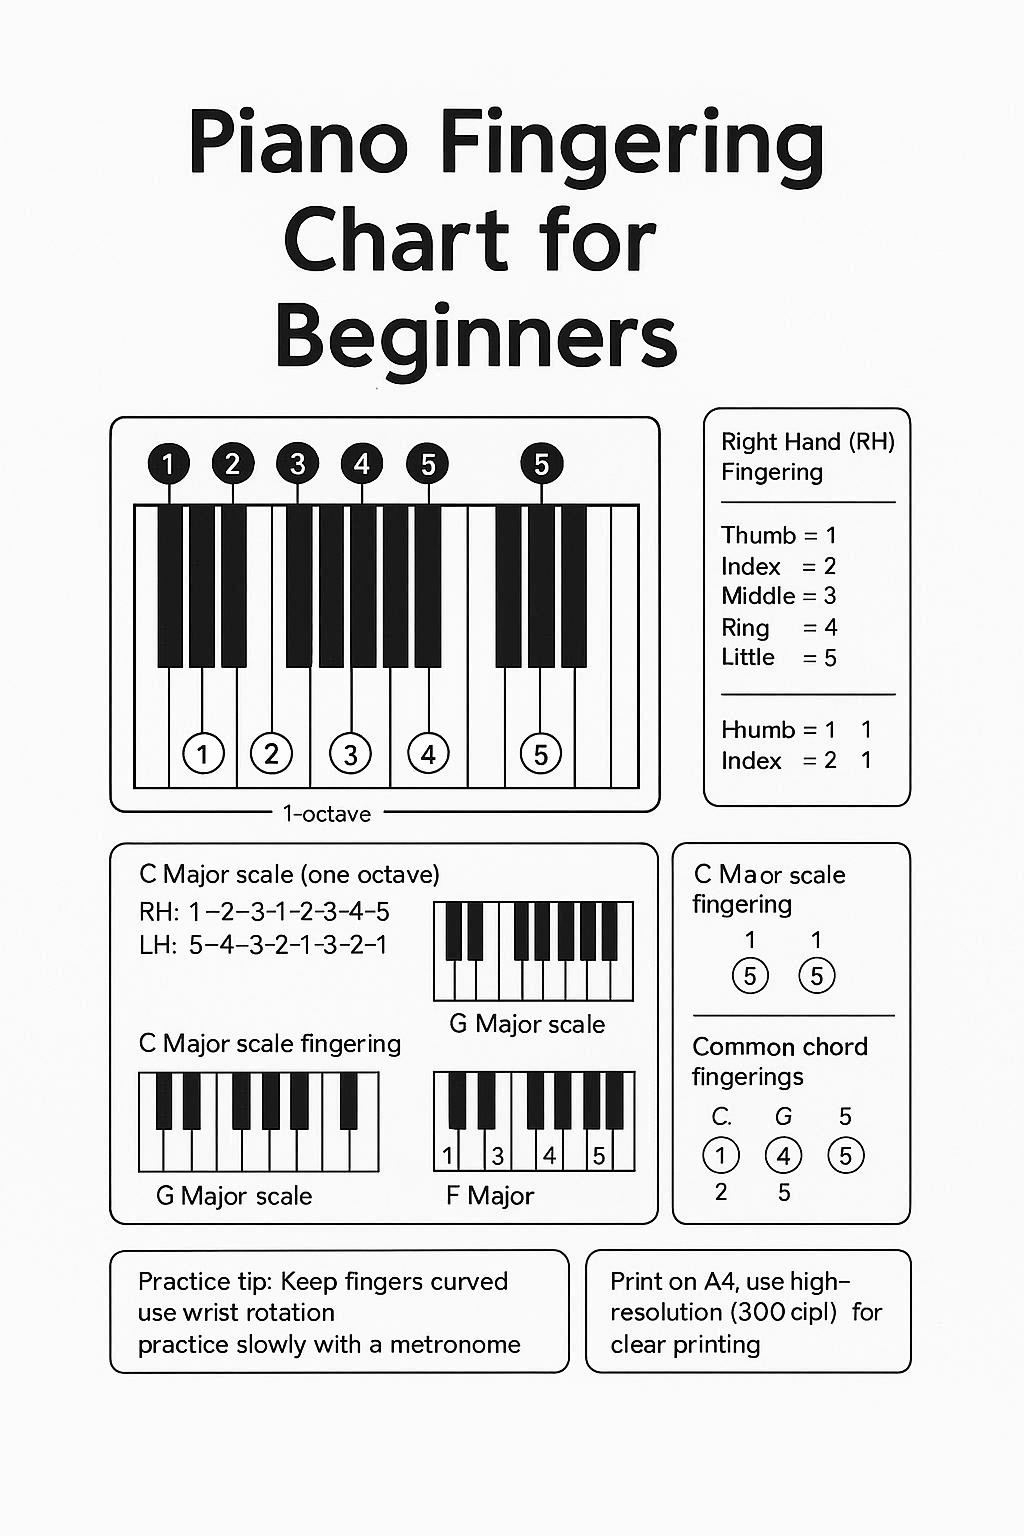
C Major scale fingering piano
Difficulty: Beginner
Key signature: 0 sharps, 0 flats
Focus: Basic thumb passing and even tone
| Hand | Ascending | Descending | Practice Note |
|---|---|---|---|
| Right hand | 1-2-3, 1-2-3-4-5 | 5-4-3-2-1, 3-2-1 | Cross the thumb smoothly under 3 |
| Left hand | 5-4-3-2-1, 3-2-1 | 1-2-3, 1-2-3-4-5 | Keep wrist level and relaxed |
Major scale order by key signature
- C Major
- G Major
- D Major
- A Major
- E Major
- F Major
- B♭ Major
- E♭ Major
- A♭ Major
- D♭ Major
- G♭ Major / F# Major
Natural minor scale fingerings
Natural minor scales share a close relationship with their relative major keys, but they should still be learned as distinct fingering patterns. In practice, you want to feel the scale shape as a separate motion, not as a modified major scale with a few altered notes.
A Natural Minor scale fingering piano
Difficulty: Beginner to Intermediate
Key signature: 0 sharps, 0 flats
Focus: Consistent hand shape and stable thumb passage
| Hand | Ascending | Descending | Practice Note |
|---|---|---|---|
| Right hand | 1-2-3, 1-2-3-4-5 | 5-4-3-2-1, 3-2-1 | Keep the crossing point consistent |
| Left hand | 5-4-3-2-1, 3-2-1 | 1-2-3, 1-2-3-4-5 | Avoid collapsing the thumb joint |
Harmonic minor scale fingerings
Harmonic minor scales raise the seventh scale degree, which creates a stronger pull back to the tonic. Because that altered note changes the spacing inside the scale, it is best to treat harmonic minor as its own fingering family instead of blending it with natural minor practice.
A Harmonic Minor scale fingering piano
Difficulty: Intermediate
Key signature: Accidental-based pattern
Focus: Accurate black-key navigation and stable hand rotation
- Keep the hand close to the keys
- Use minimal motion when moving over black keys
- Practice slowly to prevent finger tension
Melodic minor scale fingerings
Melodic minor scales are especially important because ascending and descending forms are not the same. This is one of the most common points of confusion for self-taught players, so the page should always present the two directions separately.
Melodic Minor: ascending vs descending
- Ascending: typically raised 6th and 7th scale degrees
- Descending: usually returns to the natural minor form
- Best practice: learn each direction as a separate fingering map
D Melodic Minor scale fingering piano
Difficulty: Intermediate to Advanced
Focus: Direction-specific finger patterns and smooth hand balance
| Hand | Ascending | Descending | Practice Note |
|---|---|---|---|
| Right hand | Use a fluid thumb-under pattern | Return to natural minor shape | Do not reuse the ascending pattern on the way down |
| Left hand | Mirror the hand shape with care | Use the descending natural minor layout | Practice hands separately first |
Chromatic scale fingering piano
The chromatic scale is essential for technique building, finger independence, and speed control. Unlike diatonic scales, the chromatic scale is not organized by key signature. Instead, it is built from a continuous half-step motion that must remain even and mechanically efficient.
Chromatic scale fingering principles
- Maintain a close hand position to reduce travel distance
- Use the thumb and passing fingers with minimal excess motion
- Keep the rhythm even across white and black keys
- Practice both ascending and descending patterns slowly first
Blues scale fingering piano
Blues scale fingerings are often used for improvisation, pop accompaniment, jazz vocabulary, and expressive playing. The main objective is not just technical accuracy, but smooth phrasing and flexible hand movement that supports rhythmic freedom.
C Blues scale fingering piano
Difficulty: Intermediate
Focus: Fluid hand shape, black-key control, and improvisation-ready flow
- Practice the pattern slowly with a metronome
- Keep the hand relaxed over the black keys
- Use this scale for short licks and musical fragments
Right hand vs left hand piano scale fingers
One of the most important things to remember is that right hand and left hand scale patterns are not interchangeable. They often look similar on paper, but the actual motion differs because the hands move in opposite directions and have different ergonomic priorities.
| Topic | Right Hand | Left Hand |
|---|---|---|
| Thumb movement | Thumb passes under fingers | Thumb passes under in reverse direction |
| Hand shape | Rotates slightly outward as needed | Rotates slightly inward as needed |
| Practice priority | Evenness and thumb control | Balance and hand comfort |
Piano scale fingering rules
1. Thumb passing
The thumb is the pivot point in most scale systems. A clean thumb pass keeps the scale moving without gaps or sudden hand lifts.
2. Cross-under technique
When one finger crosses under the hand, the wrist should stay relaxed and level. The motion should feel guided, not forced.
3. Hand alignment
Keep the fingers naturally curved and avoid collapsing the knuckles. A stable hand shape improves both accuracy and speed.
4. Separate direction practice
Some scale families use different patterns ascending and descending. Always practice both directions individually before combining them.
Beginner practice order
If you are just starting out, do not try to learn every scale at once. A step-by-step approach helps you avoid confusion and builds technique in a natural sequence.
- C Major
- G Major
- F Major
- A Natural Minor
- E Natural Minor
- Chromatic scale
- Harmonic minor and melodic minor
- Blues scale patterns
Common fingering mistakes
Fingers lifting too high
High finger lifts slow down transitions and create tension. Keep the fingertips close to the keys.
Ignoring the left hand
Many beginners only practice the right hand. For balanced technique, both hands need separate attention.
Mixing scale types
Do not assume natural minor, harmonic minor, and melodic minor use the same finger pattern. They are related, but not identical.
Practicing too fast too soon
Speed should come after accuracy. Use a slow tempo until the pattern feels automatic.
Printable fingering chart use cases
This page is designed for learners, teachers, and studio use. The same framework can be turned into printable PDF charts, classroom handouts, practice sheets, or scale reference cards. If you need a dedicated printable reference, you can also visit our piano fingering chart for a quick at-a-glance guide.
- Daily scale warm-up sheets
- Teacher handouts for beginner students
- Studio reference charts for left and right hand
- Printable key signature progression guides
Frequently asked questions
What is the best fingering for C major scale on piano?
The standard C major pattern is the best starting point because it teaches the essential thumb-under motion in both hands.
What is the fingering for B flat major scale piano?
B♭ major uses a flat-friendly pattern that keeps the hand comfortable over black keys. It is typically introduced after C, G, and F major.
Are melodic minor fingerings the same ascending and descending?
No. Melodic minor usually uses a different pattern descending, so the two directions must be practiced separately.
What is the best way to learn left hand piano scale fingers?
Start slowly, isolate the left hand, and practice the thumb passage until it feels natural. Then add the right hand later.
Conclusion
Learning piano scale fingerings is one of the most efficient ways to improve your overall keyboard technique. When you study major scales, natural minor, harmonic minor, melodic minor, chromatic scale fingering, and blues scale fingering in a structured order, you build consistency, hand freedom, and real musical control.
Use this page as your reference point, start with C Major, and progress key by key. With a clear fingering system, your scales will feel more comfortable, sound more even, and become much easier to play at faster tempos.